Wireless Warehouse Management System
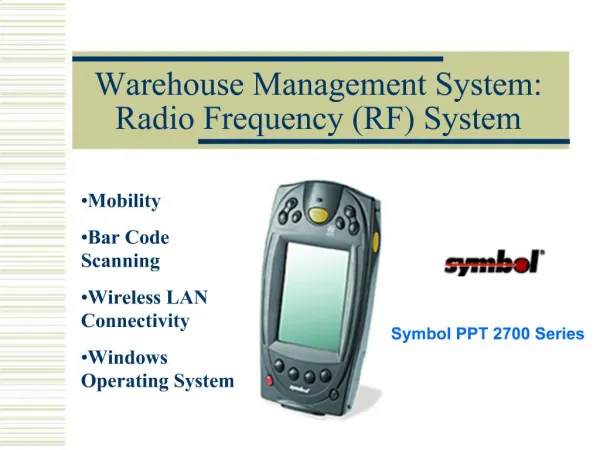
Wireless Warehouse Management System. Compsee’s M.A.T. M obile A pplication T erminal. Wireless WMS. Benefits Data Entry completed at the source Barcode Scanning of Items and Locations Accurate Put Away Accurate Picking. Wireless WMS.

Wireless Warehouse Management System
E N D
Presentation Transcript
Wireless Warehouse Management System Compsee’s M.A.T. Mobile Application Terminal
Wireless WMS Benefits • Data Entry completed at the source • Barcode Scanning of Items and Locations • Accurate Put Away • Accurate Picking
Warehouse Tracking Warehouse Tracking Screens • User Friendly • Comprehensive Functionality
Log In as a Station When a handheld operator accesses the Warehouse Tracking application he must first specify the station. This defaults to the operator’s Default Station, but may be overridden if the operator works out of multiple stations. The station determines which transactions will be shown to the operator (only transactions assigned to this station will be considered applicable).
Warehouse Options • After a warehouse operator indicates the station from which he is working from, the system displays the options menu. • Each of the options were designed for efficient scanning and minimal data entry. • The operator may choose any of the following functions: • Next Transaction • Scan for Transaction • Open Transaction List • Check Stock Item Status • Check Storage ID Status
Next Transaction • Upon selection of "Next Transaction" the system automatically displays the next open warehouse transaction that: • Has a blank status (not On Hold) • Has all the Storage IDs assigned • Is assigned to the station the operator is using • When the transaction is displayed the operator may: • Complete the transaction • Edit the transaction lines • Add lines to the transaction • Give the transaction an "On Hold" status
Find a Transaction • An operator may find an open transaction by scanning or entering any of the following numbers: • Stock number (or Pallet SID for a MOV) • Transaction number • Source document (such as order number) • The system will then show a list of the transaction(s) that contain the scanned value.
Pick/Pack an Order • For review, the operator can choose to display the entire order of a warehouse transaction that originated from an PIK or PAK order. • Each line item transaction for the order may be completed by either: • Clicking in the checkmark column next to each line item, or • Scanning a stock number to confirm it is in the order and then clicking on the checkmark to complete the related transaction • As items for the order are scanned or clicked on during the pick or pack, the system refreshes the display to show only those items remaining. When all items are completed the system returns to the Find Transaction screen for scanning of the next transaction/order.
List Open Transactions • An operator may click on Open Transactions to display a list of all transactions that: • Are assigned to the station the operator is using • Have a blank status (not complete and not On Hold) • Have all the Storage IDs assigned • The operator may click on any of the transactions shown to complete or edit the transaction.
Edit Transaction Activity • When a transaction is displayed the operator may click on any of the activities to edit the information. • This allows the operator to efficiently record what he ACTUALLY completed, if it is different than expected. • The operator may change the following information for the activity: • Quantity moved • Storage ID used • Tracking number (if applicable) • When the operator submits the change(s) the transaction detail is instantly updated and the revised transaction is displayed.
Add Transaction Lines • If the operator performed additional steps he can add activity lines to a transaction. • For example: • If a stock item was to be picked from a single Storage ID, but the operator had to actually pull it from two different SIDs, then he may record that via his handheld interface. • He may record the quantity, SID, and tracking number (if applicable) for additional SIDs used in the transaction. • When the operator submits the additional line(s) the transaction detail is instantly updated and the revised transaction is displayed.
Put a Transaction on Hold Status • In certain situations a warehouse operator may not be able to complete a transaction and will needs to record the reason why. • For example: • the Storage ID may be inaccessible • the stock items may be missing • the tracking numbers may be wrong, etc. • When the operator cannot complete the transaction he may place it on "Hold" status and indicate the reason for the change. He simply chooses a standard reason description and enters any text needed to further explain the situation. • When he submits the information the system will update the transaction to a "Hold" status and will create a warning note that contains the reason description and text entered. This allows the warehouse manager to efficiently deal with these exceptions.
Complete a Transaction To complete a transaction all the operator must do is click on the "Completed" button (or use the handheld "Enter" button if available since the button is automatically highlighted). This causes the system to change the transaction status to Complete. After completing a transaction the system automatically displays the next open transaction for the operator's station
Check Status of a Stock Item in the Warehouse • A warehouse operator may use this function to quickly check the status of a particular stock item. • Scan the item number and the system will display information about the stock item's: • Current quantities • Required attributes • (such as refrigeration) • Storage IDs • (where is it stored now) • Pending transactions • The status screen is also designed to accept another stock item so the operator can easily scan item after item to check status.
Check Status of a Storage ID in the Warehouse • A warehouse operator may use this function to quickly check the status of a particular storage ID (bin, pallet, etc.). Upon scanning of the Storage ID number, the system will display information about the unit's: • Current contents (listed by stock item) • Attributes (such as refrigeration or • secured) • Location (position in the warehouse) • Pending transactions • You may also optionally zoom to: • Position locator info (the multi-level • locator information) • SID Capacity info (maximum and • current capacity info) • The status screen is also designed to accept another storage ID so the operator can easily scan SID after SID to check status.
Receiving Pages • There are standard NetLink handheld pages that allow an operator to use the MAT Terminal to scan or enter inventory received. • Features include: • Create new transactions - submit an inventory, operator, receiving date, document type, and document number • Validation of receiving document number (PO number, etc) - if the document doesn't exist the system will display an error • Error checking to ensure that items entered are valid for receiving document - error page will display when needed • Automatic loop on received items for efficient entry - submitted items are automatically Imported • Option to view all received items on a receiving transaction - you may delete a line item to make corrections • Tracking number entry - an item that requires tracking numbers will let you enter the numbers and submit the line item when done
Physical Count Pages • There are standard NetLink handheld pages that allow you to use a handheld unit to scan in item numbers and counted quantities to record physical counts. • The examples are designed to work with the Physical Count Detail feature so that you may record multiple counts for the same item. • Features include: • Enter batch counts - enter a batch ID and inventory operator • Automatic loop for efficient entry – continue entering items • Option to display count variances – see which item counts differ from inventory records
For further information contact: • Compsee, Inc. • 304 E. Strawbridge Ave. Melbourne, FL 32901 • (800) 628-3888 (V) • (321) 724-4321 (V) • (321) 723-2895 (F) • sales@compsee.com