Download

1 / 51
510 likes | 585 Views
G1000 Proficiency Clinic. Raising the Bar in MER for G1000 Operations 10 & 24 August, 2013 S. Parson, Capt J. Karanikas, Capt S. Hertz, Maj. Purpose of the Clinic. Take G1000 IFR qualified pilots and make them highly proficient Deep dive on systems and procedures Best practices

E N D
G1000 Proficiency Clinic Raising the Bar in MER for G1000 Operations 10 & 24 August, 2013 S. Parson, Capt J. Karanikas, Capt S. Hertz, Maj
Purpose of the Clinic • Take G1000 IFR qualified pilots and make them highly proficient • Deep dive on systems and procedures • Best practices • Open discussion • IPC & Fly!
How we will get there • Assume we already know the G1000 pretty well • Familiar with training materials on NHQ website • Focus on some areas where we might be a little weak and/or rusty • Learn new things maybe?
Topics for Today • Before we fly • Standby battery test • Two good pre takeoff practices • Airways in Flight Plans • Intercepting a leg • Flying a radial to a point • VNAV • VTF subtleties • Using the CWS • The GA button • Auto Pilot Notes • Flight Syllabus
Standby Battery Test • Successful test not required for VFR or IFR flight! (see KOEL) Will often “fail” in very cold WX • But flight into IMC without standby battery would be inadvisable in most cases • Standby battery is your #1 fire hazard (see emergency checklist)
Checking LRUs is a good practice • - Check LRU Status at pre flight • - AUX Chapter, SYSTEM STATUS page • Consult KOEL for necessary items • Be sure to scroll through all the pages! • If there is a failure, take a picture for the MX folks
Two Good Practices Just before Takeoff Load departure airport approach Set up FD for departure Allows smooth and seamless transition to AP operation Provides FD guidance from take off Activate FD and set FLC to 90 knots, heading mode with runway heading, and initial altitude in altitude window • Load but don’t activate • Allows quick return if something goes wrong in IMC
Adding Airways to Flight Plans • You must have a way point in the flight plan that is on the desired airway • Can’t be part of an arrival or approach procedure • Select the point in the flight plan AFTER the entry waypoint, select the airway, then select the exit point, then “load” • Airways are deleted by selecting the airway name and pressing clear.
Adding V466 for KVJI to KHLX The entry to V466 is the GZG VOR so position the cursor on the next waypoint
Menu Selection to add Airway The Menu key brings up this list and you choose “Load Airway”. If your cursor is not on the waypoint after the entry point, there will be no “Load Airway” option.
Choose V466 There are three airways that intersect GZG so select the one of interest (V466).
Choose the exit point from V466 Next is a list of all the waypoints on V466. GZG is grayed out because you have already designated this as the entry onto V466. Choose an exit point (PSK) and hit enter.
Segment of V466 to be inserted This series of waypoints are the part of V466 that will be inserted in the flight plan starting with GZG and ending with PSK. Hit “Enter” to load this into the flight plan.
Flight plan complete! Here’s the resulting flight plan. Note the VNAV information which has been added. The airway can be deleted by selecting the white “Airway” text and hitting “CLR”.
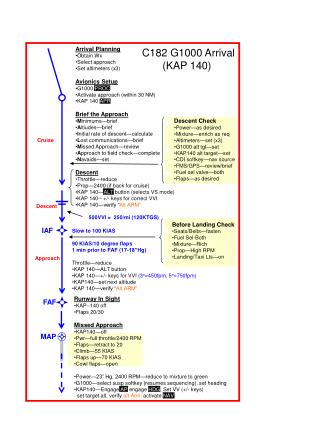
Flying a radial to a point Scenario: Flying from KGVE to KJYO, ATC clears you to intercept the AML 259° radial, direct AML, direct KJYO.
Flying a radial to a point • Use basic flight plan editing techniques to add AML to the flight plan. • AML should now be the active waypoint.
Flying a radial to a point • Use OBS key on the PFD to suspend auto-sequencing. • Then use CRS knob to select inbound course (079°) for the 259° radial (put the tail of the needle on 259 to eliminate calculation of reciprocal.) • Fly assigned heading to intercept the assigned bearing. • Once on assigned bearing to AML (079° inbound), press the OBS key to “un-suspend” and resume auto-sequencing in flight plan.
Vertical Navigation with the G1000 • The G1000 navigates in three dimensions • Provides vertical navigation in certain cases either automatically or when requested by the pilot Glidepath Glideslope
Direct using VNAV • When you use the direct to function, you can designate a target altitude and offset as well as the waypoint
Success! TOD Offset WP
VNAV Constraints and Tricks • Resulting descent cannot exceed a FPA or 6 degrees or VS > 6,000 fpm • VNAV will navigate the descent to the higher of the target altitude or the altitude in the altitude select window • VNAV has to be armed/acknowledged within 5 minutes prior to reaching the TOD by pressing the VNV key on the autopilot or by adjusting the altitude bug. In addition the altitude must be set at least 75 lower than the current altitude for the decent to begin. It’s best to wait for the 1 minute “Vertical Track” alert. • The VNV Direct softkey is just a simple way of moving the TOD up to your current position. Useful when ATC says to start your descent NOW.
Activating Vectors to Final not the best Vectors to final makes a final approach easy – but activating VTF in the G1000 replaces all your waypoint with an inbound course. Best to leave the approach in place and just follow the ATC vectors.
CWS can be useful in setting AP Parameters • When CWS is engaged the AP is “suspended” • GFC 700 monitors flight parameters and uses “current value” when CWS is disengaged • Altitude if in altitude hold mode • Vertical speed if climbing or descending • Airspeed if FLC is engaged • Roll/pitch if AP is in roll/pitch mode • Using CWS to reset parameters for FLC and VS is easier to do with CWS vice pushing buttons especially in turbulence
The flight director command bars establish a 7° nose-up pitch command to follow. GA also disconnects the autopilot, changes CDI to GPS, and un suspends the GPS . The GA Button does four things If a go-around is necessary, press the GA switch and apply full power. Start climbing to the altitude in the published MAP. Can also be useful for night takeoffs or takeoffs in low IFR
Preflighting the Autopilot • The primary purpose of preflighting the autopilot is NOT to see if it works properly (although that is a secondary objective) – it’s to make sure we can turn the thing OFF!!! • Important even if you don’t plan to use it • How many ways are there to turn it off from the preferred to the desperate? • The AC will fly perfectly well with the AP inop • FD will usually work fine even if the AP is inop
Auto Pilot Limitations GFC700 KAP140 Max engagement 160 knots, Min engagement 80 knots, Electric trim Max Operation speed 175 KIAS Max Flap with AP use is 10 degrees Max fuel imbalance with autopilot engaged: 90 lbs (~15 gallons) AP off below 800’ AGL UNLESS on an instrument approach, then to minimums (200’ AGL limit). AP may be re-engaged at the MAP once a climb is established. A pilot must occupy left seat AP can NOT be used if audio panel is inoperative (why?) • Max engagement 165 knots, Min engagement 70 knots, Electric trim Max Operation speed 175 KIAS • Max fuel imbalance with autopilot engaged: 90 lbs (~15 gallons) • AP off below 800’ AGL UNLESS on an instrument approach, then to minimums (200’ AGL limit). AP may be re-engaged at the MAP once a climb is established. • A pilot must occupy left seat • AP can NOT be used if audio panel is inoperative (why?)
Auto Pilot Limitations GFC700 KAP140 Neither auto pilot provides yaw damper or auto throttles despite what many pilots believe!!!
Auto Pilot Comparison GFC 700 KAP 140 2 Axis AP Hdg, Nav VS, Alt hold Attitude from TC Initially VS and roll NA Independent setting of altitude and barometer • 2 Axis AP • Hdg, Nav, VNAV, CWS, GA • VS, Alt hold, FLC • Attitude from AHARS • Initially pitch and roll • Flight Director • Integrated altitude bug and barometric setting Our GFC700 AC are WAAS capable while our KAP 140 AC are not
KAP 140 Autopilot Controls Used to manually arm or disarm altitude pre-select Used to input altimeter setting Follows heading bug Used to select VS rate or change selected altitude Toggles between ALT hold and VS mode Engages autopilot in roll and VS modes Tracks flight plan modes
GFC 700 Automatic Flight Control System • Flight Director • Autopilot
Instrument Proficiency Check Tasks • IIIA* – Holding • IVB - Unusual Attitudes • VA – Intercept & tracking • VIII – D Partial Panel • VIII – Instrument checks • VIA – NPA • VIB – PA • VIC – Missed • VID – Circling • VIE - Landing * Refers to PTS Task
Flight Syllabus • Extensive preflight of the G1000 • Check LRUs and various status pages • Set up FD for departure • Set up departure airport approach • In the air • Fly airways • Intercept legs • Fly radials to a point or a leg • Using the GA button • Using CWS • What really happens when you engage the AP • Complete IPC tasks • Back on the ground • Debrief
KAP 140 Autopilot Overview • Two axis autopilot with pitch and roll • Pilot must fly the rudder for coordinated flight and throttle for power (no auto throttles or yaw damper!) • Vertical components include: • Vertical Speed Hold • Altitude Pre-select • Altitude Hold • Glide slope capture
KAP 140 Autopilot Operations • Lateral control about the longitudinal axis includes: • Roll control (wing leveler), • Heading hold, • Navigation tracking, and • Approach tracking (including REV (“reverse” for backcourse)) • DC-powered turn coordinator (TC) (behind MFD) supplies rate information to the AP • Failure of the AHRS unit has no effect on the autopilot ROLL control
KAP 140 Altitude Pre-select Use inner and outer knob on right hand side to set desired altitude in upper right corner. 1 2 Above 800’ AGL Press AP button at lower left for approximately 2 seconds to engage autopilot. As shown on the top line, autopilot will engage in ROL (wing leveler) and VS (capture) modes. 2a VS mode will immediately capture and maintain the VS being flown at the time the AP button is pressed.
KAP 140 Altitude Pre-select 3 • Immediately press the UP or DOWN key to see and set desired VS.
KAP 140 Altitude Pre-select 4 • Press ARM key to arm the autopilot to capture the pre-selected altitude (4,500 MSL in this example). • Look at upper line to verify that VS mode is still engaged. • Check the lower line to confirm the ALT ARM is illuminated. • DO NOT press the ALT key, which toggles between VS and ALT hold modes. Pressing ALT while in VS mode with ALT ARM illuminated will cause the autopilot to hold the altitude being flown at the time the ALT button is pressed.
KAP 140 Altitude Pre-select 5 • When altitude reaches pre-selected value (4,500 in this example), the ALT ARM annunciation on the lower line will extinguish. • The VS annunciation on the upper line will then change to ALT, which indicates that the autopilot has captured and is maintaining the desired altitude.
KAP 140 Altitude Change • Use knobs on the right to set the new altitude in the pre-select window • The VS annunciation will replace the ALT annunciation on the top line. • Press ALT key to toggle from ALT hold mode to VS mode. • Press the UP or DN key to set the desired vertical speed. Set power – The autopilot will NOT manage power settings! • Confirm that ALT ARM annunciation illuminates on the bottom line of the autopilot status screen. • (If not, simply press the ARM key and verify that ALT ARM illuminates.)
KAP 140 Altitude Change • When aircraft reaches new altitude previously set in the pre-select window: • ALT ARM will extinguish. • ALT hold annunciation will replace VS on upper line. • REMEMBER: • Top line shows what mode(s) are ENGAGED NOW. • Bottom line shows what mode(s) are ARMED TO ENGAGE. • Set power – this autopilot will NOT manage airspeed!
KAP 140- More VS/ALT Points • With ALT hold engaged, pressing the UP or DOWN key once will move altitude by 20 feet. • Autopilot will fly the plane into a stall if there is insufficient power for the VS selected • Extended manual attempts to override pitch will cause a pitch trim lockout: • You will hear a tone and see a PT annunciation on the autopilot display screen and on the G1000 annunciation window (on PFD). • Power must be removed from the autopilot to solve this problem (avionics bus 2 off or AP circuit breaker).
Set heading bug to desired heading • Keep heading bug synced!! • Press HDG button • HDG annunciation will replace ROL annunciation in upper left KAP 140 - Heading Mode
KAP 140 - Heading Mode Use the heading bug to steer the aircraft when HDG mode is engaged. NOTE: In a rate-based system, the autopilot will normally turn the aircraft at standard rate.
Ensure that AP is in HDG mode. KAP 140 - NAV Mode To capture and track a selected course: • Set HSI to desired course. Press NAV. Unless you are already on the course you wish to track, NAV ARM will illuminate on the lower line. NAV will capture and track the course set on e-HSI. • Note: Set the HSI heading bug to a heading that will intercept the NAV course you wish to capture and track.
KAP 140 - NAV Mode • When the aircraft intercepts the desired course, HDG hold mode will disengage and the NAV ARM annunciation will extinguish. • The NAV tracking mode will engage and the NAV annunciation will replace the HDG annunciation in the upper left corner. The autopilot will track the desired course.
KAP 140 - NAV Mode • NAV mode will disengage if you change the G1000 nav source (e.g., from GPS to VOR1) while NAV mode is engaged. • AP will revert to ROL mode. • NAV annunciation will flash. • Pilot action: • Ensure that the desired course / heading are set. • Press NAV (twice) to re-engage NAV mode with new source.