Hyperlinks
Hyperlinks. Linking pages…Hyperlinks. Hyperlink “ A clickable HTML element that will direct the web browser to display a different Web page or a different location on the current Web page.”. Hyperlinks . Use tags <a>…</a> , and href attribute href = “a link destination” example


Hyperlinks
E N D
Presentation Transcript
Linking pages…Hyperlinks • Hyperlink • “A clickable HTML element that will direct the web browser to display a different Web page or a different location on the current Web page.” Lecture 8
Hyperlinks • Use tags <a>…</a>, and href attribute • href= “a link destination” • example <a href = “tutorial.html”> Tutorial </a> link destination link label, visible on a Web page, where you will click Lecture 8
Specifying a Folder Path Lecture 8
Specifying a Folder Path To create a link to a file located in a different folder than the current document, you must specify the file’s location, or path An absolute path specifies a file’s precise location within a computer’s entire folder structure A relativepath specifies a file’s location in relation to the location of the current document If the file is in the same location as the current document, you do not have to specify the folder name If the file is in a subfolder of the current document, you have to include the name of the subfolder Lecture 8
Specifying a Folder Path If you want to go one level up the folder tree, you start the relative path with a double period (..), a forward slash, and then provide the name of the file To specify a different folder on the same level, known as a siblingfolder, you move up the folder tree using the double period (..) and then down the tree using the name of the siblingfolder Lecture 8
Hyperlinks • Three type of Hyperlinks • Relative URL • links to a Web page on the same Web server • only need relative directory for the linked file • Absolute URL • links to a Web page on a different Web server • a complete URL should be used e.g., http://jjcweb.jjay.cuny.edu/ssengupta/ • Name id • links to a different location on the same Web page • links to a different location on the different Web page Lecture 8
Relative URL link destination <a href = “page2.html”> My Page 2 </a> link label, visible on a Web page, where you will click link destination <a href = “../page3.html”> My Page 3</a> link label, visible on a Web page, where you will click Lecture 8
Hyperlinks • Three type of Hyperlinks • Relative URL • links to a Web page on the same Web server • only need relative directory for the linked file • Absolute URL • links to a Web page on a different Web server • a complete URL should be used e.g., http://jjcweb.jjay.cuny.edu/ssengupta/ • Name id • links to a different location on the same Web page • links to a different location on the different Web page Lecture 8
Absolute URL <a href=“http://jjcweb.jjay.cuny.edu/ssengupta/”> Instructor’s website </a> link destination link label, visible on a Web page, where you will click Lecture 8
Linking to locations within same document To jump to a specific location within a document, you first need to mark that location One way to identify elements in an HTML document is to use the “id” attribute id names must be unique id names are not case sensitive
Hyperlink to a certain location • id attribute assigns a name (or an ID) to an element • with the ID, an element can be referred to easily • syntax <tag id=“name”> content </tag> e.g., <h1 id=“welcome”> Welcome to MAT 279 </h1> Lecture 8
Creating hyperlinks to locations in same document • use id attribute to identify the destination of the hyperlinks • syntax <a href=“#id_name”> content </a> e.g., <a href=“#welcome”> Go to the top of the page. </a> Lecture 8
Download assign1.html from course website and create hyperlinks to locations inside the same document complete this assignment as per instructor’s instruction
Creating hyperlinks between documents • create a hyperlink specific location in another file with syntax <a href=“filename.html#id">content</a> • filename is the file name of destination HTML file • id is the id name of an element in the destination file • e.g <a href=“tutorial.html#para2”>Go to the second paragraph of the tutorial </a> Lecture 8
Create a hyperlink in page8.html and link it to Mathematics and Computer Science Department element in assign1.html
Working with Hypertext Attribute (target) • You can force a document to appear in a secondary window or tab by adding the target attribute to the tag <a> tag Lecture 8
Working with Linked Images A standard practice on the Web is to turn the Web site’s logo into a hypertext link pointing to the home page Link the JJ streetsign image to JJ homepage
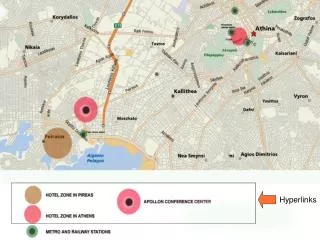
Working with Linked Images and Image Maps Earlier, entire image linked to the same destination HTML also allows you to divide an image into different zones, or hotspots, each linked to a different destination A single image can be linked to several locations
Working with Linked Images and Image Maps To define these hotspots, you create an image map that matches a specified region of the inline image to a specific destination
Client-Side Image Maps A client-side image map is inserted in an image into the HTML file The browser locally processes the image map Because all of the processing is done locally, you can easily test Web pages More responsive than server-side maps The browser’s status bar displays the target of each hotspot Older browsers do not support client-side images
Creating Hotspots • Define a hotspot using two properties: • Its location in the image • Its shape • Syntax of the hotspot element: <area shape=“shape” coords=“coordinates” href=“url” alt=“text” />
Creating a Rectangular Hotspot • Two points define a rectangular hotspot: • the upper-left corner • the lower-right corner • A sample code for a rectangular hotspot is: <area shape="rect" coords="128,132,241,179" href="http://jjcweb.jjay.cuny.edu/ssengupta/"> • first two numbers represent the coordinates for the upper-left corner of the rectangle, and • the second two numbers indicate the location of the lower-right corner • The hotspot is a hypertext link to course website
Creating a Circular Hotspot • A circular hotspot is defined by the location of its center and its radius • A sample code for a circular hotspot is: <area shape="circle" coords="68,211,35" href="http://www.google.com/"> • Coordinates are (68, 211), and it has a radius of 35 pixels • The hotspot is a hypertext link to google.com
Creating a Polygonal Hotspot • To create a polygonal hotspot, you enter the coordinates for each vertex in the shape • A sample code for a polygonal hotspot is: <area shape="polygon" coords="19,44,45,11,87,37,82,76,49,98" href="http://www.jjay.cuny.edu/"> • Coordinates are for each vertex in the shape • The hotspot is a hypertext link to JJ homepage
Creating a Default Hotspot <area shape="default" coords="0,0,345,325" href="http://www.yahoo.com/"> where 345 is the width of the inline image in pixels and 325 is the image’s height Any spot that is not covered by another hotspot will activate the default hotspot link
Creating a Client-Side Image Map • <imgsrc="streetsign.jpg" usemap="#green" border="0"> • <map name="green"> • <area shape="rect" coords="128,132,241,179" href="http://jjcweb.jjay.cuny.edu/ssengupta/"> • <area shape="circle" coords="68,211,35" href="http://www.google.com/"> • <area shape="polygon" coords="19,44,45,11,87,37,82,76,49,98" href="http://www.jjay.cuny.edu/"> • <area shape="default" coords="0,0,345,325" href="page10.html"> • </map>
As an exercise, create 4 different rectangular hotspots in the image in assign1.html and link them to 4 department homepages