Download

1 / 10
100 likes | 123 Views
A corrupted network data file, misconfiguration in the host settings and no connectivity between the host computer and QuickBooks are amongst the various reasons that give rise to the QuickBooks Error H202. Consult our specialists at 1.800.579.0391 straightaway to avail immediate resolutions for the same.

E N D
WELCOME TO ACCOUNTING HELPLINE
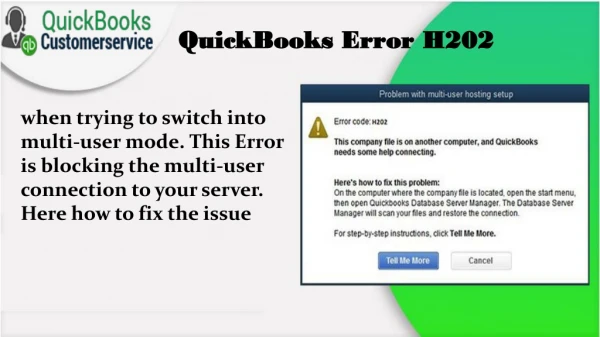
QuickBooks Error H202 Fixed in 10 Minutes! QuickBooks is a great software that helps you organize your company data and finances. This application can be accessed in 2 different modes, that is, single and multi-user. The central computer is called the Host, and the connected devices are called the workstations. If you wish to access a file stored on another device, you will have to switch to the multi-user mode. And this might result in the QuickBooks Error H202: This company file is on another computer, and QuickBooks needs some help connecting. Let us go through the main factors that trigger this error and the best ways to resolve it without affecting your company data.
Causes for QuickBooks Error H202 • Misconfiguration in the host settings. • The network data (ND) file is corrupted. • Desync between QuickBooksDBXX and QBCFMonitorService. • Disconnection between the host and QuickBooks. • Blockage by computer firewall.
Methods to Resolve QuickBooks Error H202 Solution 1: Ensure that QuickBooks Services is operational • Press the Windows key + R on your keyboard. • The Run window will pop up. • In the search space, type SERVICES.MSC. • Tap on OK. • In the Services screen, navigate to QuickBooksDBXX. • Double-tap on this button.
The following screen will display a QuickBooksDBXX Properties box. • In the Startup Type, choose Automatic. • Ensure that the Service status is Running/Started. • Select Recovery. • Click on Restart Service. • Press Apply. • Repeat the process for QBCFMonitorService. • Access QuickBooks on all workstations. • Select File. • Click on Switch to Multi-user mode to check if the error is resolved.
Solution 2: Set up the Hosting to Local Files • Open QuickBooks. • Click on Product Information. • Select Hosting. • Navigate to the Local Server Information option. • Choose Local Files Only. • Reboot device.
Solution 3: Reconstruct the .ND file • Press the Windows icon. • In the search bar, type .ND. • Press Enter. • Right-click on the .ND file. • Select Delete. • Press Confirm on the next window. • Press on Windows again. • Click on All Programs.
Tap QuickBooks. • Then, select QuickBooks Database Server Manager. • Choose the Scan Folder button. • Select Add Folder. • Navigate to your company file folder. • Choose the company file. • Hit OK.
Press Scan. • Let the process complete. • Hit Close. • It is time for us to wrap up our blog on QuickBooks Error H202. But this is not the end to our pro-advisory solutions. You can get in touch with our experts at 1.800.579.0391 for more information and guidance on tackling QuickBooks issues
CONTACT US :- ACCOUNTING HELPLINE Email: info@accountinghelpline.com Phone: 1.800.579.0391