Download
1 / 35
350 likes | 522 Views
Relationship Sales Program (RSP ) Salesforce.com Contact and Activity Creation V1.0. Training Topics. Training Overview Login Account Maintenance Search for existing Account Create new account Contact Maintenance Search for existing Contact Create new Contact Update Contact

E N D
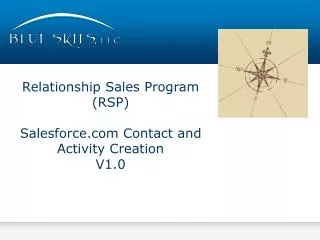
Relationship Sales Program (RSP)Salesforce.com Contact and Activity CreationV1.0
Training Topics • Training Overview • Login • Account Maintenance • Search for existing Account • Create new account • Contact Maintenance • Search for existing Contact • Create new Contact • Update Contact • Activity Maintenance • Create Activity • Update Activity • Enter Follow-Up Tasks • Close Tasks and Enter Notes • Reports
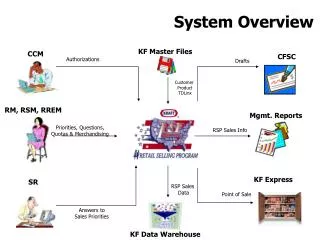
Return to Topics Training Overview 1 • Salesforce.com will be our “system of record” for tracking the RSP progress. • As soon as you have an RSP Activity confirmed with a Contact, make sure to input the Activity (Event) into SalesforceASAP. • Once you complete your Activity, make sure to update the Activity and schedule a follow-up Task. • Follow the slides below to ensure accuracy and consistency among all RSP participants. • This process will make sure you accurately update your progress so your manager can track your success and provide the necessary support.
Training Overview 2 • The Salesforce logic • Activities are associated with Contacts • Contacts are associated with Accounts • Opportunities are associated with Accounts • Opportunities generate Projects • The RSP logic • Activities with Contacts build Relationships • Relationships create Confidence and Trust • Confidence and Trust generate Leads • Leads turn into Opportunities and Projects • Projects generate Revenues
Return to Topics Login Click the following link: https://login.salesforce.com/ Use the following Logins: • lifesciences@blueskiesllc.com • Johan Amlen • Andrea Ruderman • Celeste Amlen • Julie Newton • Per Lindstrom • Paul Sutter • psoo@blueskiesllc.com • Ron Enge • Mike Streb • Grafton Harper • Andrea Ruderman • John Hoff • Tim Parkin The password for all logins is: Bsl2013q1
Return to Topics Search for Account 1 Click on Setup
Search for Account 2 Click on Customize, Contacts, fields.
Search for Account 3 View results and check for a match. If unsure, click the closest result and compare addresses. If the Account exists, skip to Contact Search.
Create Account 1 Add names and click Save
Create Account 2 Click Reorder button, click the sort alphabetically and click Save
Create Account 3 Scroll down and complete the Additional Information and IT Environment and address information. Click Save.
Return to Topics Search for Contact 1 Click the Contacts link.
Search for Contact 2 From the Contacts Home screen, enter a search term for the new Contact and click Search
Search for Contact 3 View results and check for a match. If unsure, click the closest result and compare the detailed information. If the Contact exists, skip to Update Contact.
Create Contact 1 Go back to the Contacts home screen and click the “Create New…” drop down. Select Contact.
Create Contact 2 Enter as much information as possible in each section. Search for the Account Name by clicking the magnifying glass. Make sure to enter the Target Quarter Owner.
Create Contact 3 Complete the address information if different from the Account address. Enter as much additional information as you have. Click Save. Skip to Create Activity
Update Contact 1 If a match is found, click the Contact name to add yourself as an Owner and then click the Edit button.
Update Contact 2 Add yourself as the “Contact Owner” and select the “Target Quarter Owner”. If the Contact is already associated with another Owner*, add yourself as an “Other Contact Owner”. Make sure to enter the “Target Quarter Other” as well and then Save the Contact. *There is a maximum of 2 owners per Year/Quarter combination. If there are already 2 owners for the current year/quarter, you must coordinate your activities with one of the existing owners. If there are already 2 owners but for different year/quarter combinations, go ahead and replace the oldest Owner with yourself.
Return to Topics Create Activity 1 Once the Contact is created or updated, scroll down and click the New Event button. Or, search for the Contact again and click Edit.
Create Activity 2 Enter the Event information including Subject, Start and End date and times, Location and a Description. Quite a bit of the information will default. Do not change any of the defaults. Click the button next to Subject for a drop down list of options. …Continue to more information…
Create Activity 3 Add your name to the Invitee list by scrolling down and clicking the “Add Invitees” button. This will open another window.
Create Activity 4 You can search for your name and click Go!. Click the “Insert Selected” button to add to the Selected List. Then, click the “Done” button to return to the Event window. You can add multiple Invitees from this window and then insert them all.
Create Activity 5 Click the “Save & Send Update” button to send a reminder to yourself and the other invitees and to complete the process. Note: Do not add the Contact to the Invitee list as this is for internal notification only.
Create Activity 6 That’s it. Your RSP Contact and confirmed Activity has been logged. If the Event has not occurred yet, it will appear in the Open Activities section. If the Event has already passed, it will appear in the Activity History section.
Return to Topics Update Activity – Events 1 As soon as your Event is completed, Edit the Event to enter the results and record the next steps.
Update Activity – Events 2 In the Description field, enter the date you’re making the update followed by notes from the Event. Pertinent information includes: • Activity Summary • Personal Notes about the Contact (kids’ names, home town, sports teams, hobbies) • Contact’s roles and responsibilities • Strategic notes (how can the Contact help us) • Suggested next steps This information should be clear enough for your Manager to read and assess the contact’s relationship value. Click Save when done.
Return to Topics Update Activity – Follow-up Tasks 1 After updating the completed Event, log a follow up Task for the Contact. Click the New Task button.
Update Activity – Follow-Up Tasks 2 Enter the Task Subject (click the magnifying glass for options). Enter a Due Date or deadline for completing the Task. Enter the specific Task instructions in the Comments field. Update the Status appropriately. Click Save.
Update Activity – Follow-Up Next Event Reminder Immediately after entering the follow-up Task, make sure to create a Task to Schedule another Activity with the Contact. The Due Date should be a realistic deadline for confirming another activity with the Contact. Depending on the follow-up strategy, this could be immediate or within a couple months. Use the Task creations instructions above. The result should look similar to this.
Return to Topics Update Activity – Close Task and Enter Notes 1 Once the Task is completed, Click the “Cls” link to update the Task Status to “Completed”. The Task will then move to Activity History. When appropriate, enter notes or attachments to document follow-up activities. Click “New Note” or “Attach File”.
Update Activity – Close Task and Enter Notes 2 After entering notes or attaching a document, you’ll see your results as follows.
Return to Topics Reports 1 To see all RSP Contacts and Activities, click the Reports link. Click the Unified Public Reports link to display the available reports. Click the Report name to run the report.
Reports 2 You should see all pertinent information regarding the Account, Contact and Activities. You can summarize or customize the report as needed. If you Customize the report to filter on your specific information, make sure to “Save As” and rename the report and include your name in the new title. There are quick-links for each Account, Contact or Activity.