Download
1 / 17
170 likes | 189 Views
Learn how to install Profibus card driver step-by-step for seamless communication between PC and PLC module. Includes screenshots.

E N D
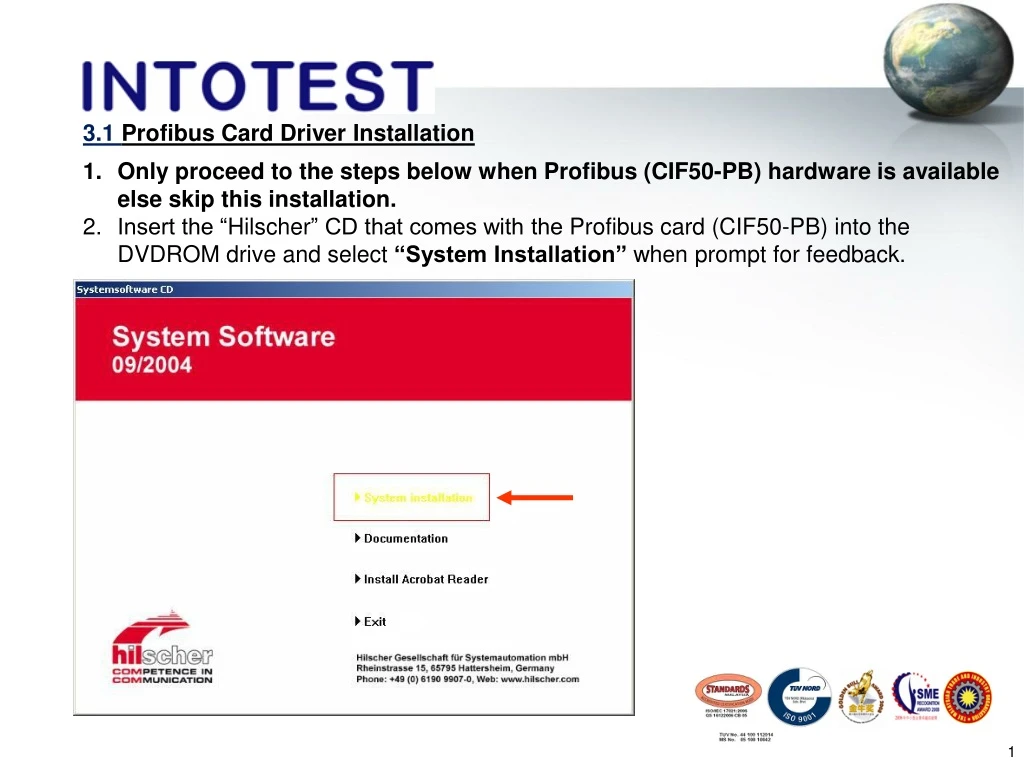
3.1 ProfibusCard Driver Installation Only proceed to the steps below when Profibus (CIF50-PB) hardware is available else skip this installation. Insert the “Hilscher” CD that comes with the Profibus card (CIF50-PB) into the DVDROM drive and select “System Installation” when prompt for feedback. 1
Click next all the way till arrive at the selection option shown below. Select the appropriate check box as shown and continue by clicking “Next”. 1) 2) 2
Following the picture shown below, select the Profibus, CIF Device Driver and Protocol. Then click “Next” to continue with the installation to the end and then remove the CD from DVDROM drive after exiting the software. 1) 2) 3) 3
Next, right click on “My Computer” icon and select “Properties” to enter “System Properties”. Select “Hardware” tab and then click on “Device Manager”. 1) 2) 4
A pop-up will appear as shown below. Right click on the “Other PCI Bridge Device” and select “Update Driver” 5
A pop-up will appear as shown in the picture below. Select “No, not this time” and click “Next” to continue. 1) 2) 6
After that, select “Install from a list or specific location (Advanced)” and click “Next” to continue. 1) 2) 7
Then, following the selection as shown below, browse for C:\Program Files\CIF Device Driver\Win2000_XP\PCI. Click “Next” to finish with the driver installation. 1) 2) 8
Then go to “My Network Places” and click on the “View workgroup computers” selection at the side bar and select Master computer. 2) 1) 9
To access “Master”, key in the appropriate username and password when prompt. The User name and Password is “ipcsetup” and check the “Remember my password” box. 1) 2) 10
Next, following the path shown in the picture below, search for the “Copy to C” folder. 11
Access the “Profibus” folder and then the “BMP” folder. Copy the contents to C:\Program Files\Hilscher\Sycon\Fieldbus\PROFIBUS\BMP. 1) 2) 12
Rollback to “Profibus” folder and access “GSD” folder. Then, copy all its contents to C:\Program Files\Hilsher\Sycon\Fieldbus\PROFIBUS\GSD as shown below. 1) 2) 13
Again in the “Profibus” folder, access “Project” folder and then copy the proper file according to machine type to C:\Program Files\Hilsher\Sycon\Project. (For other machine type, please refer to the Control Engineers) File to be copied depends on the type of machine the IPC is setup for. Machine type can be obtained from the Production Head of Department. 1) 2) 14
Then, move on to “Sycon” accessible from start menu as shown below and execute the program. 15
In the software, “Open” a project file that was copied earlier (example is XL.pb in this setup). 1) 2) 3) 16
Finally, go to “Online” and select “Download” as shown below. A pop-up will appear and select “yes” when prompt to proceed. Close program after done. Setting up Sycon will enable the communication between PC and PLC module to be established. 17