Download
1 / 28
280 likes | 319 Views
Dive into Aerial Lift builds with belt and pulley systems. Explore torque, speed, and object transport. Enhance your engineering skills in a fun way!

E N D
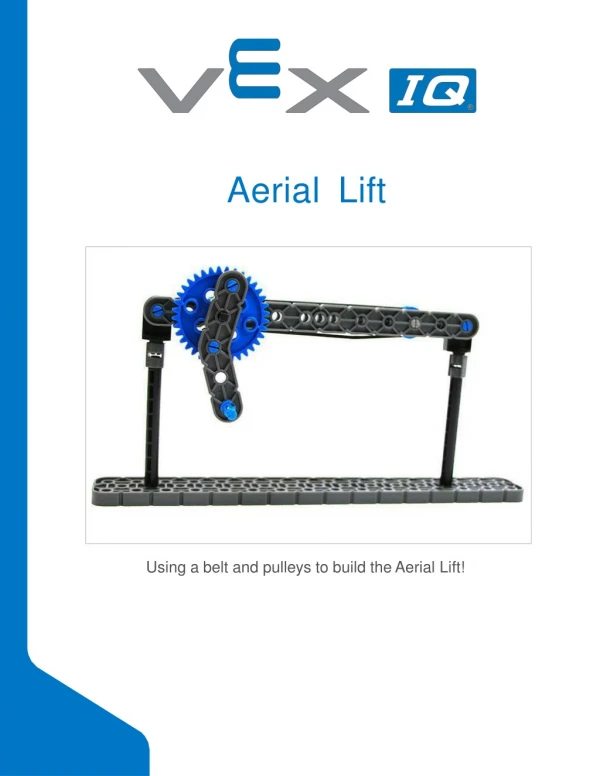
AerialLift Using a belt and pulleys to build the AerialLift!
Discover new hands-on builds and programming opportunities to further your understanding of a subjectmatter.
The Completed Look of the Build AerialLift The Aerial Lift build will be used for investigating belt and pulleysystems.
Exploration • Now that the build is finished, explore and see what it can do. Then answer these questions in your engineeringnotebook. • What does this build do? Explain withdetails. • How could you use the design of an aerial lift to help people in the real-world and/or workforce? Sketch a picture showing anexample. • The pulley used in the Aerial Lift is fixed since the wheel and axle do not move from its place. Which component of the build completes the necessary movement for it towork?
Test your build, observe how it functions, and fuel your logic and reasoning skills through imaginative, creativeplay.
Belt and Pulley Systems A belt and pulleysystem Belt and PulleySystems A belt and pulley system is a configuration of 2 or more pulleys that are linked together with one or more belts. The belts are wrapped around the grooves within the pulleys. A pulley connected to a force (a hand or motor) is called a driving pulley since it produces motion. A pulley that is not connected to a force, but spins as the belt moves is called adriven pulley. In order for the belt and pulley system to work, the belts connecting the pulleys must have tension.
TheAerialLift'sBeltandPulley System 1. Looking at step 6 of the Aerial Liftbuild
Step 6 of the Aerial Liftbuild In step 6 of the Aerial Lift build, you added the Rubber Belt to complete the belt and pulley system. This Rubber Belt allows force to be transferred from a pulley on one side to a pulley on another. Notice that when either of the axles or pulleys are spun, the belt drives the pulley and axle on the opposite side to spin in the samedirection. 2. Reversing theDrive A belt and pulley system with a reverseddrive You can also reverse the drive of your belt and pulley system by crisscrossing the belt. Once your belt and pulley system is setup that way, try spinning either of the axles orpulleys. While spinning an axle or pulley, take a look at the opposite pulley and axle. Can you see how crisscrossing the belt changes the direction the opposite pulley and axle aredriven? 3. Torque andSpeed Examples of increasing speed and torque in belt and pulleysystems
Belt and Pulley systems also work similarly to gears. The trade-off for torque or speed can change based upon the diameter of the pulley. To increase the speed of the driven pulley, try using a driving pulley with a larger diameter. To increase the torque(or power) of the driven pulley, try using a driving pulley with a smallerdiameter.
Transporting Objects with Pulleys Bottom view of an Aerial Liftpulley Transporting Objects withPulleys A belt and pulley system can be used to lift or transport heavy objects (or people!) over distances. The simplest example of this uses two pulleys that are connected by a single belt. One of the pulleys is driven by a force (often a motor) and objects are attached to the cable. Force is transferred from the pulley it is placed on and through the belt. The belt then carries the objects over the distance between thepulleys.
TransportingObjectswiththe Aerial Lift 4. Adding objects to the Aerial Liftbuild Aerial Lift build with objects attached to thebelt To see how belt and pulley systems can be used to move objects over distances, try attaching an object to the belt in your build. You can use VEX IQ parts to create an object that attaches with a Connector Pin, or even a paper clip. After attaching an object to your build, spin the pulley to see how the force is transferred from the pulley through the belt, which carries the objects across the distance of thebelt.
Become a 21st century problem solver by applying the core skills and concepts you learned to other problems.
WhereWe'veSeenBeltand Pulley Systems Belt and pulley system in a skilift Take aRide! When they’re not being used to lift heavy objects, belt and pulley systems are used to move people across long and sometimes unsafe stretches of land. An Aerial Lift is a belt and pulley system that is used for carrying people or cargo. A chairlift, also known as a ski lift, is a type of aerial lift that has two stations that are connected by a single, long belt. Supporting towers may be used to provide support and stability to the center of thebuild.
IncorporatingaBeltandPulley on a Competition Robot Robot with a belt and pulley on a drivetrain andattachment • Designing with a Belt andPulley • A belt and pulley can transfer circular motion from one spot on the robot to another. This can be useful when it comes to designing a robot for competitions because a belt and pulley mechanism can be used to engineer better attachments or betterdrivetrains. • Consider using a belt and pulley in the design of a competition robot for the following: Spinning a robot attachment with the motor in anotherlocation. • Driving multiple wheels using only onemotor. • Overcoming obstacles by having the Driving Pulley continue spinning even if the Driven Pulley becomesstuck.
Is there a more efficient way to come to the same conclusion? Take what you’ve learned and try to improveit.
ImproveandTinkerwithYour Build • Answer the following questions in your engineering notebook as you tinker with thebuild. • Consider the uses of aerial lifts in the real world. How could you adjust the design to improve safety for workers or passengers. Describe at least onechange. • What steps did you follow to change the build? Explain with details and/orsketches. • How could your design be used in other machinery to improvesafety?
Understand the core concepts and how to apply them to differentsituations. This review process will fuel motivation tolearn.
Review • What happens to the direction of force when using a belt and pulleysystem? • The force remains completely on the firstpulley. • The force transfers through the belt from one pulley toanother. • The force remains completely on thebelt. • The force remains completely on the secondpulley. • When the belt between two pulleys is crisscrossed and force is applied to a pulley, the pulleyswill: • Rotate the samedirection. • Rotate the oppositedirection. • Lock up and notrotate. • Break off theaxle. • Belts and pulleys can be usedto: • Lift heavyobjects. • Transport heavyobjects. • Change direction. • All the above. • In a belt and pulley system where one pulley is connected to a motor, the pulley connected to a motor iscalled: • A driven pulley. • A drivingpulley. • A high performancepulley. • A masterpulley.
In a belt and pulley system where one pulley is connected to a motor, the pulley not connected to a motor iscalled: • A driven pulley. • A drivingpulley. • A low performancepulley. • A working pulley. • To increase the speed of the driven pulley, the driving pulley needs tobe: • Smaller than the drivenpulley. • Larger than the drivenpulley. • The same size as the drivenpulley. • Connected to the driven pulley using twobelts. • To increase the torque of the driven pulley, the driving pulley needs tobe: • Smaller than the drivenpulley. • Larger than the drivenpulley. • The same size as the drivenpulley. • Connected to the driven pulley using twobelts.
Installing Rubber Shaft Collars Using your hand to warm a Rubber ShaftCollar Rubber Softens as it getsWarm Hold the Rubber Shaft Collars in your hand for 15-30 seconds before you slide them onto a shaft. Holding the Rubber Shaft Collar in your hand will warm and soften the rubber to make it easier to slide onto a shaft.
Sliding Small Parts Along Shafts Using a beam to slide on a 12 ToothGear Use a Beam for Leverage You can use a 1x Beam for extra leverage to push small VEX IQ parts along shafts. Place the beam directly behind the small object and push on the beam to slide the object. This technique can also be used to slide parts onto or off ofshafts.
RemovingPinsfromVEXIQ Beams and Plates Removing a pin from a plate assembly using abeam How to Easily Remove Pins from Beams andPlates You can quickly remove connector pins from beams or plates by pressing a beam against the back of the pin, which partially pushes the pin out, so you can remove it with your fingers. You can use this technique to more easily remove pins from individual plates and beams, or from builtstructures.