Download
1 / 14
140 likes | 226 Views
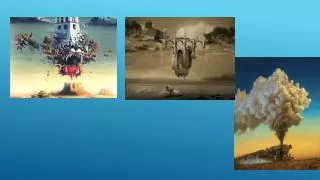
Create a surreal and atmospheric scene by combining a desert image with red phone boxes, adding shadows, light beams, and fog for a dreamlike effect.

E N D
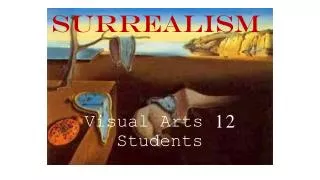
Surreal Atmospheric Phone Booth Scenery From pxleyes.com
Step 1 • Open Blank File 6 inches long and 4 inches tall • Open Desert Image
Step 2 • Use Selection tool and select the sky • Now go to Image->Adjustments->Hue/Saturation and give the desert image a reddish color. • Hue 140, Saturation -40, Lightness -6
Step 3 • We are now going to add 2 Adjustment Layers to the background image, they are as follow: Levels and Hue/Saturation.First of go to Layers->New Adjustment Layer->Levels, make sure Use Previous Layer to Create Clipping Mask is ticked and set the values as follow:Levels - 131, 0.52, 255 and click OKGo back to Layers->New Adjustment Layer->Hue/Saturation, make sure Use Previous Layer to Create Clipping Mask is ticked and set the values as follow:Hue/Saturation - Hue:0, Saturation:-29, Lightness:-34 and click OK
Step 4 • Now create a New Layer and fill it with black then on the layers palette set the Blending Mode to Saturation to give it more of a night feel.
Step 5 • Open Red Phone Boxes
Step 6 • Now drag selected phone boxes onto the desert image and resize the phone boxes to suit as below.
Step 7 • We are going to add 2 Adjustment Layers to the phone boxes they are as follow: Levels and Hue/Saturation.First of go to Layers->New Adjustment Layer->Levels, make sure Use Previous Layer to Create Clipping Mask is ticked and set the values as follow:Levels - 136, 0.70, 255 and click OKThen go back to Layers->New Adjustment Layer->Hue/Saturation, make sure Use Previous Layer to Create Clipping Mask is ticked and set the values as follow:Hue/Saturation - Hue:0, Saturation:-53, Lightness:-25 and click OK
Step 8 • Create a New Layer below the phone boxes, take a medium sized soft edged brush Hardness set to 0% and draw around the of the phone boxes like in the image below, then go to Filter->Blur->Gaussian Blur and set it to about 0.6 and click Ok • Create the Shadows
Step 9 • Create a New Layer above the phone boxes, we are now going to make the Light Beam.Select the Polygonal Lasso Tool and set the feathering to about 30px and draw a rectangular shape on the image like below.
Step 10 • We are now make Fog for the background. Create a New Layer below the phone boxes, set the colors to White for foreground and Black for Background select the Rectangular Marquee Tool set the Feathering to about 30px and draw a selection from about the center to almost top of the image now go to Filter->Render->Clouds, set the Layer Blending Mode to Lighten and the Opacity to around 36%.
Step 11 • Now for the foreground Fog.Create a New Layer above the phone boxes this time and with the same setting as in Step 10 but from almost the bottom to the center of the image this time and change Blending Mode to Lighten.