Download

1 / 2
140 likes | 858 Views
v.1.1 (January 2014). Alere TM Filariasis Test Strip.

E N D
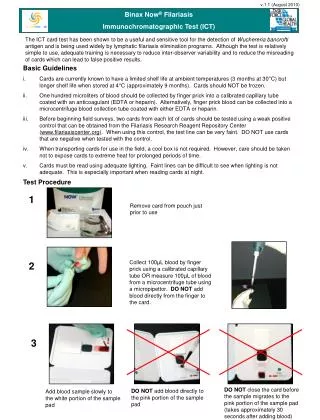
v.1.1 (January 2014) AlereTM Filariasis Test Strip The AlereTM Filariasis Test Strip is a rapid diagnostic tool used for the qualitative detection of Wuchereria bancrofti antigen in human blood samples collected by fingerstick. Although the test is relatively simple to use, adequate training is necessary to reduce inter-observer variability and to reduce the misreading of strips. • Basic Guidelines • Kits should be stored at 2-37°C. Test strips should NOT be frozen. The AlereTM Filariasis Test Strip kit is stable until the expiration date marked on its outer packaging when stored as specified. Kits should NOT be used past the expiration date. • Before beginning field surveys, two strips from each lot of kits should be tested using a positive control that can be obtained from the Filariasis Research Reagent Repository Center (www.filariasiscenter.org). DO NOT use strips that are negative when tested with the control. • When transporting strips for use in the field, a cool box is not required. However, care should be taken not to expose strips to extreme heat for prolonged periods of time. • Strips must be read using bright unfiltered light. Faint lines can be difficult to see when lighting is not adequate. This is especially important when reading strips at night. Test Procedure Allow all kit components to equilibrate to ambient temperature (15-37°C) before testing. Remove contents from the foil pouch just prior to use. Provided materials include one test strip, plastic work tray and fixed volume (75µL) micropipette. 1 A Collect 75µL of fingerstick blood by holding the supplied micropipette slightly above the horizontal plane. DO NOT squeeze the bulb end of the micropipette when collecting the sample. Alternatively, measure 75µL of anti-coagulated blood from a microcentrifuge tube using a calibrated micropipettor. DO NOT add blood directly from the finger to the strip. 3 B The strip should be placed in the work tray before the sample is added. NOTE: It is advisable to secure the strip to the work tray with a sticker -type patient identifier label or tape. 2 Strips should be handled carefully and held only at the end without the arrows. DO NOT apply pressure to the sample pad at the bottom of the strip. Strips should be labeled with appropriate patient identifiers. Strips can be labeled directly (preferred) (A). Alternatively, the work tray can be labeled (B).
4 Slowly add the blood sample to the lower half of the sample pad by gently squeezing the bulb. Set a timer for 10 minutes. NOTE: It is helpful to record the reading time on the work tray. 5 Read test results 10 minutes after the sample has been added. NOTE: Record the appropriate result on the strip (preferred) or work tray. DO NOT read tests if the sample has not migrated ALL the way up the strip. Test Interpretation C T C T C T C T POSITIVE* NEGATIVE* POSITIVE (weak)* Any visible pink line in the test area should be interpreted as a positive result Control line only C = control T = test C T INVALID INVALID No lines appear Test line only *Scoring of test strips is useful but optional. Negative, 0; test line weaker than control line, 1; test line equal to control line, 2; test line stronger than control line, 3 An electronic version of this bench aid can be found at: http://www.ntdsupport.org/resources