Slide Conversion Tool for Photos with Photo Editor Tips
Easily convert JPG files to slides with captions using the provided macro tool. Improve photo quality with Microsoft Photo Editor. Resize, crop, adjust color balance for web page use. Learn how to add Photo Editor to your programs for easy access.

Slide Conversion Tool for Photos with Photo Editor Tips
E N D
Presentation Transcript
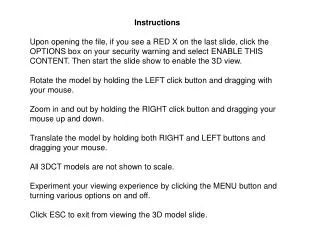
Instructions • Name all your JPG files for conversion to slide and picture captions. Avoid spaces and all capitals letters will have a space added in the captioning process. Place all the files for inclusion in one folder. • File-Open and browse to the folder with the desired JPGs & Cancel, because there is no PPT to load. You are just changing the default directory. • Tools-Marco-Run ‘LoadPicturesLandscapeWithCaptions’ and all JPGs will be pulled into PowerPoint and 2 HTM files in the default directory will be written, one to ‘display’ the pictures and that will hyperlink ‘index’ to the pictures.
Photo Improvement Tips • Open Microsoft Photo Editor program • Open your file • Use the Image menu to resize, crop, or change color balance • Is reasonable for a web page? • Did you try brightness, Red, Blue & Green? • Can part of the photo be discarded for room? • Save to your own folder See next slide for MS Photo Editor Program
Adding the Photo Editor Icon • If you can not locate Microsoft Photo Editor, add it to your programs in the Start Menu: • 1. Using Start-Menu -> Settings -> Start Menu & Taskbar load the explorer for your Start Menu. • 2. Choose the 'Start Menu Programs' tab and 'Add..' button. Note: 'Advanced' is a good tool to re-organize your program icon listings. • 3. Browse to: C:\Program Files\Common Files\Microsoft Shared\PhotoEd\PHOTOED.EXE and click 'Open' => 'Next' • 4. Put the icon where you can find it again, such as, 'Accessories' or your 'Desktop' and click 'Next' • 5. Rename 'PHOTOED.EXE' to 'Microsoft Photo Editor' and click 'Finish'