Download
1 / 6
60 likes | 60 Views
Click on the given link to know how to unvoid a check in QuickBooks enterprise. Dial (855)-526-5749 to get help from quickbooks experts. To know more: https://bit.ly/3frYpjm

E N D
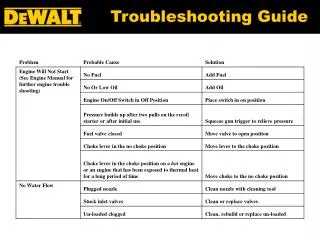
Troubleshooting guide for QuickBooks Error OL 301 QuickBooks accounting software records all the finances or transactions in the company file. In business, sometimes users didn’t get the money for their product or services, which creates a void transaction in QuickBooks that unbalances the report. However, QuickBooks allows users to unvoid a voided check to zero out the total discrepancy difference. Through this blog, we’ll discuss how to un-void a check in QuickBooks. So, read carefully till the end.
Unvoiding a check by re-entering the transaction in QuickBooks Online There is no way to restitute an unvoid check automatically in QuickBooks. You can re-enter the transaction manually by following the steps given below: Search the voided transaction and open it. Move to the end of the page and click More. Next, select Audit Trail. Choose Show All to view the original details of the transaction. Keep note of important information to enter the transaction again. On the browser, click on the back button and re-enter the voided transaction. After entering the correct transaction, the records will update automatically.
The steps given below will help you view the audit log and check the details of voided transactions: Steps to Verify the Voided Transactions First, click on the Gear icon. Then select Audit Log. Select the Filter button. Under the Events, choose Reconciliations. At last, click Apply. Once viewing, you can re-enter the voided transaction manually and then view the discrepancy report.
Following the steps given below, you can perform a mini-reconciliation for each month. Here’s how: Reconciling the Account Click on the Accounting menu. Then, choose Reconcile. Select the account you want to reconcile from the Accounts drop-down list. Enter the Ending balance and ending date for the month you are reconciling. After that, select Start reconciling.
The following steps help you re-create a voided check by reviewing the details from the Audit Trail: Recreate a Void Check First, go to the Reports. Select Accountant & Taxes. Choose Audit Trail. Now, view the details of the void check.
Conclusion That’s all about un-void a check in QuickBooks. We hope you find the blog informative. If you still have any doubts, get in touch with the QuickBooks technical support team by calling us on our customer service number (855)-526-5749.