1 / 9

EPSON 點矩陣印表機 LQ-300+ 發票紙張格式設定

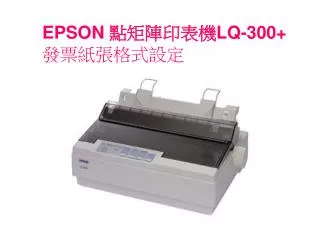
EPSON 點矩陣印表機 LQ-300+ 發票紙張格式設定. 1. 請先用 EPSON 的光碟片安裝 LQ-300 的驅動程式 2. 再新增發票格式 , 請點選 “檔案” -> 伺服器內容. 3. 請點選 “建立新格式” -> “ 單位” -> “ 英制” 寬度 8.5 高度 5.5 格式名稱 “發票” 點 “儲存格式” -> 確定. 4. 為了列印方便 , 還要新增一台印表機 , 但紙張格式不同 , 請點選 “新增印表機”. 5. 請點選 “ EPSON LQ-300+”, 並將印表機名稱改為 “發票”.

keola
Download Presentation

EPSON 點矩陣印表機 LQ-300+ 發票紙張格式設定

An Image/Link below is provided (as is) to download presentation Download Policy: Content on the Website is provided to you AS IS for your information and personal use and may not be sold / licensed / shared on other websites without getting consent from its author. Content is provided to you AS IS for your information and personal use only. Download presentation by click this link. While downloading, if for some reason you are not able to download a presentation, the publisher may have deleted the file from their server. During download, if you can't get a presentation, the file might be deleted by the publisher.

E N D

Presentation Transcript


  1. EPSON 點矩陣印表機LQ-300+ 發票紙張格式設定

  2. 1.請先用EPSON的光碟片安裝 LQ-300的驅動程式 2.再新增發票格式, 請點選 “檔案” ->伺服器內容

  3. 3. 請點選 “建立新格式” -> “單位” -> “英制” 寬度 8.5 高度 5.5格式名稱 “發票” 點 “儲存格式” ->確定

  4. 4. 為了列印方便, 還要新增一台印表機, 但紙張格式不同, 請點選 “新增印表機”

  5. 5. 請點選 “EPSON LQ-300+”, 並將印表機名稱改為 “發票”

  6. 6. 印表機新增完成 “發票”

  7. 7. 點 “列印喜好設定” -> “進階” -> “紙張大小” -> 選 “發票” -> “確定”

  8. 8. 點 “進階” -> “列印預設值” -> “進階” -> “紙張大小” -> 選 “發票” -> “確定”

  9. 9. 點 “裝置設定值” -> 在 “手動送紙” - “送紙器” 及 “曳引送紙 等三個地方都選 “發票” -> “確定” 若省略一部份, 會造成列印格式不對 10 設定完成

More Related