Download
1 / 52
520 likes | 644 Views
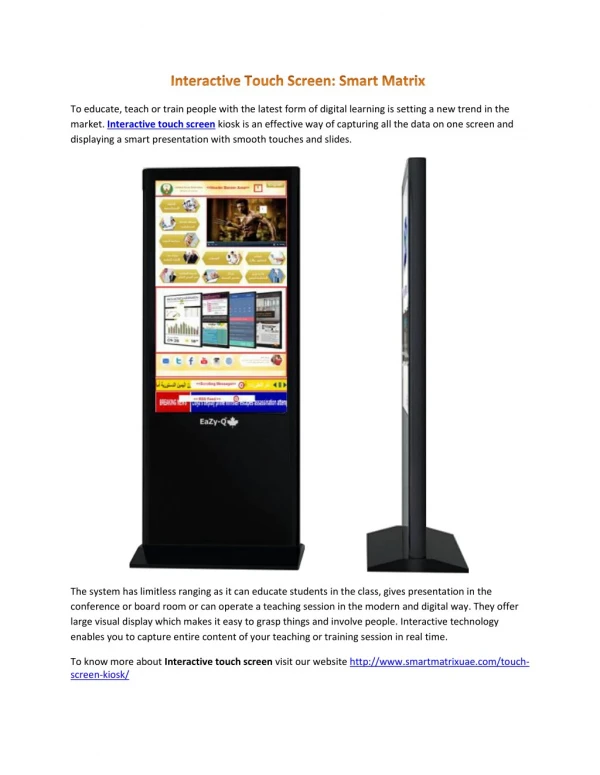
Touch Screen Time Clock. With Great Plains Manufacturing. Clocking In. There are six steps for clocking in:. 4. Manufacturing Order Entry 5. Sequence Entry 6. Labor Code Entry. 1. ID Entry 2. Password Entry 3. Pay Code Entry. 1. ID Entry. ID Entry.

E N D
Touch Screen Time Clock With Great Plains Manufacturing
Clocking In There are six steps for clocking in: 4. Manufacturing Order Entry 5. Sequence Entry 6. Labor Code Entry 1. ID Entry 2. Password Entry 3. Pay Code Entry 1. ID Entry
ID Entry • The default setup for the Time Clock ID is the Employee ID. • The Time Clock ID can be personalized. • Each employee must have a unique Time Clock ID.
Employee enters ID Employee hits “Enter”
Clocking In There are six steps for clocking in: 4. Manufacturing Order Entry 5. Sequence Entry 6. Labor Code Entry 1. ID Entry 2. Password Entry 3. Pay Code Entry
Password Entry • Passwords can be disabled which increases the efficiency of clocking in. • Passwords can be changed in Time Clock Employee Setup.
Employee enters her password Employee hits “Enter”
Clocking In There are six steps for clocking in: 4. Manufacturing Order Entry 5. Sequence Entry 6. Labor Code Entry 1. ID Entry 2. Password Entry 3. Pay Code Entry
Pay Code Entry • Pay Code selection can be restricted by day of week and time of day. • Employees who work different positions or shifts at different pay rates select the type of work for which they are clocking in. • This will open the MO Entry screen for production employees.
Employee chooses pay code and hits “Select”
Clocking In There are six steps for clocking in: 4. Manufacturing Order Entry 5. Sequence Entry 6. Labor Code Entry 1. ID Entry 2. Password Entry 3. Pay Code Entry
MO Entry • If the time is indirect labor, enter “none.” The sequence will automatically default to “none.” Production time will be posted to Data Collection as indirect labor. • Only MOs with a Firm or Partial Post are allowed to have time entered.
Employee enters the MO The MO can be looked up using the magnifying glass
Selecting an MO will open the Sequence Entry screen.
Clocking In There are six steps for clocking in: 4. Manufacturing Order Entry 5. Sequence Entry 6. Labor Code Entry 1. ID Entry 2. Password Entry 3. Pay Code Entry
The sequence can be looked up using the magnifying glass Employee enters the sequence
Selecting a sequence enters that information on the Clock In screen
Clocking In There are six steps for clocking in: 4. Manufacturing Order Entry 5. Sequence Entry 6. Labor Code Entry 1. ID Entry 2. Password Entry 3. Pay Code Entry
The Labor Code can be looked up using the magnifying glass The Labor Code is manually entered here. Checking the box to the right of the sequence entry field defaults the labor code for that sequence.
Selecting a Labor Code enters that information on the Clock In screen
Clock In • Touch Clock In to finish clocking in. • Touch Cancel if you do not wish to Clock In. • Clocking in will not add an entry to the Logbook. A time entry can only be added when the Change MO or Clock Out time is known, thus enabling hours worked to be calculated.
Employee clicks “Clock In” to complete the transaction
Enter Number of Pieces • You must enter the number of pieces completed, rejected, or scrapped before changing to a new MO or clocking out. • If the work is complete or has been set up, the quantities must be entered and the appropriate box checked before changing the MO or clocking out.
Change Project • Changing MOs will add a time entry to the Logbook for the previous MO. • The new MO’s clock in time will be exactly the same as the previous MO’s clock out time. No time will be lost on the employee’s payroll. • To change MO, steps 3-6 of Clocking In need to be repeated.
“Change ” is for employees who work using more than one MO in the course of one day.
Clock Out • The pay code, manufacturing MO, sequence, and labor code which were selected when clocking in will all be displayed. • Touch Cancel if you do not wish to Clock Out.
When the employee hits “Clock Out,” both her start and end times are shown, and her hours are entered in the Logbook.
Logbook • The Logbook may be accessed from both the Clock In and Clock Out screens. • The Logbook shows the time entries that were added by Changing MOs or Clocking Out. • The logbook can only be viewed, not changed, from the Time Clock.
Touch Today to view entries only from the current date. Use the browse buttons to view entries not displayed on the screen.
Calendar • The Calendar may be accessed from both the Clock In and Clock Out screens. • Logbook hours are shown in black. • Scheduled hours are shown in blue. • A red V indicates vacation pay, S indicates sick time, H indicates holiday time, and O indicates overtime.
The month, year, and date browse buttons can be touched to view times from various dates. Touch a specific date to display the Logbook for that day. Monthly totals of scheduled and actual hours are provided. For a visual representation of their time, employees may view the calendar.
Print Time Sheet • The Print Time Sheet screen allows employees to verify that their hours are correct. • The employee can choose to print either the current pay period or a past pay period. • Hitting Print will show a summary of the employee’s hours and a total for the pay period selected.
Hitting the “Print” button prints an employee’s hours to the screen or to a printer.
Company Messages • Messages may be sent company-wide, to a specific department, or to a specific individual. • Messages may appear when the employee clocks in, changes MOs, or clocks out. • The employee must acknowledge that they have read the message before completing their time transaction. • Would you like to see a couple of examples?
Touching Acknowledge deletes the message and returns the employee to their previous time transaction.
Time Clock Inquiry • This screen allows administrators to view the status of all employees. • Administrators can inquire as to who is clocked in and clocked out. • The Great Plains MO, sequence, and labor code will be displayed for each employee.
The Time Clock Inquiry screen is accessible only to administrators.
Time Clock Editing • Time Clock Editing allows administrators to change the time clock status of an employee. • Status entries or changes may be made to: times, dates, pay codes, MOs, sequences, and labor codes.
Time Clock Editing (Continued) • The employee’s clocked in/out status may be changed, or it may remain unchanged. • If the employee has a clocked out status, an entry will be made in the Logbook when Save is clicked; otherwise, the entry will be made when the time transaction is completed.
The Time Clock Editing screen is accessible only to administrators.
Employee Control Center • The Employee Control Center screen shows employee information entered in Dynamics Payroll. • Employees must be set up in Payroll before they can be viewed. • Payroll clerks use this window to edit entries or to make new ones.
Click Logbook to show the Logbook for the selected employee. Click Calendar to show the Calendar for the selected employee.
Employee Time Logbook • This screen can be reached through the Employee Control Center screen. • Unlike viewing the Logbook from the Time Clock, the Logbook can be edited from the Employee Control Center. • Only existing non-posted entries can be edited or deleted.
Employee Time Logbook (Continued) • Logbook time transactions automatically calculate weekly overtime. • The Time Logbook Report can be printed for supervisors to verify time entry accuracy. • Time can be entered and posted to Great Plains Manufacturing Data Collection and Payroll Transaction Entry without using the Time Clock.
Clicking the Print button prints a time card for the date range selected. Posted time entries are indicated by an X in the posted column. A range of dates can be displayed by clicking the From button and entering a starting and ending date range. x Clicking the Totals check box displays the total number of hours worked for the date range selected. Selecting a time entry displays that day’s text in this portion of the window.
Time Clock Navigator The Navigator shows the relationship between Time Matrix by Business Computers Software, Inc. and Manufacturing and Payroll by Great Plains Software.
Time Clock Navigator (Continued) • The Navigator makes it easy to start programs and to view their relationships. • The Navigator can be used to access programs in Time Matrix, Manufacturing, and Payroll. Clicking any button will open that form.
Time Matrix Navigator & Great Plains Payroll • The Time Clock uses employees entered in Payroll as lookups and verification. • GPS Data Collection posts production time transactions to payroll. • Employee’s check processing is completed in Payroll.
Time Matrix Navigator & GPS Manufacturing • The Time Clock uses MOs, sequences, and labor codes entered in GPS Manufacturing for lookups and verification. • Because the Time Clock looks at the actual Manufacturing data tables, any changes are immediately reflected in the Time Clock. • The Logbook posts production time to Manufacturing Data Collection.