Download
1 / 29
290 likes | 411 Views
Discover the capabilities and benefits of using Team Systems for productivity and integration within your projects. With support for SQL Server, efficient project management, and source control features including check-in/out, branching, and shelving, Team Systems promotes a collaborative environment. It enables partners to integrate their tools seamlessly, enhancing communication and visibility. Explore how to access project information through Team Explorer, generate dynamic reports, and utilize an integrated solution that supports third-party enhancements.

E N D
sy config
SY • Non-Student machines • SYTS • Team system • SY01 • Sql Server • Student machines • SY02 • SY03 • SY04 • SY05 • SY06 • SY07 • SY08
SY • SY • 16.7G (16380 MB) RAM • CPU #1 • Virtual Machines • SQL Server
SY • SYTS • 2G RAM • CPU #2 • 1 CPU reserved • Team Systems
SY • SY01 • 2G (2048MB) RAM • No CPU reserved • Max 1 CPU usage. • Relative weight higher than students • Max 16 GB hard disk • Optional Software
SY • SY02 • 1G RAM, 16GB HD max • CPU #4 • Max 1 CPU no reserved CPU • Student • SY03 • 1G RAM, 16 GB HD max • CPU #4 • Max 1 CPU no reserved CPU • Student
VS Team System Goals • Productivity • Easy to use. Short learning curve. • Integration • Frictionless data flow. • Extensibility • An integrated solution with support for third party improvements. • Partners can integrate team system functions in their systems like getting statistical data and work item tracking. • Partners can integrate their own tools to the team system. • Partners can enhance team system functions and change components like using third party database. • Increase communication and visibility (Who did what?).
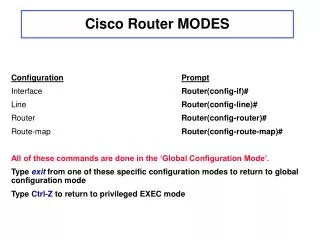
Opening a Team project • Tools Connect to Team Foundation Server… • Choose your server (http://syts:8080/). • Choose the project(s) you want to work on. Or do not choose any. You can create one in team explorer window. • Click OK. • ViewTeam Explorer…
Team Explorer • Integrated to the visual studio. • View Team Explorer. • Can work as stand alone. • What can be done? • Look at work items. • Bugs, My items, all …etc. • Documents • All docs related with a project. • Reports • Dynamic reports generated from statistics collected. • Go to project portal. • For accessing project information through an existing internet browser like Internet Explorer. • No need to install a new software to the users system. • Source Control • Opens “Source Control Explorer window”.
Source Control • Check-in, Check-out, Get a specific version. • Changesets. • Shelving • Branching • Diffing and conflict resolution • Workspaces
Checking-in and Checking-out • Atomic operation. • Either succeed as a whole or fail as a whole. • Check-out • You want to make changes to the file and make everyone know it. • Check-in • You made your changes. And want to submit it. The item is in a usable state. • The system creates a change-set for you. So your changes can always be undone. • Atomic operation. • Either succeed as a whole or fail as a whole. • No indeterminate state. • Get latest version • Want to get the latest version. • Will just use the file and make no changes.
How to Check-in/out? • Can use “solution explorer” or “Source Control Explorer” window. Both under View menu. Second one under “Other Windows” submenu. • Source control window. Global view of the source control items. • Solution explorer is always present. Easy to use. Just right click on an item and select your action. More specific view of the repository. Only items in the solution are visible. • Right click on the items and look for the menu option.
Changesets • Everything related to a single check-in operation. • You can go to the state of the system or a specific item after or before a changeset was applied to it. • You can branch from a specific changeset. • Branching is a saved state of the system. You can continue changing things in a branch. This will create versions. • We will talk about branching later.
Shelving • You made changes and want it to be protected in the system. • It is not complete. Others can’t use it yet. Interrupted in the middle. • It is night. Want to go home. But want to keep your changes in a safe place. • A more important work needs to be done before completing what you are currently working on. • Your friend wanted to look at his code. You made some changes to it but they are not complete. • It is in good state but you want other people to review it before checking it in.
How to use shelving? • Just like checking-in. But use shelve option. Name your version. • An important decision is do you want to keep your pending changes locally. • If you want to continue working on you can keep it locally. • If you are going to work on a totally different version. In which you don’t want your changes to appear. It may be better not keep it. Especially, if both work is related with the same file. You can unshelve it later. • After unshelving and completing your changes. You can check it in. During this check-in you can resolve the conflicts either by hand using merge tool or automatically.
Branches • Take a copy of the project at a specific state. And, work on it as a distinct copy of the project • Can continue working on the old version while developing the new one. • Merging is the process of merging two branches of a project into one.
How to create branch? • Use “source control explorer”. • Right click on the item under your team project. • Select branch. • Select branching criteria. • Choose a name for the branch.
Diffing and Conflict resolution • When you make changes to a file. It may conflict with other changes made to the file in the repository. • Can choose to automatically merge. • Resolve • Keep your changes. • Keep changes in the repository • Can use merge tool. • Selectively choose from each difference between your version and the version in the repository.
Workspaces • Mappings of the server repository folders unto your client side copies. • Changes in the workspace stay as pending changes till you check them in. • You can see the existing workspaces from “Manage Workspaces” dialog. • One way to reach it “FileSource ControlWorkspaces” • Who is working on which source control project and to which local folder does it map to. • Can’t find where you put your specific version of the project? • You are working on different versions of the same project. • You are reviewing another persons changes. • Create another workspace on your local machine with mappings to the particular persons changes or the whole project.
How to on workspace? • FileSource Control Workspaces…. • Can add a new workspace or edit existing ones. • See other workspaces on other machines or your local machine. • Using “Source Control Explorer” you can switch between different workspaces and add files to these workspaces by checking-out, or getting a specific version. • “Source Control Explorer” : ViewOther windowsSource Control Explorer.
Office Integration • Excel, M.S. project • A new “Team” menu is added to the main menu. • Both office tools are available in syXY machines. You can play with them. • Excel is good for work-item tracking. • M.S. Project for project planning. • Changes reflected on the repository and on the office tools. • There are videos on MSDN-TV related with office integration.
Back to team projects • Areas and iterations • Alerts • Work-items
Areas and iterations • Areas: categories with security info and restrictions. • Can put security restrictions to areas. • You can use specific Computer Science user names of people. Like “CPSC\user_name”. • Then give/take rights to/from the user. • Associate work items with areas. • Effectively putting security restrictions on work-items. Can make them viewable, changeable …etc. by only specific people. • This also groups them according to areas they belong to. • Iterations • Can assign work items to iterations. • Group work items by iteration. For example, we can see all work items related with development or testing iteration.
How to Areas and Iterations? • Team Explorer • Right click on the team_project_name you want. • Choose “Team Project Settings Areas and Iterations…” • To change the security settings for an Area • Go to Areas tab. • Select the area name. • Click “Security…” button at the bottom of the dialog box.
Alerts • When • My work items are changed by others • Anything is checked in • A build quality change • A build is done • Sent e-mail to a specific e-mail address. • Customizing • http://blogs.msdn.com/jefflu/ (From Noah’s book)
How to configure alerts? • TeamProject alerts…. • Check the alert type (leftmost column). • Write the comma separated list of e-mail addresses to the “Send to” column. • Example: “name surname<name@domain>, name2@domain2” • Choose format • HTML seems like a good choice most of the time.
Work items • Have types. • Types available depends on the Process Template chosen for the team project. • In “MS for agile…” Process Template: Bug, quality of service requirement, risk, scenario and task • Can create work-item queries or use existing ones. • New work item types can be created and customized for specific needs and processes. • http://msdn2.microsoft.com/en-us/library/ms404850(VS.80).aspx
How to modify Work-item type? • StartAll programs Microsoft Visual Studio 2005 Visual studio tools Visual studio 2005 command prompt. • Witexport /f path_toxml_file.xml /t TFS_server_name /p project_name /n “work_item_type_name” • Open path_toxml_file.xml. • Modify it according to your needs. • Save it. • Witimport /f path_toxml_file.xml /t TFS_server_name /p project_name • This is project specific • http://msdn2.microsoft.com/en-us/library/ms400654(VS.80).aspx
Conclusion • You can always come and ask questions. • If we don’t know the answer at that time, we will search for it. • If you find the answer yourself, let us know. Other people may have the same problem.