User guide SIM31 / 63
230 likes | 361 Views
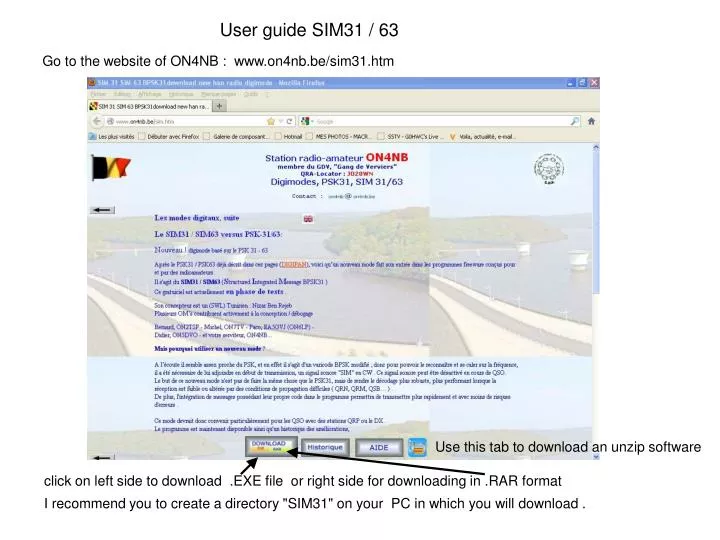
User guide SIM31 / 63. Go to the website of ON4NB : www.on4nb.be/sim31.htm. Use this tab to download an unzip software. click on left side to download .EXE file or right side for downloading in .RAR format.

User guide SIM31 / 63
E N D
Presentation Transcript
User guide SIM31 / 63 Go to the website of ON4NB : www.on4nb.be/sim31.htm Use this tab to download an unzip software click on left side to download .EXE file or right side for downloading in .RAR format I recommend you to create a directory "SIM31" on your PC in which you will download .
Reminder : to create a folder named “SIM31” I am in " My Documents " left click on file Then "New" left click on "File" This will open a folder called "New Folder" Name it "SIM31" or any name you want, then type ENTER You have just created the folder SIM31 If the folder was closed inadvertently, right click on your " new folder “ and rename it as "SIM31" and this is what you'll get
After clicking download RAR file, the download window does open ; eg. here Internet Explorer Left click on "save" find the folder "SIM31" you created double-click on it to open You should have this Click on "SAVE"
after downloading click on "close" Locate and open your file SIM31 You got a file compressed in .RAR
If you have a software to unzip right click on the file to open menu then left click on "Extract here" If not , you can get one on the website of ON4NB After decompression you should have this
User guide SIM31 / 63 For convenience, I have created a shortcut on the desktop Note The shortcut must be replaced for each new version Right click on icon "SIM31" and choose "copy" Right-click on the desktop and select "paste shortcut" double click left on the shortcut to open the software Window used to choose the sound card Choice of the sound card, Input / Output switching PTT by RTS, DTR or CAT Setting maximum output audio level check for using the CAT command COM port to use with PTT or CAT write specific command string adapted To your TX brand : eg: TX; RX; Click the black lifts to choose the interface used for input and output My configuration
At starting the software gives a few informations on how to use main functions Just click OK to continue and go to the settings ( at first use ) . Your settings will be automatically saved in the file "personal.cfg" which must be in the same directory as the program
Click Left button on "SETTING" and then "Personal" Easy to understand Check to send WX You could add comments Check boxes of QSL services you are using Number of repetitions. In SIM mode, informations are transmitted much faster than in PSK mode After having filled in the needed fields, click on OK
Click Left button on "SETTING" and then “Station” Left click on the black lift of each window, for choosing your TX, antenna, interface, Power, and level of antenna above ground I make similar for the rest If you see " TEST OF " in front of your callsign when calling, it is because you didn’t enter the CALL of your opposite number, (the window on the upper right of main screen is probably empty ) Left click on OK
Click Left button on "SETTING" and then “Macro” Possible choice of several CQ Check this box to send CW idle "SIM" before each message , allows to identify SIM mode Check this box to send a TUNE before the CQ (to help the reception setting ). Delay for automatic sending of CQ Check this box allows to send automatic CQ Adjusting the transmission duration of the "Tune" Left click on OK
Click Left button on "SETTING" and then General Sound + Com ports When a file "personal.cfg" already exists, parameters are reloaded. Nevertheless this window opens when starting SIM-PSK31 and can be modified by user... Setting maximum output audio level Choice of the port COM to use for PTT In new releases 52xx, if you use CAT, these ASCII strings are to convert into Hexadecimal characters Left click on Log Is not active if there are no QSO data to save It’s easier to understand When there are CALLS in it. Be careful while filling information in the log-book because it is locked. It can't be modified afterwards. If necessary, it can be deleted. ( in project : use of ADIF format )
Left click on OPTION To change the color of texts To change the color of the bottom of screen of the received texts To change the color of the vertical cursor To change the color of the line of reception To change the background color screen of the signal of reception To change the color of barograph, giving the audio input level To go back to original colors Left click on "Clear-Screen" deletes all texts displayed in reception window Received texts Screen background Vertical cursor Screen displaying signal reception Line of reception Audio level input barograph
Procedure for using SIM31 Calling CQ is easy QRZ is as easy Maintain depressed the mouse left button on “TUNE” When you decode a calling Double click with left button on the callsign This window opens and allows to choose amongst the various functions I check CALL Left click on OK
The callsign appears in the first window Don't forget to choose the right QRG To answer the station, click the left button "REPLY"
When he answers you, the program sends the information that you entered during the configuration Double click left button on Name The window opens again and allows you to check "NAME" Repeat the same procedure for "QTH", and then "LOCATOR" double-click left on report (599) to write it into "MY S" You should see the window filled like this Now, answer to him by clicking on left button, on "MY INFO"
Transmission of "MY_INFO" click left button The macros are predefined ; check the box on the right to activate a message, then, use the black lift to choose an integrated text Check the box to insert a free comment and include in it, the NAME and/or QTH of your contact All checked option is sent but you can leave all them blank ! nothing will be sent Left click "Insert Header" to send it at the beginning of transmission Left click on "KEYBOARD TX" to send all the chosen macros after having typed your message You can insert a free comment and include NAME and/or QTH . A message written in the black window will be memorized for all further contacts Choice of the macro to be transmitted after the above message Check TU = back to you, the QSO will be continued - END = last round ; Ending QSO Left click on "ALL TX" will send the checked choices in the continuity of first window
Here above is a transmission with choice of the macro in header and "TU" checked. And hereunder , with “END” checked for ending QSO
The transmission of info "STATION" is done by same procedure as for MY_INFO The macro are predefined ; check the box and then click the black lift to choose the text Check the box to insert a free comment and include in it, the NAME and/or QTH of your contact if needed All checked option is sent but you can leave all them blank ! nothing will be sent Left click "Insert Header" to send it at the beginning of transmission Left click on "KEYBOARD TX" to send all the chosen macros after having typed your message You can insert a free comment and include NAME and/or QTH . A message written in the black window will be memorized for all further contacts Choice of the macros to be transmitted after the above message Check TU = back to you, the QSO will be continued - END = last round ; Ending QSO Left click on "ALL TX" will send the checked choices in the continuity of first window
The transmission of info “TEXT" is done by same procedure as for MY_INFO The macros are predefined ; check the box on the right to activate a message, then, use the black lift to choose an integrated text Check the box to insert a free comment and include in it, the NAME and/or QTH of your contact if needed All checked option is sent but you can leave all them blank ! nothing will be sent Left click "Insert Header" to send it at the beginning of transmission Left click on "KEYBOARD TX" to send all the chosen macros after having typed your message. ( you can continue to write during transmission ) You can insert a free comment and include NAME and/or QTH . A message written in the black window will be memorized for all further contacts Choice of the macro to be transmitted after the above message Check TU = back to you, the QSO will be continued - END = last round ; Ending QSO Left click on "ALL TX" will send the checked choices in the continuity of first window
Transmission of " 73 bye " same procedure as MY_INFO or STATION : left click on the button Good news there is now a window to send your personalized message Left click on "KEYBOARD TX" to send all the chosen macros after having typed your message. ( you can continue to write during transmission ) Check the box to insert a free comment in black window and include in it, the NAME and/or QTH of your contact if needed The macros are predefined ; check the box on the right to activate a message, then, use the black lift to choose an integrated text You can leave all them blank ! nothing will be sent Choose END at last round to finish the QSO Left click on ALL TX All the choices are transmitted You will see this
The function « TCHAT » You type your text in the CHAT window The Kings of keyboard are going to feast Click "START TX" to start the text transmission while you continue to type your message As it is a chat window, the text in it will not be kept If you finished your message, click left " TX ALL AND CLOSE " this will end the transmission by sending your callsign and will close the window If you check "Save Text" the next click into the CHAT window will save the text Here is the transmission of the TCHAT window
The screen in transmission : a small blue logo shows the mode in use The screen in reception of a signal "SIM31" the green logo " REWIND " becomes purple and indicates PSK31, a bug? It is really a signal "SIM31" I don't think so... The signal is probably saturated, the eye diagram doesn't show the straight losanges as usual, hence this hesitation of squelch to display something SIM 31 SIM 63 To go into mode SIM63, click right button on the vertical cursor, the color changes to white. When you click left again you go back to SIM31 Every mode change is notified on the screen. Of course, all these functions are the same for modes PSK31 and PSK63
Here is an extract of my log Yes with NC5O, we made tests on on four bands 30/09/2012; propagation was with us For our tests we have found ourselves on http://www.obriensweb.com/sked/index.php?board=digitalradio I would like to tell that I work with Signalink on USB port . The setting "Inp Vol" was always too low as you can see on the screen-shot, but despite that, it was decoded . Nizar, who conceived the software SIM-PSK has found the solution in TiggerTronic's datasheets. I just had to open my Signalink and put a Jumper JP2 behind the marked button RX 2 You can see on the next picture how was improved the level "Inp Vol" ; furthermore I can now control the reception by the RX button of my "Signalink". The cursor must be approximately in the middle. F1ABL Michel