Download
1 / 30
320 likes | 497 Views
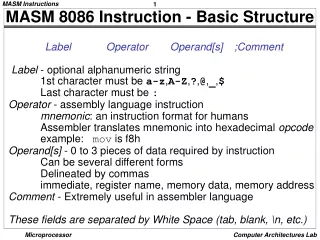
MASM CODEVIEW TUTORIALS. 1. Download the package MASM 6.14 2. Unzip the package to a folder name MASM32 or MASM 6.14 anywhere you like.

E N D
1. Download the package MASM 6.14 • 2. Unzip the package to a folder name MASM32 or MASM 6.14 anywhere you like.
3. Set the path to the compiler. Open “My computer”, right click and select “Properties”. Select “Advanced” -> “Environment variables”->”Path”. Click “Edit” and add “;c:\masm32\bin” to the path
4. Check the installation by opening the command prompt window (Start->Run->cmd) • and typing ML at the command prompt
Now you can use almost any text editor to create an assembly program. In this example, we will use Microsoft’s EDIT. Type “edit example1.asm” on the command prompt and enter the text of the program. • Save the file by “Alt-F”,”Alt+S”. Exit “Alt-F”,“Alt-X”
8. Compile and link the assembly file by issuing “ml /Zi example1.asm” Notes: The letter Z must be capital.Different way: masm/zi example1; Compilinglink/co example1; Linking Linking is the final stage of compilation. It takes one or more object files or libraries as input and combines them to produce a single (usually executable) file.
Now lets start and configure the Code View debugger. Type “cv example1.exe’ at the command prompt. • Enter “Alt-W” and make sure that you have the following windows on the screen: - Code 1 - Registers - Memory 1 • Press “Alt-F5” to arrange the windows on the screen.
Now lets set the options. “Alt-O” -> Preferences. Set the options as shown and click “ok”.
“Alt-O” - >”Memory 1 window” • Make sure to mark X over Re-evaluate expression always field.
Now lets step through the program and observe execution of each instruction. - Press “F10”. - The debugger will show execution of the first line of the prolog. - Press “F10” until instruction “MOV AX,0” is highlighted. This is the first instruction of your program.
Observe the value in the register EAX. Register AX contains number 09DFH.
Now press “F10”. The debugger will execute the highlighted instruction. • Note the change in the content of EAX and the fact that the register has been highlighted by the debugger, indicating the change.
The highlighting the code window moved to the next instruction. • Note that the line of the source code “MOV AL, VAR1” became“MOV AL, [000C] where 000CH is the actual offset of VAR1 in the data segment. You can check that this is true by checking the content of memory location DS:000CH in the data window. • Now execute this instruction by pressing “F10”. Content of the register AL changed, taking the value from the VAR1.
The next instruction is “MOV BX, OFFSET VAR2”. VAR2 follows VAR1 in memory and has offset of 000DH. This is the value that will be placed into the BX upon execution of this instruction. Press “F10” to execute.
The following instruction “MOV [BX], AL” will copy the content of AL into the memory location pointed by BX within the data segment. After the previous instruction BX contains the offset of the first byte of VAR2 or 000DH. That is where the data from AL will appear. Press “F10” to execute. • Note the debugger also highlighted changes in the data window.
Instruction “MOV [BX+1], AL” will copy the content of the register AL into the memory location with offset equal whatever the number is in BX plus 1. In our case BX=000DH, then the offset is 000DH+0001H=000EH. That is the second byte of the VAR2. Press “F10” to execute. Note the change in the memory content.
Instruction “MOV EAX, 12345678H” will place number 12345678H into the register EAX. Press “F10” to execute.
The instruction “MOV VAR3, EAX” became “MOV DWORD PTR [000F], EAX”. • VAR3 has been replaced by the actual offset (000FH) of VAR3 in the data memory. This instruction will take the content of the EAX and place into the four consecutive bytes of memory (a 32-bit variable) starting with the offset 000FH. Press “F10” to execute.
That was the last instruction of the user program. The remaining instructions are generated by the .EXIT directive and serve to terminate the program. Press “F10” until the process terminates.
Examples .Model small .data var1 db 33h var2 dw 0101h var3 dd 0AAAA5555h .code .386 .startup mov ax,0 mov al,var1 mov bx,offset var2 mov [bx],al mov [bx+1],al mov eax,12345678h mov var3,eax .exit END
Examples NOTE: If the .startup directive is used (MASM version 6.x), the Mov Ax,@data followed by Mov DS,AX statement can be eliminated. .Model small .data array DW 20 DUP(?) .code Mov Ax,@data Mov DS,AX Mov ES,AX mov DI,OFFSET array Mov Bx,05H Mov CX,20 L1: Mov [DI],Bx ADD DI,2 loop L1 .exit END
Examples NOTE: In new versions of MASM, the assembly program can be complied successfully without using .startup directive. .Model small .data array DW 20 DUP(?) .code .startup mov DI,OFFSET array Mov Bx,05H Mov CX,20 L1: Mov [DI],Bx ADD DI,2 loop L1 .exit END
Examples 'DATA’ is an optional field: gives important Information to the assembler for organizing The segment, but is not required. DATA_SEG SEGMENT 'DATA' array DW 20 DUP(?) DATA_SEG ENDS CODE_SEG SEGMENT 'CODE' MOV AX, DATA_SEG MOV ES, AX MOV DS, AX mov DI,OFFSET array Mov Bx,05H Mov CX,20 L1: Mov [DI],Bx ADD DI,2 loop L1 CODE_SEG ENDS END NOTE: In new versions of MASM, the assembly program can be complied successfully without including the following instructions: MOV AX, DATA_SEG MOV ES, AX MOV DS, AX
Examples • Notes: • The ASSUME statement is needed because a given assembly language program can have several code segments, one or more data segments, and more than a stack segment, but only one of each can be addressed by the CPU at a given time since there is only one of each of the segment registers available inside the CPU. Therefore, ASSUME tells the assembler which of the segments defined by the SEGMENT directives should be used. • Procedures: • FAR corresponds to the term global which denotes for a procedure that can be used by any program. • NEAR corresponds to the term Local which defines a procedure that is only used by the current program. DATA_SEG SEGMENT 'DATA' array DW 20 DUP(?) DATA_SEG ENDS CODE_SEG SEGMENT 'CODE' ASSUME CS:CODE_SEG, DS:DATA_SEG MAIN PROC FAR MOV AX, DATA_SEG MOV ES, AX MOV DS, AX mov DI,OFFSET array Mov Bx,05H Mov CX,20 L1: Mov [DI],Bx ADD DI,2 loop L1 MAIN ENDP CODE_SEG ENDS END MAIN ; or just END
Still not clear how to work with the CodeView debugger? • Here is additional tutorials you can go through. CodeView tutorial • http://www.nuvisionmiami.com/books/asm/cv/index.htm Debugging • http://www.math.uaa.alaska.edu/~afkjm/cs221/handouts/debugging.pdf