Download
1 / 25
250 likes | 381 Views
PlanetLab. www.planet-lab.org. What is PlanetLab ?. A group of computers available as a testbed for computer networking and distributed systems research. computers located in more than 40 countries allows researchers to run their experiments in a real world scenario

E N D
PlanetLab www.planet-lab.org
What is PlanetLab? • A group of computers available as a testbed for computer networking and distributed systems research. • computers located in more than 40 countries • allows researchers to run their experiments in a real world scenario • on nodes which are thousands of miles apart • Initiated in 2002 by Dr. Larry L. Peterson • As of Mar 2014 is composed of 1184 nodes at 577 sites worldwide
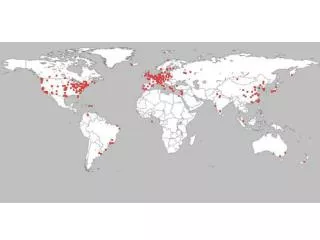
PlanetLab is… • Large collection of machines spread around the world for distributed systems research • Can deploy and run code in Seoul, San Francisco, Rio de Janeiro, Moscow, Mumbai, … • Most major Universities now host sites
The value proposition • Institutions join, provide nodes • IA32 architecture servers • Hosted outside the firewall • Provide power, cooling, & bandwidth • In exchange, researchers get to use a small “slice” of many machines worldwide.
PlanetLab is not… • A distributed supercomputer • A simulation platform • An Internet emulator • An arena for repeatable experiments • Completely representative of the current Internet
PlanetLab is… • An opportunity to qualitatively validate distributed systems research in a real deployment environment • An opportunity to gain valuable experience about what works and what doesn’t in the wide area at scale
What is it good for? • PlanetLab addresses the related problems of: • Deploying widely-distributed services • Evaluating competing approaches in a realistic setting • Evolving the network architecture to better support such services
How to use PlanetLab • Don’t expect: • Repeatable experiments, other than very long-running studies • Large numbers of nodes (approx 1000) • Lots of CPU (machines are loaded!) • High availability • machines reboot without warning • Do expect: • The unexpected! • Real experience running a service • Real users (if you want them) • Lots of interesting challenges • To find out if your idea really works
Introductıon to PlanetLab • Principal Investigator. PI is the controller of PlanetLab nodes at a particular site and is responsible for everything being done by users of the site. He gives approval of new user accounts, creates slices, etc. • Technical contact. He is responsible for installing PlanetLab operating system on new nodes, monitoring of nodes and day to day maintenance if required. • User. Actual user who conducts experiment on PlanetLab. • PLC. It is an abbreviation for PlanetLab Central. PLC is the main controller of PlanetLab. They provide basic interface for controlling and managing slices and nodes. • Site. A physical location where nodes have been kept e.g. University of Nevada, Reno • Node. Actual computers provided by the participating universities / organizations. Minimum of two nodes have to be provided by each participating university / organization. Linux operating system runs on these computers. • Slice. It is a network wide resource container. A maximum of 10 slices can be created by Principal Investigator of a university and only two slices by Principal Investigator of an organization. Any number of Nodes can be added to a slice. Slices can only be created by Principal Investigator but users can add nodes to them. • Sliver. It is actual allocated resources on a node. Slivers are implemented using Linux
How to use PlanetLab • Create an account on planet-lab.org Select: “university of Nevada, Reno” as Site
Registering planet-lab.org • After registering, your registration request goes to site_admin • Site_admin should approve your request • After site_admin approves your request, your account is created.
Using nodes • There are two nodes (servers) in UNR that are allocated for planet-lab.org • These nodes are under administration of UNR PI (site_admin) • To be able to user these nodes for your experiments • You have to be assigned to a slice by PI (site_admin) • After you are assigned to a slice, you can add as many nodes as you wish to your slice • The nodes that you want to add into your slice don’t have to be just UNR nodes • You can add nodes from different universities, organizations, etc.
Connecting to your slice • To be able to connect to a slice you need to use SSH • Secure Shell (SSH) is a cryptographic network protocol for secure data communication • You can either use Linux (preferred) to connect to your slice or you can connect to you slice using Windows
Connecting from Windows • Following software can be used to access PlanetLab nodes using Microsoft OS. • Putty. It is used for making connection with remote PlanetLab node. • Putty gen. It is used for generating public and private key pair. • PSCP. It is used for transferring files to remote nodes. • All these software are executable programs therefore there is no need to install them. They can be downloaded for free from the following address : http://www.chiark.greenend.org.uk/~sgtatham/putty/download.html
Key generation • In order to communicate with PlanetLab nodes you need public/private key pair. • Putty generator will be used for creating public and private key pair. • In putty generator GUI, select SSH-2 & 1024 as number of digits in key and then press generate key.
Generating Private Key • Click ‘Save private key’ and copy public key form putty generator window and save it in a text file.
Key Upload • Go to PlanetLab’s web site and open your account. • Select ‘My Account’ sub menu and click on ‘Key’. • It will display browse and upload option. Upload the text file containing the public key.
Adding Nodes to Slice • Open your account and go to ‘My Slices’. • Click on your slice name. • It will display list of nodes which are part of slice. • Select and click in front of nodes which you want to add to your slice and click on ‘add selected’. • It will only be possible if Principal Investigator has already created slice for you.
Communicating with your slice • Open putty by double clicking on it. • Select session and write down IP address of the remote node. • Assign this session a name in ‘Saved Sessions’ and click ‘Save’. • Click on ‘Auth’ under ‘SSH’ category given on left plane. • Browse and point to the place where file containing private key was saved. • Click on ‘Open’. If everything goes fine, then a command comm window with active prompt & name of slice will open. • You can type ‘pwd’ to see path of your current directory and ‘ls’ to list files’ names in this directory. • At that moment, there will be no programs installed on the remote node.
Connecting from Linux • Create an SSH key • Before you can access any PlanetLab nodes, including those at your own site, you must create an SSH key pair for authentication purposes. • Remote access to PlanetLab nodes is restricted to SSH login using RSA authentication. • RSA authentication is based on public-key cryptography. • Encryption and decryption are performed with separate keys • It is not possible to derive the decryption key from the encryption key • To generate an SSH key pair, use the ssh-keygen program on a secure UNIX system: ssh-keygen –t rsa –f ~/.ssh/id_rsa
Connecting from Linux • Upload the public key under the directory of /.ssh (this file is in hidden format) to your account in planet-lab.org • Assign nodes to your slice using planet-lab.org interface. • You can now connect to your slice by typing: ssh –l name_of_slice –i ~/.ssh/id_rsa planetlab1.unr.edu IMPORTANT !! After you upload your public key to your account, you have to wait about an hour for it to be active. If you are using putty, after connecting, it may ask “Login as:” and you should enter your slice name here.
Uploading files to Nodes (with putty) • PSCP will be used to copy program to remote node. • PSCP is command line tool. • Open it in command prompt by typing PSCP (inside the putty directory). • Syntax for copying file to remote node is as under : C:\>…\putty>pscp -scp c:\file name plab:/home/canterbury_slice1 • First part ‘-scp ’ is forcing PSCP to use scp protocol • second part ‘c:\file name’ is location and name of the file to be copied • third part ‘plab’ is name of session saved in Putty • last part ‘/home/canterbury_slice1’ is location on remote node where the file has to be saved. This location can be found by typing ‘pwd’ in command comm of remote node.
Uploading files to Nodes (with Linux) • The most straightforward way of deploying your application to a single node is with scp: • If your slice were named unr_test1, the above command would recursively copy the local directory test1 to your home directory on planetlab1.unr.edu. scp -i ~/.ssh/id_rsa –r test1 unr_test1@planetlab1.unr.edu