The Writing Process
The Writing Process. 1. Pre-Writing. Have you ever sat staring at a blank piece of paper? You probably skipped the vital first stage of the writing process: prewriting . This covers everything you do before starting your rough draft. As a minimum, prewriting means coming up with an idea!

The Writing Process
E N D
Presentation Transcript
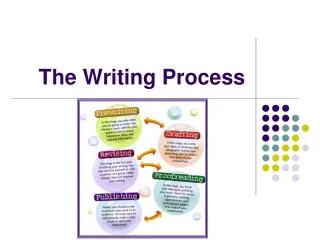
1. Pre-Writing • Have you ever sat staring at a blank piece of paper? • You probably skipped the vital first stage of the writing process: prewriting. • This covers everything you do before starting your rough draft. • As a minimum, prewriting means coming up with an idea! • Your story journals are a way to help you!
1. Pre-Writing Ideas are all around you. • Self & Scene Awareness! • If you don’t have any ideas, try: • Using a writing prompt to get you started. • Writing about incidents from your daily life. • Using your story journal – make sure you’re jotting down those thoughts that occur throughout the day. • Once you have an idea, you need to expand on it. • Don’t make the mistake of jumping straight into your writing – you’ll end up with a badly structured piece.
1. Pre-Writing Building on Your Idea • Here are two popular methods you can use to add meat to the bones of your idea: 1. Free writing: Open a new document, and write everything that comes into your head about your topic. Don’t stop to edit!
1. Pre-Writing 2. Brainstorming: Write the topic in the center of your page. Jot down ideas that arise from it – sub-topics or directions you could take with the article. • Meet the Topic Spider: Once you’ve done one or both of these, you need to select what’s going into your first draft.
1. Pre-Writing Planning and Structure • Some pieces of writing will require more planning than others. • Typically, longer feature pieces need a lot of thought at this stage. • Inverted Pyramid News is pretty straight forward. • First, decide which ideas you’ll use. During your free writing and brainstorming, you’ll have come up with lots of thoughts. Some are keepers … some aren’t. • Then, decide how to order those ideas. Try to have a logical progression.
2. Drafting / Writing • Sit down with your plan beside you, and start your first draft (also known as the rough draft or rough copy). • At this stage, don’t think about word-count, grammar, spelling and punctuation. Don’t worry if you’ve gone off-topic, or if some sections of your plan don’t fit too well. Just keep writing! • You may go through multiple drafts … no-one gets it right first time.
3. Revising • Revising your work is about making “big picture” changes. • You might remove whole sections, reorder subtopics, rewrite entire paragraphs, and add in information which you’ve realized the reader will need. • Everyone needs to revise – even talented writers. • The revision stage is sometimes summed up with the A.R.R.R. • A.R.R.R. Adding, Rearranging, Removing, Replacing.
4. Proofreading / Editing • The proofreading and editing stage is different from revision, and needs to be done after revising. • I recommend getting the help of a parent or peer! • Proofreading involves the close-up view of individual sentences and words. • It needs to be done after you’ve made revisions on a big scale. • When proofreading, go through your piece line by line, and make sure that each sentence, phrase and word is as strong as possible … edit accordingly!
4. Proofreading / Editing Check to see… • Have you used the same word too many times in one sentence or paragraph? • Use a thesaurus to find alternatives. • Are any of your sentences hard to understand? • Rewrite them to make your thoughts clear. • Which words could you cut to make a sentence stronger? • Words like “just”“quite”, “very”, “really” and “generally” can often be removed. • Are your sentences grammatically correct? • Keep a careful look out to stay consistent in your use of the past, present or future tense. • Is everything spelt correctly? • Don’t trust your spell-checker – it won’t pick up every mistake. Proofread as many times as necessary (Sometimes it helps to do it on paper!) • Have you used punctuation marks correctly? • Commas often cause difficulties.
5. Publishing • The final step of the writing process is publishing… • In our case, you need to produce a final copy of your work, in the correct format. • Typed & Printed – Microsoft Word document • 12 pt Times New Roman font • Double spaced • Don’t indent for paragraphs (double space down) • Don’t need to layout in columns unless you want
Stage One… • Pull out your story journal and select a topic or write down a new one that will be the subject of your first article. • This will be a feature article. • Draw a topic spider with main subject in the middle and brainstorm leg ideas for your article. Show me your topic spider. • Next, we’ll look at how a feature story is developed, so as you move to stage 2 (drafting), you know how to write your story.