EXCEED Training Completing the IEP 2012
910 likes | 930 Views
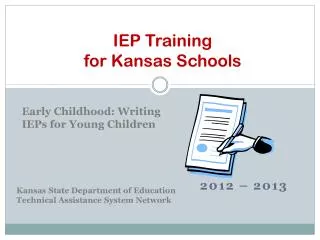
EXCEED Training Completing the IEP 2012. Dashboard. Open/Close. Dashboard. Refresh. Quicklink. Look Back. Look Ahead. Student List Filter. Expand/ Collapse. Finding Your Students. Using the Student List Panel Filter. The Student List Panel can be filtered using the drop down.

EXCEED Training Completing the IEP 2012
E N D
Presentation Transcript
EXCEED Training Completing the IEP 2012
Dashboard Open/Close Dashboard Refresh Quicklink Look Back Look Ahead Student List Filter Expand/Collapse
Finding Your Students
Using the Student List Panel Filter • The Student List Panel can be filtered using the drop down. • Choose the Student List you wish to view. • My Caseload: all students on your • My Watch List: students added to your Watch List by your or another user • My Progress Monitoring (not in use at this time) • My Services: all students for which you provide a service • My Programs>Special Ed: all students for which you are the Case Manager
Searching for Students Not on yourMy Caseload Panel • Choose “Student Search” from Student List Panel Filter • Expand Search panel directly below “Student Search” • Enter student’s Last Name, First Name or Student ID (best choice if known) • Click Search • Results will display in panel directly below the Search panel
Locate a Student for training • Choose My Programs > Special Ed • Students you case managed as of April 9, 2012 should appear on panel • If you used a training login, or no students appear, choose Student Search and Search for one of your students • Click the name of the student you would like to use
Student Profile Navigation
Student Profile Navigation Navigation Panel
IEP Snapshot IEP Snapshot
Open Events Panel • Click Events on the Student Navigation Panel • No Events are available on Invited Events • Remember – Always click All Events
Viewing Ended and Locked Events • Click on Options Menu Icon (the blue cog) next to the event you wish to view • Select View from drop down options • Entire document appears as PDF in separate window or tab depending on browser
Notification of Meeting – Annual IEP
Notification of Meeting – Annual IEP • Notification of Meeting is linked to Annual IEP • Click Meeting Manager to open NOM • After clicking “All Events” both Current and Upcoming Events, & Ended and Locked Events are visible
Notification of Meeting • To view form, click Notice of Meeting on Event Sections panel • Can be backdated • Click Save • Click Event Overview
Notification of MeetingCheck Compliance • Form Status is “Blank” until Compliance is checked • Click Compliance • Message appears indicating event is compliant • Click OK
Notification of MeetingSend Invite • When Notification is Compliant click Send Invite • Choose Invitation Attempt Reason and click Save
Notification of MeetingPrinting • Click OK • PDF of Notification opens • Use PDF controls to print
Viewing Saved NOMs • Open Notification of Meeting • Click Previous Invites • Click Custom/Edit icon • PDF opens
Annual IEP – Event Click the Meeting Manager icon next to the Annual IEP event to begin completing the forms. The Annual IEP has several sections. To view forms click on the name of the section on the Event Sections panel.
Using EXCEED Help • To open EXCEED Help click the Help Icon (the question mark) • Choose Event Help or Form Help – can only choose Event Help when on Event Overview
Event Help • Event Help page – links to all form and screen help • Screen Help only available from Event Help page
Front Page Section – Plan Dates • Plan Dates are effective dates of the IEP (the Plan) • Automatically calculated based on Meeting Date from Notification of Meeting • Critically important that these dates are correct • IEP cannot be locked with incorrect Plan Dates
Front Page Section – Plan Dates • Dates must follow rules on the screen • Initiation Date must match Service/Goal Start Date and must be the same as or later than the Meeting Date • IEP/SP End Date and Service/Goal End Date must match the Projected Annual Due Date (calculated from Meeting Date)
Form Help Form Help page – use anchors on left to navigate Choose Form Help
Front Page Section – Front Page IEP • Some fields previously autofilled must be completed by the user • If additional space is needed choose “Additional Participants” at the bottom for new page
PLAAFP Section – PLAAFP • Text fields expand • Can type or copy/paste • All providers enter information on the PLAAFP
Special Considerations • If Yes is chosen for section requiring a form – the form is created as a tab at the top of the page (i.e. Form D)
Special Considerations-Form A This form will be completed by a Teacher of the Visually Impaired.
Special Considerations-BIP • Complete required fields. Click Save. • Questions about the content or use of this form should be directed to the SSD Administrator
Special Considerations – Form B • Can only select “The student is eligible”. • ESY Services are entered on Services Screen and print on Form B.
Special Considerations – Form C • Can choose more than one Responsible Person using checkboxes. • Text fields are expandable.
Special Considerations – Form D – Part 1 (Grades 3-8) • Used for MAP, NAEP and WIDA-ACCESS • Indicate which tests will be taken or enter MAP-A information • Accommodations are entered on Accommodations screen and print with Form D-Part 1
Special Considerations – Form D – Part 1 (High School) • Used for EOC, NAEP and WIDA-ACCESS • Indicate which tests will be taken or enter MAP-A information • Accommodations are entered on Accommodations screen and print with Form D-Part 1
Special Considerations-Form E • If “The student WILL ..” participate in district testing, complete top section. • Accommodations are user entered (no drop downs). • If “The student WILL NOT . . . “ participate, complete bottom section.
Accommodations – State/National Assessments – MAP • For MAP leave Testing Decision as “Will Take” • For MAP-A choose “MAP-A” from drop down • Choose “Refer to Form D” from Justification Drop Down • For all students, click the box under “Accom” • Accommodations window opens • For MAP-A only “No accommodations needed is available.
Accommodations – State/National Assessments – EOC No assessments appear automatically for EOC. User must add them one at a time.
Accommodations – State/National Assessments – EOC • Choose the specific assessment the student will take • Click OK
Accommodations – State/National Assessments – EOC • For EOC leave Testing Decision as “Will Take” • For MAP-A choose “MAP-A” from drop down • Choose “Refer to Form D” from Justification Drop Down • For all students, click the box under “Accom” • Accommodations window opens • For MAP-A only “No accommodations needed . . . “ is available
State/National Assessments Choosing Accommodations • Choose the accommodations needed • To view only those selected, click “Show Selected” • When finished, click OK
Accommodations – State/National Assessments – MAP-A • Do not add MAP-A to the Assessment panel • Choose MAP-A from Testing Decision menu • Choose “Refer to Form D” from Justification menu • Click box under “Accom” - Choose “No Accommodations needed” • Save Assessments • Click green “Have” button to indicate accommodations have been entered
Accommodations – State/National Assessments – NAEP / WIDA • The National Assessment of Educational Progress (NAEP) – the national assessment – and the WIDA-ACCESS – for English Language Learners – must be added to the Assessment panel by the user when needed • These assessments are not administered in every district • If your student will be participating in one of these assessments, follow instructions for adding an End of Course (EOC) Assessment to add the appropriate assessment
State/National AssessmentsNo Accommodations Needed • Must complete Accommodations screen even if the student is not using any accommodations for assessments • After clicking the box under Accomm, choose “No accommodations needed . . . “ • Click OK • Save Assessments • “No Accommodations . . .” prints on Form D-Part 2 or Part 3
Goals – Using a Goal Bank • Choose Domain • Choose a Goal Bank • Choose Area of Concern • Choose Goal in Search Results panel • When all goals have been selected, click Add Selected Goals
Goals – Entering Goal Details • Click a goal on the Plan Goals panel to enter goal details • When using a goal bank complete the direction, action, condition, measurement and duration fields. The information will fill in the goal text as it is entered. • To edit the goal text click the Custom button.
Goals – Measurement & Monitoring • Assign provider (Primary Staff) • Click smile face icon to assign to yourself • Click Custom/Edit (pencil) icon to assign someone else • If needed, choose or edit measure • Edit begin/end dates if necessary • Enter Baseline and Target scores – whole numbers only! • Enter Baseline Narrative • Click Progress Reporting tab
Goals – Progress Reporting Tab • Do not make changes to Progress Reporting panel • Enter Evaluation Criteria • Must choose one – can choose multiple • May need to scroll or collapse the Progress Reporting section to view all options
Goals – Goal Details Tab • If goal supports a post-secondary goal/expectation check the box and choose from the drop down • If the student is eligible for ESY and this goal will be addressed, click the box
Goals – Objectives/Benchmarks • If the student is participating in an alternative assessment click Objectives tab to enter objectives/benchmarks • Enter a title for the objective/benchmark • Title cannot be edited after Add Custom Objective is chosen • Click Add Custom Objective to expand the section and enter details