Download

1 / 74
740 likes | 758 Views
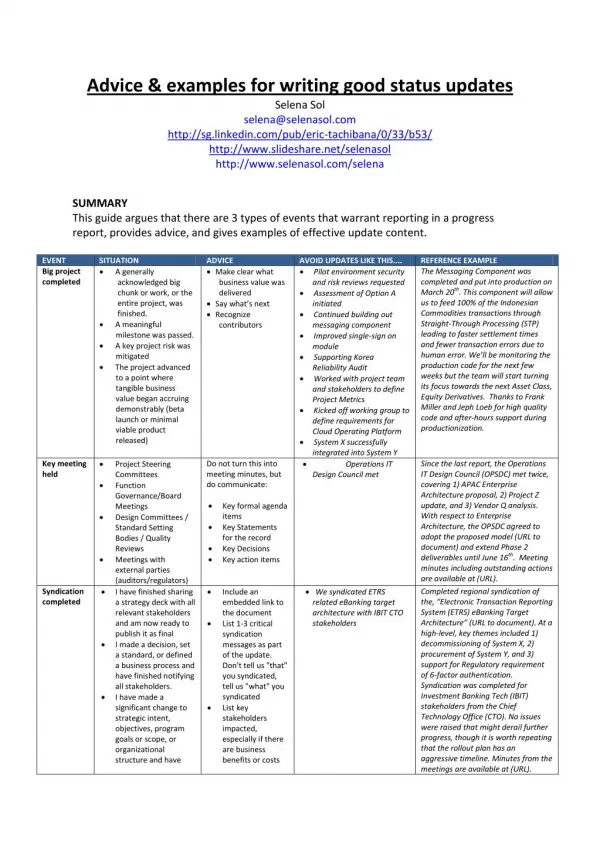
Learn about FRAM, its importance in accurately reporting meal status, and how to approach FRAM for accurate and timely data. Discover the tools provided by FRAM module and the timeline for FRAM coordinators.

E N D
FRAM A to Z: Understanding and Accurately Reporting Free Meal Status By Samantha Engstrom
What is FRAM? F R A M ree educed pplication anagement
Common Acronyms HouseholdIncome Form • HIFs- • SES- • CEP- • NSPL- • DC- • SNAP- • KTAP- • POS- Socio Economic Status Community Eligibility Provision National School Lunch Program Direct Certification Supplemental Nutrition Assistance Program Kentucky Transitional Assistance Program Point of Sale (system used by food service to count meals, determine meal eligibility, etc.)
Why is FRAM important? • Meal status data is… • Confidential • Used for key funding purposes • SEEK At Risk • eRate- is a federal initiative that provides discounts on telecommunications, Internet, and eligible internal connection technologies to elementary and secondary schools and public libraries across this country. • FRYSC - August 15 • Time sensitive- HIFs due in the system by OCTOBER 1. • What the eRate calculation does is look at every day in October and give the district the FRL count from the date with the highest FRL count in that month. If your district’s direct certifications are fairly consistent and you get your HIFs in by the last week in October, that would be enough time to have one of the days in October show as your highest day. By suggesting all HIFs be entered by October 1, that allows the most “chances”/days for getting the highest number possible. • Frequently changing, especially at the beginning of school Goal: Accurate + Timely Data
FRAM and Infinite Campus • The FRAM module provides the tools for processing applications and approving federal meal service assistance for students. • The FRAM module allows users to: • Review and update processed applications via the household application tool • Generate batch approval and denial letters • Conduct and report annual federal verification of applications • Automate the importing of eligibility status with the Campus Eligibility Wizard • Complete state reporting of meal status
Timeline for FRAM Coordinators • Prior to school year • Devise a process for distribution and collection of HIFs • Beginning of school year • 30-day carryover period at the beginning of each school year when districts are updating information for student meal status. • All students should have a correct/updated lunch status by the end of the 30-day carryover period. • Throughout the school year • Constant communication between FSD and FRAM coordinator • Each month, the FSD receives a DC list. FSD should immediately import this information into the POS, ensuring that it is also available in the FRAM module • If a student that was qualified for a free or reduced meal price via a HIF appears on the DC list at any time throughout the school year, the FRAM coordinator should locate the student’s HIF and make a note on the form that includes the date that the student switched over the DC. • End of school year • Retention schedule for HIF
How do I approach FRAM? • Devise process for distribution and collection of HIFs • Set up data Synchronization • HIF processing • Continue monthly DC import
Retrieving DC list • https://applications.education.ky.gov/login
b. a. Blank User Name d. e. g. g. h. h. f. • Logged in as – your current username • Logout – to log out of the system • File are up to date as of – date the files were last updated • Current Files – the current month’s KTAP/SNAP/Medicaid and foster care recipients for your assigned counties • History Files – a unique list of all KTAP/SNAP/Medicaid and foster care recipients from your assigned counties from July 1st to the current month • County Name – the assigned counties for your user ID • {Current File} - the hyperlink to download the current direct certification file in .csv format • {History File} – the hyperlink to download the historical direct certification file in .csv format • Contact Us/Help – access for assistance from the KETS Service Desk KTAP/SNAP/Medicaid – a list of all KTAP/SNAP/Medicaid participants for which DC eligibility can be extended to other members in the household. Foster - a list of all active foster children in Kentucky; DC eligibility cannot be extended to other members in the household
Retrieving DC list continued After you have clicked on the “Current File” link select “Open” • The data has been placed in a logical order. The definitions of the fields follow in the appendix. Following below are comments on the file layout: Remember to log out of the system when you are finished • The county name appears in the final column. You should verify this contains the counties you are interested in. • The guardian SSN contains only the last 4 digits to protect privacy. • The Zip + 4 and the guardian SSN will omit any leading zeroes from displaying, which is an Excel issue. However, the data does appear in the file itself. Save the file format in the original .csv type. When Excel prompts you to save the file in a .csv format, select ‘Yes’
Data Import into Infinite Campus Log in to IC. If you do not have a user ID contact your district IT administrator. Ensure the correct year and other information is shown on the top menu bar for the current year: in this example, the ’18-19 school year’ is selected. Navigate to FRAM>Eligibility Import Wizard. Choose the import mapping. Click “Edit”
Blank1 District may choose unique name • 5. Complete the fields below as follows: Ensure the current year is selected. SSID is typically chosen because it has a higher number of data matches but this choice is up to the district. Finally, select Upload & Continue Select the DC file here.
DC Import • Define the student ID field. Input a ‘7’ into the field as above. • Click “Map Field” • Click “Next”
Blank2 Select “No” (unless you are importing the DC Foster file then you mark “Yes” 1. 2. • Key in the appropriate Start and End dates: • The ‘Start Date’ will be when the DC data is imported into Infinite Campus. • The ‘End Date’ will be the last day of June within the school year; in this example for school year 2018-2019 the date will be 6/30/2019. 4. • Enter a ‘1’ for the sequence in the data file. • Click ‘Set Value’. • Enter in the values as shown. • Enter in today’s date for the “Eligibility Start Date” • Click ‘Save’. • Scroll down and click ‘Next’. 3.
Blank3 Verify your information is correct. Review the information to ensure it is correct, especially the start/end dates. Records will have to be manually corrected for each student in the event of any errors or through a Campus support ticket. • Review the test report (see example below). • Finally, if everything appears correct, then click ‘Import’. • Larger districts of >3,000 students should consider using the • Batch Import Option to import large batch files. More information on this option is available in the Infinite Campus – Eligibility Import Guide.
DC Import Report Review • Review the report • Provides a summary description of import results (focus on “Errors/Warnings) • Shows duplicate students were located in Campus > Run the Duplicate Student Search Report in IC to correct these • If the student ID field (SSN or SSID) were not matched in IC: • SSN is incorrect in the DC import file or Campus • The child is not enrolled in your district/diocese
Reminder: Change School Year for DC Import • For any DC imports on or after July 1st into Infinite Campus • Important: Please remember to change the school year in your DC import mapping(s)
POS Data Synchronization A Brief Overview
Steps for POS Data Synchronization Set up of data synchronization Monitor the process Adjust to correct any errors
POS Data Sync: What could go wrong?Shown below are common scenarios with data synchronization: “The data sync has stopped working” • Confirm that the username and password are correct under Scheduled Imports • Verify that the file path/folder name has not changed • Confirm that a file of “IC_Eligibility.txt” is being produced by the POS server • Consider changing the IC scheduled start time to a later time • Ensure that the school year is correct in the data mapping • Verify that the POS data extract has the current school year’s data “My free/reduced percentage appears low in IC” • Verify all values are mapped in POS import mapping • Check when latest data sync was done under Scheduled Imports>Scheduled Import Log • Spot check a few students without a meal status against POS • (CEP districts) Verify that DC imports are being regularly done
Troubleshooting Import Process FRAM>Eligibility Import Wizard>Scheduled Imports • Directory Path – Check to see that your Directory path is correct, you have a shared folder on the POS…and your file is named IC_Eligibility. • Test Connection – Use this to ensure you can connect to the POS. • Test Import – Verify you can connect and pull in the data. • Run Import – Run the import process manually and review the Eligibility Import report to locate and correct and errors (see IC Eligility Report definition earlier).
Finding the errors Campus tracks the status of the data import from POS • Path: FRAM > Eligibility Import Wizard > Scheduled Imports – Scheduled Import Logs tab
Finding the errors continued • Scheduled Import Log • ‘Successful’ means the data imported in • Review both ‘Unsuccessful’ and ‘Successful’ import logs to search for data import errors Click on the task name to see the details Click on the log file to review the data synch report
IC Eligibility Import Report FRAM>Eligibility Import Wizard Focus on any errors/warnings POS Import Only: Preschool student SSNs! These should have SSIDs: follow KDE data entry instructions for enrolling preschool students in Infinite Campus; incorrect SSIDs in the POS need to be corrected with what is in Campus Duplicate SSIDs in IC; student enrollment records need to be merged; contact your IC administrator to resolve these Warnings are FYI only; can generally be ignored
Before you start • Plan how you will distribute and collect HIFs. • Who will help me? • How will I file them? • What incentives (or disincentives) can be offered to increase the return rate? • When will I be able to work on these?
HIFs • When do I send the HIFs to the households? • The HIF can be distributed in the student registration packets prior to July 1. • Begin processing HIFs after July DC data has been imported and preferably after August data has been imported. • Income Eligibility Guidelines for the current school year also need to be updated in Campus so we recommend waiting until late July to begin processing the HIFs.
Direct Certification continued • Directly Certified (DC) students are “free” automatically and are entered into FRAM by the Food Service Director (FSD) • FSDs are responsible for the record keeping requirements of DC students
Entry of HIF Suggestions • Steps to Data Entry • Block out time to solely work on HIFs • Ensure the HIF is complete and legible before entering into FRAM
HIF and Infinite Campus • FRAM coordinators will process the HIFs electronically within Infinite Campus using the FRAM module.
HIF Processing Checklist • monthly DC imports are performed in IC • Process HIFs in Campus • Follow up with students who have not returned HIF • Check DC and free/reduced percentages periodically
HIF page 1- Part 1. All Household Members • All applications should complete this part • All household members should be included • If you need additional space, attach a separate piece of paper
HIF page 1- Part 2. Homeless, Migrant, Runaway Status • If any child is homeless, migrant or a runaway the appropriate box must be checked
HIF page 1- Part 3. Total Household Gross Income • Use a ruler to clearly differentiate each line
HIF page 1- Part 4. Signature • Must be signed by adult household member • If no signature is present the HIF will be denied • You may contact household before denying HIF
Household Application Forms 2 • Select Household Applications (FRAM> Household Applications) • Search tab –Select Households from drop down • Search for Household name • Select Household Name • Click New 5 3 4
Blank4 Application Date – the date on which the application was signed by the parent/guardian Effective Date – The eligibility effective date based on the approval of the application App Sign – This radio button indicates the household member who signed the application. SNAP/FDPIR/TANF # - Campus does not currently use this field. The number for SNAP/FDPIR/TANF benefits is entered in the Case Number field.
Blank7 1 2 3 • SNAP/FDPIR/TANF # - Campus does not currently use this field. The number for SNAP/FDPIR/TANF benefits is entered in the Case Number field. • Work- M (Monthly), SM (Semi-monthly), BW (Bi-weekly), W (Weekly), A (Annual) • Add Student (button) - This button allows you to add selected people to the Student section of the application.
HIFs continued • Helpful hint: Write the generated reference number on the physical HIF and file the HIFs by Reference #
Amending a HIF • Select Amend and make the necessary changes • Click the Process button and the Reference number will be
Income Conversion • If there are multiple incomes with more than one frequency, conversion is required. All of the incomes must be converted to annual income. For example: Bob Belcher $500/week Linda Belcher $100/month $500 x 52 weeks = $26,000 year $100 x 12 months = $1,200/year Total income: $27, 200/year Check the IEG (income eligibility guidelines) chart to determine if the student’s SES will be identified as free, reduced, or paid.
Recordkeeping: Completed HIFs • On a completed HIF, the FRAM coordinator must: • Indicate SES • Sign or initial the HIF • Indicate the approval date Not required but useful- As previously stated mark down the Reference number provided by the FRAM module
Which households do not need HIFs? • Mixed CEP Households (Partial CEP Only): Households which have submitted NSLP household applications • DC Students: Households with students who are directly certified (SNAP, KTAP, Medicaid, Foster) • District Certified: Students who are directly certified through a signed and dated list by the appropriate district coordinator (Head Start, homeless, migrant, runaway, foster)
Comparison of Full CEP vs Partial CEP Full CEP Partial CEP • Collect HIF forms on all schools • Perform no data synchronization with POS system • Import DC file into Campus • Collect HIF forms for only CEP schools • Perform POS data synchronization with only non-CEP schools • Import DC file into Campus Footnotes for Partial CEP 1. IC POS users have a special setup; please contact Infinite Campus for assistance. 2. Districts should collaborate with their POS vendor to include only the non-CEP school in the meal status data extract
What if a HIF is not returned? • If a HIF is not return it defaults to “Paid” Eligibility Report These students do not have a form processed or were not on DC import list