Download
1 / 6
60 likes | 74 Views
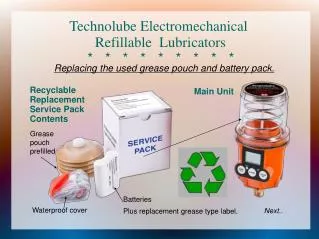
Order service packs with pre-filled grease pouches and replacement batteries for Technolube Electromechanical Refillable Lubricators. Includes waterproof cover and new grease label. Follow the procedure to replace the used pouch and battery.

E N D
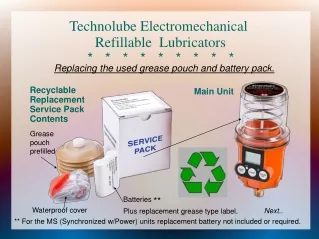
Recyclable Replacement Service Pack Contents Technolube Electromechanical Refillable Lubricators* * * * * * * * * Replacing the used grease pouch and battery pack. Main Unit Grease pouch prefilled Batteries ** Waterproof cover Plus replacement grease type label. Next.. ** For the MS (Synchronized w/Power) units replacement battery not included or required.
Technolube Electromechanical Refillable Lubricators* * * * * * * * * . Replacing the used grease pouch and battery pack. Order service packs from your distributor, with the grease pouches pre-filled with your choice of lubricant. The pack also includes a replacement battery, waterproof cover and new grease label. (The battery should be replaced for each new grease pouch as the old battery does not have enough power remaining for a second dispense period.) Procedure: Unscrew the housing and then the empty grease pouch. Remove old battery and replace with the new one, pressing down firmly. The used pouch and battery can be recycled. Next..
Technolube Electromechanical Refillable Lubricators* * * * * * * * * One very important step – check the hole in the centre of the base for proper setup. The check valve beneath the hole in the centre of the unit base has been improved by making it deeper in the most recent production. As the valve no longer protrudes into the grease pouch it is important to squeeze out grease until it is slightly above the tip of the grease pouch as shown below, to fill any space above the valve and eliminate an air bubble. If the check valve in your unit appears to protrude as in the picture below, please go to the next slide for instructions New and older style check valves Grease pouch ready to assemble Now reassemble the unit with the new pouch. Press and hold the TEST button to activate a test cycle before resetting and replacing the unit on its location. RESETTING INSTRUCTIONS AFTER THE NEXT SLIDE.. So please be sure to screw the grease pouch down firmly but do not over-tighten. If you strip the thread on the pouch air can enter more easily.
Technolube Electromechanical Refillable Lubricators* * * * * * * * * For the older style checkvalve, one very important step – ALWAYS ensure that there is no air bubble in the unit. When you remove the grease pouch from the unit, the pressure release often causes air to be drawn into the greaseway forming an air bubble. Unless removed this will stop the grease In the newly installed pouch from travelling into the bearing. There is a check valve beneath the hole in the centre of the unit base to deal with this. After removing the pouch, gently depress the check valve as illustrated a few times with a thin Allen wrench or screwdriver, or similar tool. This will remove any air which has been suctioned in. Tool inserted Check valve location Wipe away any grease and reassemble the unit with the new pouch. Press and hold the TEST button to activate a test cycle before resetting and replacing the unit on its location. RESETTING INSTRUCTIONS NEXT..
Technolube Electromechanical Refillable Lubricators* * * * * * * * * Press POWER for two seconds If you have the 125cc or 250cc unit, press the “125/250/TEST” button until the display shows the correct capacity for your lubricator. Reset the dispensing rate by pressing the MODE LOCK until you reach the required month number. See setup chart below. After you have confirmed active dispensing, press RESET to stop, clean off the excess grease from the outlet, and check the bearing for any solidified grease. Fill the bearing to entrypoint with the same grease if necessary. Re-install the lubricator. If the lock icon appears on the display deactivate by pressing MODE LOCK until it disappears, and resume setup. The MODE LOCK will protect your setting from accidental change after a few seconds. Fix the grease label in place and replace the new clear plastic cover and you are done! months Reset button Next..
Technolube Electromechanical Refillable Lubricators* * * * * * * * * Your lubricator is now programmed and running. The setting is locked against accidental change, the display is giving you confirmation of your settings, and the time left is being displayed in days. These are the tests and procedures we use when assembling your initial refillable Mechanical Lubricator purchased “ready to set up” on arrival. The display unit may later flash various codes; charts with the message translations are on our flyers for the Mechanical series, and on our website. If you need more information, please get in touch with us by phone or email. Technolube Inc. Richmond BC V7A 3K5 Canada Ph. 604.204.0144 – tollfree 1.888.777.0144 Fax 604.275.3599 – tollfree 1.877.270.3599 technolube@telus.net- www.technolube.ca “We strive to exceed your expectations”