School Manager
School Manager. Only one computer in your classroom can be logged into School Manager. School Manager will launch on the first computer where Waterford is launched. The Navigation Bar. Waterford School Manager has a navigation bar at the bottom of every screen.

School Manager
E N D
Presentation Transcript
School Manager Only one computer in your classroom can be logged into School Manager. School Manager will launch on the first computer where Waterford is launched.
The Navigation Bar Waterford School Manager has a navigation bar at the bottom of every screen. You will see these icons on the navigation bar: • To exit Waterford School Manager. • To log in as a new user. • To return to the previous menu. • To see an index of help topics.
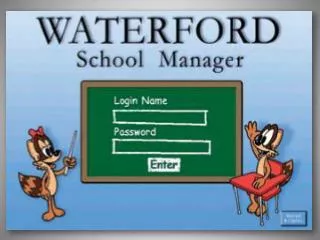
Logging Into School Manager • Usernameis your first initial and last name (i.e., lmoya-mendez) • Password are your initials (i.e., lm)
Icons in the Class Tree • Teacher at a desk – Teacher • Three People – Class • Two People – Group • One Person - Student
Planning To Use Waterford • Plan Implementation • Create classes • Add Students/Take Photos • Set Up Groups • Copy Students/Groups to Each Class • Assign Curriculum
Creating a Class Within School Manager, click on the Set Up Classes Drawer. Select Your Name in the Class Tree. Click on the Set Up Students Tab. Click on the New Class button. Enter a Name for the Class. Naming Conventions for Classes – last name and current school year (i.e., moya-mendez10-11) Make Sure Date in the First Day of School box reflects the Day You Actually Start Waterfordverses the actual first day of school. Fill in each area requested. Click Save.
Adding Students Click on the Set Up Classes drawer. Select the Class from the Class Tree where you want to add a student. Click on the Set Up Students tab. Click on the New Student button. Completed the fields needed. (You can let Waterford generate a Student ID rather than entering the student’s actual student number.) Click on Save.
Taking Pictures of Students In order to take student photos you must install your camera software on your computer. Once that is done follow these steps: Click on the Set Up Classes drawer. Select a student’s name from the Class Tree. Click the Record Names Take Photos tab. Click Preview to see what the camera is seeing. Click Take Photo to take a picture of a student.
Setting Up Groups • Why Use Groups – It allows you to assign a specific curriculum to students within a groups (different from the curriculum assigned to the class) and to manage the order in which students are called to the computer. To create one or more groups in a class follow these steps.
Setting Up Groups • Creating Groups • Click the Set Up Classes drawer. • Select a class in the Class Tree you want to add the group to. • Click the Set Up Students tab. • Click the New Group button. • Type in a name for the group. (A group number will automatically be assigned.) • Click Save.
Assigning Curriculum Assign curriculum to a group if all are on the same level. Assign curriculum to each student if students are on different levels. The number of minutes of a session is calculated with the grade level – no matter what level. K-15 minutes 1st-2nd – 30 minutes
Steps to Manually Assigning a Level • Click the Set Up Classes drawer. • Select a class, group or student from the Class Tree. • Click the Choose Curriculum tab. • From the list of courses, select the program you want to assign. (i.e., Early Reading Program) • Move the slider to the correct level of difficulty. (DO NOT USE PLACEMENT!) • Click Save.
Printing Reports • Class Summary Report • Click the Manage Curriculum drawer. • Click a course in the Curriculum Tree and then select a class. • Click the Reports tab. • Click Class Summary Report in the reports window. • Choose a time period. (If you click on Custom, you must specify the dates for the reports.) • Click Print or View.
Printing Reports • Individual Student Report • Click the Manage Curriculum drawer. • Select the course from the Curriculum Tree and then select a student. • Click the Reports tab. • Click Individual Student Report in the reports window. • Choose a time period. • Click Print or View.