Download
1 / 21
250 likes | 318 Views
Learn how to safely restrain your pet for first aid and examinations, identify signs of pain, and provide effective pain treatment. Helpful tips and techniques for approaching everyday pet problems. Keep your furry friends safe and healthy!

E N D
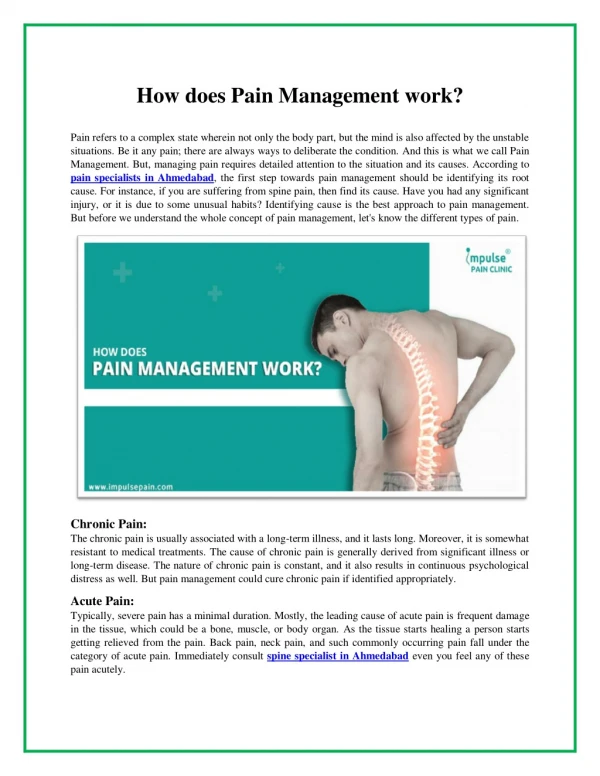
Pet Restraint Techniques and Pain Management Approaching Solutions to Everyday Problems With Your Pet
Intro • Pet owners are faced with everyday problems like ear infections, cut paws, or upset stomachs. • Basic restraint is vital first step towards investigating hundreds of dog and cat conditions. • In dramatic situations, they can save your pet’s life • In any situation they ensure that you can safely examine your animal without causing injury to the pet or to you. uptownvetsnyc.com
General: Signs of Pain • Signs of pain in dogs and cats can be pretty subtle. • Animals that didn’t hide signs of injury were more likely to be attacked. • You must be alert to changes in behavior to determine if your pet is indeed in pain. • Dogs tend to be more vocal and may yelp, hold a hurt paw, or limp. howtodothings.com
General: Signs of Pain • Cats more often simply hide and refuse to move. • Other signs can include panting, drooling, refusing to eat, “hunching” or tucking up a painful stomach, “bowing” a painful neck, flinching when touched, or squinting if an eye is painful or watery. raritananimalhospital.com
Pain • If you suspect spine problems or fractures, don’t use any pain medication for first aid. • Since the most common pain relievers can make bleeding worse, do not give as first aid when you aren’t sure about the extent of the problem. • NEVER give aspirin to cats. One does of Tylenol is fatal to a cat • Veterinarians have much more effective and safer pain medicines that they can give to pets once a diagnosis has been made. drsfostersmith.com
Pain Treatment • However, there are some effective and safe pain treatments that you can safely use as first aid. • Cortaid contains steroids that reduce painful inflammation. It works well on minor cuts and scrapes or insect stings. • Products containing benzocaine, like Lanacane or Solarcaine, contain topical anesthetics that numb the pain of sunburn and mouth sores. Benozcaine should not be used on cats. • Hot compresses work well on sore joints caused by arthritis • Ice numbs the pain of nearly any skin injury, bruise, or burn within minutes. buzzillions.com lanacane.com
Restraint • To examine an injury to your pet, you likely will need to restrain the animal. • A humane restraint serves three purposes: • 1. it protects you from being bitten or clawed while administering first aid • 2. it restricts your pet’s movements to prevent further injury • 3. it keeps your pet in one place so that the injury can be examined and treated tenthstvet.com
Muzzles • Any pet will bite as a reflex when hurt • While commercial muzzles are available, a home-made muzzle can be nearly or equally as effective danceswithcorgis.com
Muzzles - short nosed animals • Cats and short-nosed dogs (like pugs) are a concern are a challenge because they do not have enough of a nose to tie shut. • In this case, one of the best muzzles is a pillowcase. proguardpets.com
To make a pillowcase muzzle: • Fit a cloth bag over the pet’s head and gently hold it around the neck • The fabric will keep the teeth engaged and pets often stop struggling once they can’t see • You can also pull the case over the pets body as necessary to contain the front legs and/or paws • Allow the affected body part to stick out of the pillowcase for access • Some treatments, such as a cool water soak for heat stroke, can be done through the pillowcase
Muzzles – long nosed dogs • You can use any piece of material from a necktie or length of gauze to a panty hose or extra leash • Loop the material around your pet’s jaw and tie it in a single knot (half-hitch) on top of his nose. • Then bring both ends of the tie back down under his jaw and tie another single knot. • Finally, pull the ends behind the base of his neck and tie them in a bow or knot. lingerpets.blogspot.com
Restraint Techniques • Each form of restraint works best for a specific type of injury • The selected technique should leave the injured area accessible for treatment • If possible, have one person restrain the animal while another performs the first aid. • It is best to place small pets on a counter or tabletop so that they are at waist level…this can prevent you from putting too much weight on an injured body part. • Medium or large dogs are best treated on the floor – a long fall could further worsen a serious injury. gsah.com irvingpethospital.com
Reclining Restraint • Place your pet on his side, with the injured area facing up. • With one hand, grasp the ankle of the foreleg that’s against the ground while gently pressing your forearm across his shoulders. • With the other hand, grasp the ankle of the hind leg that’s against the ground while pressing that forearm across his hips. • This technique works best for medium-large dogs and/or dogs with prominent eyes (e.g. Pekingese) • Holding these types of dogs around the neck produces pressure that may pop out their eyeballs • Photos on next slide
Reclining Restraint • Proper techniques for reclining restraint
Stretch Restraint • With cats and small dogs, grasp your pet by the loose skin at the back of the neck (scruff) with one hand • Capture both hind feet with the other hand. • Gently stretch out your pet and hold it against a tabletop
Hugging Restraint • Bring one arm underneath and around your dog’s neck (like a half nelson) to hug him to your chest • With the other arm, reach under and around his chest and pull him closer against you. • This technique works best for dogs over 20 lbs and is most useful when trying to immobilize the abdomen, chest, legs, and back.
Kneeling Restraint • Pressure around the necks of dogs with prominent eyes (e.g. Pekingese) may pop out their eyeballs. • Instead of restraining with a neck grip or by the scruff, put your dog on the floor between your knees facing away from you as you kneel. • Put one hand on top of your dog’s head and the other around or beneath his jaws to steady his head while another person treats this area. • This method also works for giving pills to cats. gotoaid.com
Elizabethan Collars • Elizabethan Collars (or E-collars) prevent dogs and cats from reaching injuries with their teeth. • They also protect facial sores from pawing or scratching nails. • You can get them at pet-supply stores, catalogs, or from a vet. • They can also be home-made. thatpetplace.com
Making an E-collar • 1. Measure the pet’s neck and the distance from his collar to the tip of his nose • 2. Mark these measurements on a piece of rigid cardboard or plastic. • 3. Make a V-shaped cut from the outer edge to the inner circle. • 4. Use a knitting needle or awl to punch holes along both edges of the collar. • 5. Lace a shoe string or yarn through the holes to secure the collar around your pet’s neck.