Download
1 / 42
420 likes | 529 Views
Track and manage employees' personal, company, and emergency details efficiently in one database. Capture employee IDs, addresses, medical info, and more with user-friendly design.

E N D
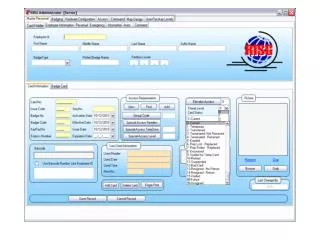
CARD HOLDER TAB • List of employee personal information. • Employee ID: maximum of 11 alphanumeric characters. • First Name: cardholder’s first name, input a maximum of 30 alphanumeric characters. • Middle Name: cardholder’s middle name, input a maximum of 30 alphanumeric characters. • Last Name: cardholder’s last name, input a maximum of 30 alphanumeric characters. • Suffix Name: cardholder’s title, input a maximum of 5 alphanumeric or special characters. • Badge Type: links to the badging tab. Used as badge ID of a particular cardholder. • Printed Badge Name: The name displayed on the badge ID/card. • Partition Level: partitions cardholder into different levels. Set by using partition number. Next
Card Information: information assign to each cardholder’s badge to grant, deny or void access. Access Requirements: allows cardholder access by Group Code, Special Access Readers, Special Access Time zone. Set Elevator Access restricting cardholders to access certain floors in the facility. Set Threat Level [1-5], Card Status, Annunciate Cardholder, initiate Reader Tour and Anti - passback Exemption. Assign picture, signature and barcode of the cardholder for identity. View Last Used Information or transactions of the cardholder. Create New Record, Edit, Delete or Search cardholder.
Assign Status on each cardholder Shows all transactions of the annunciated card to be tracked on the Alarm Display. This is all called employee watch which shows you all the activity of cardholder. This command will reset an Individual Card In/Out flag to ZERO (0). This enables the selected card one “free pass” from one area to another if Anti-pass back is being utilized. Threat Level: This system function is used in conjunction with reader and master personnel threat levels. Anyone with an access card that is programmed with a threat lower than the system threat will be Denied Access. The command is sent to all intelligent controllers. Special Features: This feature allows the operator to define whether the reader allows access or only records the fact that the tour card accessed the reader.
EMPLOYEE INFORMATION • consist of cardholder’s company information, status, department etc. • Company: Name of the company (click on the gray box button at the right side of the company field box to fill-in company data) • Dept.: Name of the department (click on the gray box button at the right side of the company field box to fill-in Department data) • Dept. No.: maximum of 30 alphanumeric characters fordepartment number • Dept. Location: exact location to where the cardholder’s department • is located. • Division: cardholder’s division title • Job Title: cardholder’s position/title in the company. • Shift: time of cardholder’s shift • Mail: cardholder’s company email address • Work Phone: cardholder’s company phone number. • Extension: cardholder’s extension line/number. • Hired Date- cardholder’s hired date. • Termination Date- cardholder’s termination date. • Company 02- secondary company information • Code- maximum of11 alphanumeric characters company codes can be added in the Company Information • Company 03- secondary company information • Code- maximum of11 alphanumeric characters company codes can be added in the Company Information
PERSONAL TAB • List cardholder’s address and personal information. • Address- cardholder’s complete address (street, city, state, zip code, phone number). • Social Security Number– cardholder’s SSN number. • Physical- cardholder’s physical description (sex, hair, eyes, height, weight and date of birth) • Ethnic- cardholder’s ethnicity (click on the gray box button at the left side of the ethnic field box to fill-in cardholder’s ethnicity)
PERSONAL TAB • List cardholder’s address and personal information. • Address- cardholder’s complete address (street, city, state, zip code, phone number). • Social Security Number– cardholder’s SSN number. • Physical- cardholder’s physical description (sex, hair, eyes, height, weight and date of birth) • Ethnic- cardholder’s ethnicity (click on the gray box button at the left side of the ethnic field box to fill-in cardholder’s ethnicity)
EMERGENCY TAB • list of cardholder’s emergency personal contact and medical information • Contact Personal Info- cardholder’s complete personal information in case of emergency (emergency contact name, relationship, etc) • Medical Information- cardholder’s medical history / information
INFORMATION TAB -- List cardholder’s contract company and employment type. Employed By Name of Contract Company- Name of cardholder’s contractor. Employee Type- identifying card holder’s employment type (full time, contract, temporary employee) Contractor Assignment Date- hired and ends of contract date.
AUTO TAB - list of cardholder’s licenses and assigned numbers (License 1-8, Assign 1-2) or plate numbers.
COMMENT TAB – list provided for comments of a specified cardholder (Comment 1-10)
Badge Layout : is the blank area in the middle to layout a variety of fields Badge card – name of the saved badge card and allows users to create new, edit or delete Badge Number – is a preset number that is saved along with the badge card Style – allows user to set the badge card as front side or back side Object Properties- displays the location, fonts and size of the items displayed on the badge ID/Card Badge Layout Properties – allows user to input a badge name and an option to set front or back side style Text- allows user to input plain text on the badge ID/Card Signature- allows adding signature of a cardholder for verification
Telnet is a tool used to communicate to an ANX/ANL Series Intelligent Controllers. Help - A step by step instruction guide on how to Add and Communicate to an ANL/ANX series controllers. This tool is used to select/set-up the ANL/ANX Series of Intelligent Controllers. Enter a unique IP Address for each controller and Description.
HyperTerminal is a tool used to communicate with AN1 Series controllers. This tool is used to select/setup the AN1 Series of Intelligent Controller. Enter a unique IP Address for each controller and Description.
List Showing RISG’s Controllers programmed in the system with an option to edit each circuits.
List Showing RISG’s Sub Controllers programmed in the system with an option to edit each circuits.
List Showing RISG’s Multiplexers programmed in the system with an option to edit each circuits.
List Showing RISG’s Readers programmed in the system with an option to edit each circuits.
List Showing Inputs programmed in the system with an option to edit each circuits.
List Showing RISG’s Outputs programmed in the system with an option to edit each circuits.
Add, edit or delete hardware circuits such as Reader, Input, Output and Expansion Boards in the ANX Configuration tab. We can view all hardware circuits programmed in the system on this window.
Add, edit or delete hardware circuits such as Reader, Input, Output and Expansion Boards in the ANX Configuration tab. We can view all hardware circuits programmed in the system on this window.
Add, edit or delete hardware circuits such as Reader, Input, Output and Expansion Boards in the ANX Configuration tab. We can view all hardware circuits programmed in the system on this window.
Add, edit or delete hardware circuits such as Reader, Input, Output and Expansion Boards in the ANX Configuration tab. We can view all hardware circuits programmed in the system on this window.
Access Level No. – Consists of one or more readers that will be combined with time zones to form group code. Each Reader can be used in a variety Access Levels. By having access levels it allows cardholders or group of cardholders to use a variety or combination of readers. Description - is the name or description of the access level. This will define and sets each a different level to grant access depending on level. Last Change By - is an auto populated box of the account user or account name setting up the access level. Access Level List - is a list of access levels been created. System Readers - is a list of readers programmed in the system and available for the access level to use. Selected Reader - is a list of readers that have been selected for a specific access level to get access.
Time Zone No. – are primarily used for cardholder accessibility requirements based on time of day. You can also use Time zones for unlocking doors and shunting alarms points. Maximum of 32767 time zone number. Time Zones are combined with Access Levels to form Group Codes. Description - is the name or description of the Time Zone to get access on a specific time and date. Last Change By - is an auto populated box of the account user or account name setting up the time zone. Set Time Format To Military Time - there is no AM and PM option in setting up the time zone module. This button allows user to adjust to military time to be in sync with Windows XP. Normal Date - is a drop down list consist of First Period begin, First Period End, Second Period begin and Second Period End. Holiday - is a drop down list consist of First Period begin, First Period End, Second Period begin and Second Period End. Time Zone List - is a list of time zones been created.
Group Code - This where user combines access levels and time zones together to form accessibility rights for the cardholder. Each Group Code has a unique and separate number (which in one access level number paired with one Time Zone number). There is also expiration dates available for Group Code. Group Code No. - is the assigned number of a particular Group Code, maximum of 32,767 group code number. Description - is the name or description of the Group Code. Last Change By - is an auto populated box of the account user or account name setting up the group code. Access Level – This Box displays all available Access Level created. Choose desired Access Level Number. Time Zone - This Box displays all available Time Zone. Choose desired Time Zone number. Expiration Date - you can set expiration date to terminate certain Group Code on a specified date. Group Code List – displays list of Group Codes created.
Event Schedule – controls and manages light, air conditioning and other devices day or night. You can also set security on each event through your circuits. You can unlock, lockout or turn on and off output circuits automatically. Day – Desired day for the automatic event to be set. Time – Desired time for the automatic event to be set. Event Type – Type event to be set automatically which allow 12 options Circuit Type – consists of Readers and Output circuits.
Holiday – allows you to declare calendar dates as Holidays thereby invoking a different set of access or security parameters for you facility on that particular day. Holiday Type – 1 to 8 holiday types and an option to repeat or use the same holiday type number. Description – holiday name or description like Labor Day, Thanks Giving, Christmas, New Year, etc. Holiday Period – holiday period box must be checked to enable this feature. Sets holiday period to deny access on number of days or period. From – the start day of holiday period and To – the end day of holiday period Holiday Type - 1 to 8 holiday types and an option to repeat or use the same holiday type number. Description – holiday name Holiday List - is a list of holidays been created
Elevator Output – allows the control of multiple elevators securing multiple floors. This feature is split into two modules: Elevator Outputs - controls the floor that can be accessed Elevator Readers – controls access into the elevators Elevator Record Circuit – complete list of reader circuits that will be used for the elevator control Description – name or description of the elevator control settings System output – complete list of output circuits that will be use for the elevator control Floor – floor number or area where the setup will be located Add and Remove – are tools to add and delete output circuits that will be use in the elevator control Floor Output – floor number and its corresponding output circuit(s) used Elevator Output List – is a list of elevator output installed
Elevator Access – settings to grant access on specific number of elevators. Elevator works in conjunction with the Master personnel files as an Elevator Access Level Elevator Access level Number - is the assigned number of a particular Elevator Access level, maximum of 32767 Elevator Access Level No. Description – name or description of elevator access settings Floor table- consists of 64 floors to use as elevator access. Checked floors would allow cardholder to access the selected floors Elevator Access list – is a list of Elevator Access installed
Group files or Group Commands allow you to build a group reader circuits. After the group is built you can give this group Lock, Unlock or Lock Out Command from the operator’s screen. This will permit you to Lock, Unlock or Lock Out group of Readers with a single command instead of calling each reader individually.
Group Shunt provides a means with which you can group Input Circuits together for the purpose of enabling/disabling them by Manual Command on a Workstation automatically via a Time zone.
Group Output provides a means with which you group Output Circuits together for the purpose of turning them on or off by manual command from a Workstation.
1 This is a Fire Alarm. All doors have been unlocked. Call the Fire Department. Make sure everybody has left the building “Click Here to Start” “Click Here to Clear” The Instruction file is the location where Instructions are created for use in the Alarm Display. Instructions are assigned by their number to individual input circuits and can also be assigned globally to reader circuits in the Transaction File. An instruction is 255 characters in length.
The Transaction File is the control table that routes all global alarm types to the appropriate Workstation. This table allows you to direct alarm transactions, assign instruction sets and set priorities to alarms that are not otherwise set by the circuit files.
Map design is user defined diagram to show location of all the hardware circuits installed in the facility or in the building. This module sets up the Graphic Map program that is used with the Alarm module. In this module you will setup the map icon overlays and prepare the data for connection to the circuits.
The User Level file is the location where all users of the Alliance System are assigned their Passkey levels and Partition levels. Password levels are assigned as a numerical value between 1 and 8; with 8 being the highest assignable password level.
Passkey Level is the level of authority that an operator has with regard to the Alliance applications. This is assigned as a numerical value between 1 and 8; with 8 being the highest assignable passkey level.