Download
1 / 52
520 likes | 535 Views
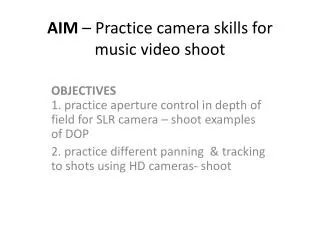
A comprehensive guide for teenage girls to become co-creators of science learning engagement through shooting and editing media. Covers HD and file types, editing programs, subtitles, shooting and framing techniques, and technical specifications for video cameras.

E N D
How to Shoot & EditMedia Handbook ScienceGirls - Teenage girls as co-creators of science learning engagement Project ID: 2016-1-UK01-KA201-024248
Contents • What is HD & File Types • Editing programs • Subtitles • Shooting & Framing
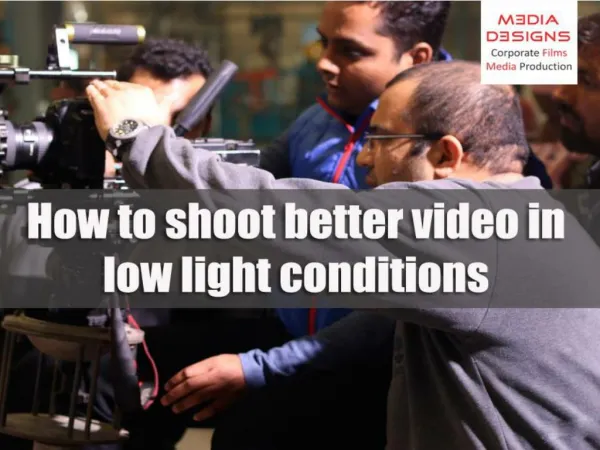
Technical specifications for the video camera Image quality Cameras with larger sensors and lenses normally take better shots, regardless of the unit's megapixel count. Bigger sensors normally create better images, especially in low light, as do higher-quality lenses; this is why DSLRs take such stunning photos or videos. In general, you pay more for a larger sensor.
The majority of today's cameras can capture 1080p high-definition video. Most of them record this full-HD video at 24 fps or 30 fps, and a few of them capture 1080p video at a brisk 60 fps, which usually translates to smoother-looking video.
What is HD? So, what actually is HD? HD, or High Definition, refers to the detail level of a screen; or to put it another way, the number of pixels that are packed into a display. A pixel is the smallest visible element on a display, the ‘dots’ that combine to make up the overall picture.
Mov, mp4, m2ts… File types
M2TS It is a file extension that is used for the development of the blu-ray disk as well as the avchd format that is used in the camcorders. The container that is associated with this filename extension is MPEG-2 transport container. Again, this container is associated with the blu-rayand the camcorder extensions in this regard. It is also known as BDAV container format and for the same reason it is associated with other storage devices as well DVD, hard drives and the solid state drives.
MP4 It is one of the most common formats that mainly supports audio and video formats but other formats can also be used to make sure that the advantages of MP4 are enjoyed. Still images and the subtitles are also some of the other forms of media that are supported by the MP4 format. It is the most common container that is considered as the latest one due to the fact that it not only supports internet streaming but the size is also too small which makes the sharing with friends and other people easy.
MOV MOV is an MPEG-4 video container and also a common multimedia format using a proprietary compression algorithm developed by Apple Computer. It is mainly used in Apple's Quicktime for saving movies and other video files, and it is compatible with both Macintosh and Windows platforms. Some DVCPRO (HD) files are also MOV ones.
avchd • It uses MPEG – 4 AVC/H.264 standard for video compression which supports a variety of standard, high definition, and stereoscopic video resolution. It supports both Dolby AC-3 and uncompressed linear PCM for audio compression. • An avchd file consists of recorded audio and video with subtitles and other ancillary streams. These are multiplexed into an MPEG transport stream and stored on media as binary files. For file system, memory cards and HDDs use FAT and optical discs use UDF or ISO9660.
Note that if you are using a smart phone for the recording of the scenes, it is recommended to be at least FullHD. The camera should have at least 12mp.It is recommended that you use a tripod. Note that there are special tripods for smartphones too.
Subtitles For the subtitling of the scenes, you could use YouTube, because it is the smartest and the most simple way to do that.
YouTube • Subtitles and closed captions open up your content to a larger audience, including deaf or hard of hearing viewers or those who speak languages besides the one spoken in your video. If you already have captions or subtitles, get help editing or removing existing captions. • Go to your Video Manager by clicking your account in the top right > Creator Studio > Video Manager > Videos. • Next to the video you want to add captions or subtitles to, click the drop-down menu next to the Edit button. • Select Subtitles/CC. • Click the Add new subtitles or CC button. • Choose how you want to add or edit subtitles or closed captions to your video:
Lightworks • Putting professional-quality tools within reach of everyone, Lightworks is the best free video editor • Lightworks is far much more than a simple tool for cutting clips – the pro version has been used to create big-name movies including The King's Speech and Road to Perdition. • Lightworksis described as the professional video editor for everyone, and we reckon that's a fair summary. Despite its power, it will run well on modest hardware, and it handles video capture and advanced editing with ease. • If you've tried other free video editors you'll probably find that the interface is a little different to anything you're used to, but you can arrange the various controls and windows to create something that suits your way of working.
VideoPad Video Editor • Simple to use, even for complete newcomers. Not as feature-packed as Lightworks, but still excellent • Free video editors have a tendency to be either simple to use and limited in terms of features, or powerful and time-consuming to learn. VideoPad Video Editor does an excellent job. It is a powerful editor that you can easily navigate, even if you've never used anything similar in the past. • This ease of use plays a big part in VideoPad's appeal, but it also comes highly recommended because of the sheer range of tools it has on offer. It may not be quite as feature-packed as Lightworks, but it's much easier to just jump straight into. • You can work with video footage that's already on your hard drive, or capture from your connected camcorder. You then have access to various video and audio editing tools (effects, transitions, sequencing and more).
Shotcut • It takes a little time to master Shotcut's unusual interface, but once you do, you'll reap the benefits • Shotcut is another free video editor that requires a little patience if you want to achieve results it is capable of delivering. To start with, the interface may seem a little stark. You will need to not only load a video, but also choose which editing mode you would like to work in and which tools you'd like to use. • There's no getting away from the fact that Shotcut has a steep learning curve. It's possible to achieve some impressive results by simply applying one of its many filters to your video.
VSDC Free Video Editor • A non-linear video editor stacked with tools, VSDC is very impressive and in constant development • VSDC Free Video Editor provides a huge array of effects and filters to enhance your footage, with both wizards and manual options to suit beginners or more advanced users. • VSDC is highly capable, and can yield superb results. As a non-linear editor, it works in rather a different way to many other similar tools, letting you position clips and other elements on the timeline wherever you like and edit them there. • With the ability not only to work with multiple scenes and transitions, but also to add sprites and text to videos, you can create a professional-quality movie.
Avidemux • An accessible free video editor, Avidemux is ideal for small editing tasks and enhancing clips • Avidemuxis a set of essential tools for everyday video editing, covering all of the basics such as converting formats, trimming footage, appending one clip to another, and applying filters and effects. • While Avidemuxdoes not offer the most powerful free video editor, still it's not a pared-back Windows Movie Maker style affair either. You might have to go hunting for some of the more advanced options, but spend a little time perusing the menus and you'll be impressed. • There's also a handy quickstart guide to get you rolling if you're totally new to video editing. If you can't see a tool you need, Avidemux is also expandable via plugins that add features like subtitles and watermarks.
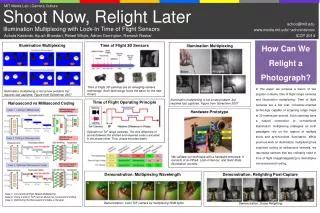
A lot of people think they know how to take pictures or record videos. After all, it is just a matter of pressing the shutter and record button, right? • Well, not exactly. Apparently, there is more to just pointing and taking shots if the goal is to get an impressive and professionally done video clip or photos. Why do you think there are schools for film enthusiasts? • The basic formula for an effective video though is effective shots and framing.
First, you need to compose an image about your subject and everything else surrounding it. This is what framing is all about—creating a composition that will bring out dramatic results of an otherwise ordinary-looking object. But because images and clips are subjective, that is, not all of them may suit everyone’s definition of impressive or dramatic, you must learn some industry guidelines that serve as rule of thumb.
Second, understand the basic types of shots. After all, they are the key to effective framing because they define your subject’s relation to a certain scene or clip. Know though that terminologies used may vary in different production environment, but the definition is basically the same.
Extreme Wide Shot(EWS). This view doesn’t exactly show where the subject is, but it is often used as an establishing shot. Similar to a beginning of a story, EWS is intended to tell the audience where a particular scene is taking place. • Very Wide Shot (VWS). This is considered another establishing shot, except that the subject will be slightly visible in it. Although the focus is still on the environment, the viewers will get an idea of where the shot is leading to. • Wide Shot (WS). This is the part where your subject takes up the full frame. If your focus is a human, for example, getting too close could crop off either the feet or head, thus the need to maintain a wide shot.
Mid Shot (MS). Unlike the other shots, this is an approximation of how you view a person in real life or when having a casual conversation. That is, you would normally focus on the upper half of the body, making the lower part unnecessary. • Medium Close Up (MCU). This shot is neither too far nor too close to the subject and still provides a clear view. This is halfway between MS and CU. • Close Up (CU). Is where the subject takes up the whole frame—a close up shot of a person’s face, for example. • Extremely Close Up (ECU). From the term itself, you can pretty much surmise what this shot is all about. More than that, however, it is used to convey emotion. • Cutaway (CU). This is a shot of another action or a CU of a different part of a subject. It is used to add interest or information between shots.
Now that you are familiar with the basic types of shots, it is time to know some rules in framing. The most important would be identifying straight vertical and horizontal lines. Both aspects must be level, unless you are aiming for a tilted effect.
Then, follow the rule of thirds. In a frame of nine sections, place points of interest at 1/3 or 2/3 of the way up or across rather than in the middle. There should also be just enough “headroom”, “looking room” and “leading room”, as too much of them would be a waste of frame space. A shot of a person moving forward, for instance, must have a leading room for him to walk into. • Most importantly, remember that everything in a frame is vital to a particular composition. So don’t focus on the subject alone but also the rest of the surroundings, background, and even lighting.
Framing • Shots are all about composition. Rather than pointing the camera at the subject, you need to compose an image. As mentioned previously, framing is the process of creating composition. Notes: • Framing technique is very subjective. What one person finds dramatic, another may find pointless. What we're looking at here are a few accepted industry guidelines which you should use as rules of thumb. • The rules of framing video images are essentially the same as those for still photography.
Basic shot types • There is a convention in the video industry which assigns names to the most common types of shots. The names and their exact meanings may vary, but the following examples give a rough guide to the standard descriptions. • Basic shots are referred to in terms relative to the subject. For example, a "close up" has to be a close up of something. A close up of a person could also be described as a wide shot of a face, or a very wide shot of a nose. The subject in all of the following shots is a boy standing in front of a house.
EWS (Extreme Wide Shot) In the EWS, the view is so far from the subject that he isn't even visible. The point of this shot is to show the subject's surroundings. The EWS is often used as an establishing shot — the first shot of a new scene, designed to show the audience where the action is taking place.
VWS (Very Wide Shot) The VWS is much closer to the subject. He is (just) visible here, but the emphasis is still on placing him in his environment. This also works as an establishing shot.
WS (Wide Shot) In the WS, the subject takes up the full frame. In this case, the boy's feet are almost at the bottom of frame, and his head is almost at the top. Obviously, the subject doesn't take up the whole width of the frame, since this is as close as we can get without losing any part of him. The small amount of room above and below the subject can be thought of as safety room — you don't want to be cutting the top of the head off. It would also look uncomfortable if the feet and head were exactly at the top and bottom of frame.
MS (MidShot) The MS shows some part of the subject in more detail, whilst still showing enough for the audience to feel as if they were looking at the whole subject. In fact, this is an approximation of how you would see a person "in the flesh" if you were having a casual conversation. You wouldn't be paying any attention to their lower body, so that part of the picture is unnecessary.
MCU (Medium Close Up) Half way between a MS and a CU. This shot shows the face more clearly, without getting uncomfortably close
CU (Close Up) In the CU, a certain feature or part of the subject takes up the whole frame. A close up of a person usually means a close up of their face.
ECU (Extreme Close Up) The ECU gets right in and shows extreme detail. For people, the ECU is used to convey emotion.
CA (Cutaway) A cutaway is a shot that's usually of something other than the current action. It could be a different subject (e.g. these children), a CU of a different part of the subject (e.g. a CU of the subject's hands), or just about anything else. The CA is used as a "buffer" between shots (to help the editing process), or to add interest/information.
Some Rules of Framing • Look for horizontal and vertical lines in the frame (e.g. the horizon, poles, etc.). Make sure the horizontals are level, and the verticals are straight up and down (unless of course you're purposely going for a tilted effect). • The rule of thirds. This rule divides the frame into nine sections, as in the first frame below. Points (or lines) of interest should occur at 1/3 or 2/3 of the way up (or across) the frame, rather than in the center.
Headroom", "looking room", and "leading room". These terms refer to the amount of room in the frame which is strategically left empty. The shot of the baby crawling has some leading room for him to crawl into, and the shot of his mother has some looking room for her to look into. Without this empty space, the framing will look uncomfortable. • Headroom is the amount of space between the top of the subject's head and the top of the frame. A common mistake in amateur video is to have far too much headroom, which doesn't look good and wastes frame space. In any "person shot" tighter than a MS, there should be very little headroom.
Basic Camera Moves • As with camera framing, there are standard descriptions for the basic camera moves. These are the main ones: • Pan: The framing moves left & right, with no vertical movement. • Tilt: The framing moves up & down, with no horizontal movement.