Cells Lesson 1
Cells Lesson 1. Click ↓. Starter. What do these things have in common? They all make things look b i g g e r !. Learning outcomes. By the end of this lesson: All pupils should know that microscopes magnify tiny things to make them bigger so that we can see them better and in more detail

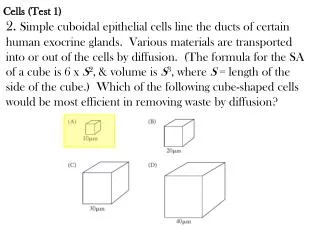
Cells Lesson 1
E N D
Presentation Transcript
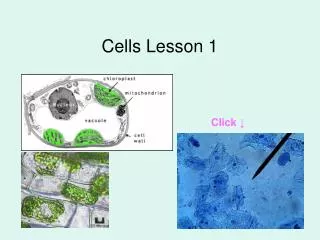
Cells Lesson 1 Click ↓
Starter What do these things have in common? They all make things look bigger!
Learning outcomes By the end of this lesson: • All pupils should know that microscopes magnify tiny things to make them bigger so that we can see them better and in more detail • Most pupils should know the main parts of a microscope, have viewed samples under the microscope and drawn them • Some pupils can calculate total magnification
What do we use microscopes for? To make very small things look bigger
Homework Choice of homeworks to develop your literacy skills. Your teacher will suggest what tasks to complete: • Microscope word search • Observing cells • The development of microscopes
Robert Hooke (1635-1703) Hooke used an early microscope to look at corkClick image for film He saw what looked like tiny rooms and called them ‘cells’
Antonie van Leeuwenhoek (1632-1723) Van Leeuwenhoek was a Dutch textile merchant who became a pioneer of microbiology. He was a man with many talents; his most important attributes were creativity, power of observation, and ingenuity. Leeuwenhoek was a common man without any fortune or formal education, so he had to work as a draper for a living. Leeuwenhoek made simple (one lens) microscopes.
Antonie van Leeuwenhoek He was not the first person to build a microscope, but the microscopes that he did build were the best ones for that time period. Click!→ Leeuwenhoek was the first person to describe bacteria (from teeth scrapings), protozoans (from pond water), and helped to prove the theory of blood circulation. He gained much of his inspiration from reading Hooke's Micrographia.
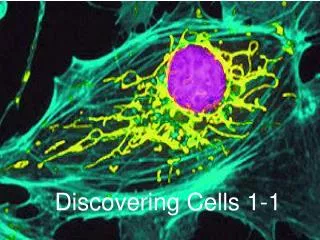
As you already know, micro-organisms are very small, too small to be seen with the naked eye. In order to be able to see and study micro-organisms, micro-biologists use a tool called a microscope that allows us to see very small things. Before you attempt to use the microscopes, look at the diagram and make sure you can locate all the parts on your own microscope.
Eye Piece Tube Arm Objective lens Stage Stage Clamps Coarse Focus Fine Focus Light Base
Tricks to remembering The names of the parts of the microscope are easy to remember: • The specimen is viewed on the stage; just as actors are viewed on a stage. • The objective lens is near the object being viewed. • The eyepiece lens is near they eye.
Responsible use of microscopes Microscopes are fragile and delicate: • They should always be carried with two hands: one underneath and one holding the curved part of the body. • You should not touch the lenses. Persistent mistakes include: • holding the microscope with one hand • focussing down onto the slide and breaking it • turning the objective lens around and crashing into the slide • forgetting to mop up excess liquid.
How to use a microscope Now follow the instructions below carefully. • Make sure you have selected the low power objective lens(it’s the smallest). • Look down the eyepiece and adjust the mirror until it is as light as you can get it. • Move the focussing knob until the stage is as far down as it will go. • Put your slide on the stage and secure it with the stage clips. • Using the coarsefocussing knob, move the objective lensslowly up. Until you can see something. (You will need to keep looking down the eyepieceas you do this). • Then use the fine focussing knob to get the sample in full focus • When you think you can see something, check with the teacher before drawing (in pencil) what you see. • When you have finished, remember to remove the slide from the microscope before packing it away.
Rules for microscope drawing: • Use a sharp pencil • Don’t colour/shade in any parts of the drawing • Give your drawing a heading • Draw the specimen in a rectangle not a circle • Calculate the total magnification and write it on your drawing: Total Magnification = magnification of OBJECTIVE lens x magnification of EYEPIECE lens
How to work out the magnification Total magnification = magnification of eye piece lens x magnification of objective lens
A sense of scale I am holding a metre ruler. My hand is 10 centimetres across (0.1m). My finger is 1 centimetre across (0.01m). Each of my eyelids is 1 millimetre thick (0.001m). The hairs on my head are 0.0001 metres thick. My red blood cells are 0.000 001 metres thick. Some bacteria are 0.000 000 1 metres long. Some bacteria are 0.000 000 01 metres thick. Some viruses are 0.000 000 001 metres across.
Post-it note plenary • What does a microscope do? • Name three parts of a microscope and state what they do (function). • What is the total magnification if: the eye piece has a magnification of x10 and the lens has a magnification of x40?
Video clip 3 mins16 secs The microscopic life in an Italian lake (Lago di Candia). Algae and Protozoa are a vital part of the aquatic ecosystem, providing food and shelter for other organisms. As a major part of the world's biodiversity, they contain a vast array of different biochemistries, morphologies and life cycles. What is more, they are often spectacularly beautiful under the microscope.