Download
1 / 62
620 likes | 700 Views
MS Excel Training One. Section One: Excel Introduction. Section Goals Create a new workbook. Enter text and numbers. Edit text and numbers. Insert and delete columns and rows.

E N D
Section One: Excel Introduction Section Goals Create a new workbook. Enter text and numbers. Edit text and numbers. Insert and delete columns and rows.
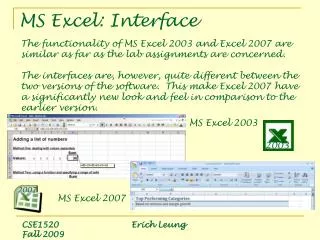
To open an existing workbook created in a previous version of Excel. Click the Microsoft Office Button in the upper-left corner of the window. There you'll get the same commands you've used in the past to open and save your workbooks. Now, getting back to that workbook, click Open, select the workbook you want, and then click Open. That's all you have to do to open a file created in a previous version. You're ready to get to work. Click the Microsoft Office Button to open this menu. In the menu, click Open to open an existing workbook. Or click Excel Options at the bottom of the menu, to set program options. Open and Save Files
When you start Excel you're faced with a big empty grid or table. There are letters across the top and numbers down the left side. And there are tabs at the bottom named Sheet1, Sheet2, and so on. If you're new to Excel, you may wonder what to do next. These are the Columns, Rows, Cells, and Worksheets you will use in Excel. Columns, rows, and cells are what you see when you open Excel.
The band at the top of the Excel 2007 window is the Ribbon. The Ribbon is made up of different tabs. Each tab is related to specific kinds of work that people do in Excel. You click the tabs at the top of the Ribbon to see the different commands on each tab. The Home tab, the first tab on the left, contains the everyday commands that people use the most. Commands are organized in small related groups. For example, commands to edit cells are grouped together in the Editing group, and commands to work with cells are in the Cells group. The Ribbon spans the top of Excel. Related commands on the Ribbon are organized in groups. The Ribbon
Workbook and Worksheets • When you start Excel, you open a file that's called a workbook. Each new workbook comes with three worksheets, like pages in a document. You enter data into the worksheets. (Worksheets are sometimes called spreadsheets.) • Each worksheet has a name on its sheet tab at the bottom left of the workbook window: Sheet1, Sheet2, and Sheet3. You click each sheet tab to view a worksheet. • NOTE: It's a good idea to rename the sheet tabs to make the information on each sheet easier to identify. For example, you might have sheet tabs called January, February, and March for budgets or student grades for those months, or Northcoast and Westcoast for sales regions, and so on. • You can add additional worksheets if you need more than three. Or if you don't need as many as three, you can delete one or two (but you don't have to). And you can use keyboard shortcuts to move between sheets.
You may be wondering how to create a new workbook. Here's how: Click the Microsoft Office Button at the upper left. Then click New. In the New Workbook window, click Blank workbook. The first workbook you open is called Book1. This title appears in the title bar at the top of the window until you save the workbook with your own title. Sheet tabs at the bottom of the workbook window. Create a New Worksheet
Columns, Rows, and Cells Worksheets are divided into columns, rows, and cells. That's the grid you see when you open up a workbook. Columns go from top to bottom on the worksheet, vertically. Rows go from left to right on the worksheet, horizontally. A cell is the space where one column and one row meet. • Each column has an alphabetical heading at the top. The first 26 columns have the letters from A through Z. Each worksheet contains 16,384 columns in all, so after Z the letters begin again in pairs, AA through AZ. See Figure 2. • After AZ, the letter pairs start again with columns BA through BZ, and so on, until all 16,384 columns have alphabetical headings, ending at XFD. • Each row also has a heading. Row headings are numbers, from 1 through 1,048,576. The alphabetical headings on the columns and the numerical headings on the rows tell you where you are in a worksheet when you click a cell. The headings combine to form the cell address, also called the cell reference.
Column headings are indicated by letters. Row headings are indicated by numbers. After the first 26 column headings (A through Z), the next 26 column headings are AA through AZ. The column headings continue through column XFD, for a total of 16,384 columns. Columns, Rows, and Cells
Cells: where the data goes… • Cells are where you get down to business and enter data and information in a worksheet. • When you open a new workbook, the first cell you see in the upper-left corner of the worksheet is outlined in black, indicating that any data you enter will go there. You can enter data wherever you like by clicking any cell in the worksheet to select the cell. But the first cell (or one nearby) is not a bad place to start entering data in most cases. • When you select any cell, it becomes the active cell. When a cell is active, it is outlined in black, and the headings for the column and the row in which the cell is located are highlighted. For example, if you select a cell in column C on row 5, the headings on column C and row 5 are highlighted, and the cell is outlined. That cell is known as cell C5, which is the cell reference.
Cells: where the data goes…(cont’d) • The outlined cell and the highlighted column and row headings make it easier for you to see that cell C5 is the active cell. Also, the cell reference of the active cell appears in the Name Box in the upper-left corner of the worksheet. By looking in the Name Box, you can see the cell reference of the active cell. • All of these indicators are not too important when you're right at the very top of the worksheet in the very first few cells. But when you work further and further down or across the worksheet, they can really help you out. Keep in mind that there are 17,179,869,184 cells to work in on each worksheet. You could get lost without the cell reference to tell you where you are. • For example, it's important to know the cell reference if you need to tell someone where specific data is located or must be entered in a worksheet.
Column C is highlighted. Row 5 is highlighted. Cell C5, the active cell, is shown in the Name Box in the upper-left corner of the worksheet. When you open a new workbook, the first cell is the active cell. It has a black outline. In the second picture, cell C5 is selected and is the active cell. It is outlined in black.
Section Review • You need a new workbook. How do you create one? • Does the Name Box shows you the contents of the active cell? • In a new worksheet, must you start by typing in cell A1? Or can you start anywhere? • There are three worksheets with every new workbook. Can you change that automatic number if you wish?
Questions? • Understand worksheets?
Section Two: Entering Data Section Goals: How to move your selection one cell to the right. Entering a fraction such as ¼. What ###### means. How to enter the months of the year and dates.
Data Entry • You can enter two basic kinds of data into worksheet cells: numbers and text. You can use Excel to create budgets, to work with taxes, or to record student grades. You can use Excel to list the products you sell or to record student attendance. You can even use Excel to track how much you exercise every day, and your weight loss, or how much your house remodel is costing you. The possibilities really are endless.
Column Titles • When you enter data, it's a good idea to start by entering titles at the top of each column so that anyone who shares your worksheet can understand what the data means (and so that you can understand it yourself, later on). • In the picture, the column titles are the months of the year, across the top of the worksheet. You'll often want to enter row titles too. In the picture, the row titles down the left side are the names of companies. This worksheet shows whether or not a representative from each company attended a monthly business lunch.
The column titles are the months of the year. The row titles are company names. Worksheet with Column and Row Titles
Entering Info • Say that you're creating a list of salespeople names. The list will also have the dates of sales, with their amounts. So you will need these column titles: Name, Date, and Amount. • You don't need row titles down the left side of the worksheet in this case; the salespeople names will be in the leftmost column. You would type "Date" in cell B1 and press TAB. Then you'd type "Amount" in cell C1. After you typed the column titles, you'd click in cell A2 to begin typing the names of the salespeople. • You would type the first name, and then press ENTER to move the selection down one cell to cell A3 (down the column), and then type the next name, and so on.
Press TAB to move the selection one cell to the right. Press ENTER to move the selection down one cell. Navigating Within a Worksheet
Dates and Times • To enter a date in column B, the Date column, you should use a slash or a hyphen to separate the parts: 7/16/2009 or 16-July-2009. Excel will recognize this as a date. If you need to enter a time, type the numbers, a space, and then "a" or "p" — for example, 9:00 p. If you put in just the number, Excel recognizes a time and enters it as AM. • Tip To enter today's date, press CTRL and the semicolon (;) together. To enter the current time, press CTRL and SHIFT and the semicolon all at once.
Excel aligns text on the left side of cells, but it aligns dates on the right side of cells. Time/Date Alignment
Numbers To enter the sales amounts in column C, the Amount column, you would type the dollar sign ($), followed by the amount. • Other numbers and how to enter them • To enter fractions, leave a space between the whole number and the fraction. For example, 1 1/8. • To enter a fraction only, enter a zero first. For example, 0 1/4. If you enter 1/4 without the zero, Excel will interpret the number as a date, January 4. • If you type (100) to indicate a negative number by parentheses, Excel will display the number as -100.
Excel aligns numbers on the right side of cells. Currency Alignment
“Auto” Texts Here are two time-savers you can use to enter data in Excel: • AutoFill Enter the months of the year, the days of the week, multiples of 2 or 3, or other data in a series. You type one or more entries, and then extend the series. • AutoComplete If the first few letters you type in a cell match an entry you've already made in that column, Excel will fill in the remaining characters for you. Just press ENTER when you see them added. This works for text or for text with numbers. It does not work for numbers only, for dates, or for times.
Section Review • Does pressing ENTER moves the selection one cell to the right. • To enter a fraction such as 1/4, the first thing you enter is _____. • What does ##### mean? • To enter the months of the year without typing each month yourself you'd use: • Which of these will Excel recognize as a date?
Questions? • Understand formatting?
Section Three: Edit and Revise Data/Worksheets Section Goals Delete the formatting from a cell. How to undo a deletion. To add a column. To add a new row.
Editing Information • Say that you meant to enter Peacock's name in cell A2, but you entered Buchanan's name by mistake. Now you spot the error and want to correct it. There are two ways to do it: The Formula Bar.
Editing Information (cont’d) • What's the difference? Convenience. You may find the formula bar, or the cell itself, easier to work with. If you are editing data in many cells, you can keep your pointer at the formula bar while you move from cell to cell by using the keyboard. • After you select the cell, the worksheet says Edit in the lower-left corner, on the status bar. While the worksheet is in Edit mode, many commands are temporarily unavailable (these commands are gray on the menus). What can you do? Well, you can delete letters or numbers by pressing BACKSPACE, or by selecting them and then pressing DELETE. You can edit letters or numbers by selecting them and then typing something different. You can insert new letters or numbers into the cell's data by positioning the insertion point and typing. • Whatever you do, when you're all through, remember to press ENTER or TAB so that your changes stay in the cell.
Double-click a cell to edit the data in it. Or, after clicking in the cell, edit the data in the formula bar. The worksheet displays Edit in the status bar. Editing
Clear Formatting • Someone else has used your worksheet, filled in some data, and made the number in cell C6 bold and red to highlight the fact that Peacock made the highest sale. But that customer changed her mind, so the final sale was much smaller. You delete the original figure and type in the new number. But the new number is still a bold red number. Why? • What's going on is that it's the cell that is formatted, not the data in the cell. So when you delete data that has special formatting, you also need to delete the formatting from the cell. Until you do, any data you enter in that cell will have the special formatting. • To remove formatting, click in the cell and then, on the Home tab, in the Editing group, click the arrow on Clear . Then click Clear Formats, which removes the format from the cell. Or you can click Clear All to remove both the data and the formatting at the same time.
The original number is formatted bold and red. Delete the number. Enter a new number. Bold and red again! Formatting stays with the cell. You can't delete formatting by deleting or editing data. To delete cell formatting, on the Home tab, in the Editing group, click the arrow on Clear, and then click Clear Formats. Or click Clear All to delete data and formatting both at once. Clearing Formats
Insert Column or Row • After you've entered data, you may find that you need another column to hold additional information. For example, your worksheet might need a column after the date column, for order IDs. • To insert a single column, click any cell in the column immediately to the right of where you want the new column to go. So if you want an order-ID column between columns B and C, you'd click a cell in column C, to the right of the new location. Then, on the Home tab, in the Cells group, click the arrow on Insert. On the drop-down menu, click Insert Sheet Columns. A new blank column is inserted. • To insert a single row, click any cell in the row immediately below where you want the new row to go. For example, to insert a new row between row 4 and row 5, click a cell in row 5. Then in the Cells group, click the arrow on Insert. On the drop-down menu, click Insert Sheet Rows. A new blank row is inserted. • Excel gives a new column or row the heading its place requires, and changes the headings of later columns and rows.
Section Review • To delete the formatting from a cell, you would: • You learned in the practice how to undo a deletion. Press: • How do you add a new column? • How do you add a new row?
Questions? • Understand formats?
Section Four: Formulas Section Goals Use the SUM button. Start a formula in an empty cell. Understand a function. Know how to see/reveal the formula. Using math operators. Explain what ##### means. Using SUM in formulas.
To quickly add a column of data together, use the SUM button. To use this feature, select the numbers you want to add together by clicking and dragging, then click on the SUM symbol. The numbers will be added will be totaled in a cell directly after your selection. “Auto” SUM Button
In this lesson you'll learn how to use Excel to do basic math by typing simple formulas into cells. You'll also learn how to total all the values in a column with a formula that updates its result if values change later on. In the practice session at the end of the lesson, you'll have a chance to use the formulas you've learned about. A budget in a worksheet needs an amount in cell C6. Insert Subtotals in a List of Data in a Worksheet
Begin With an Equal Sign • The two CDs purchased in February cost $12.99 and $16.99. The total of these two values is the CD expense for the month. You can add these values in Excel by typing a simple formula into cell C6. • Excel formulas always begin with an equal sign (=). Here's the formula typed into cell C6 to add 12.99 and 16.99: • =12.99+16.99 • The plus sign (+) is a math operator that tells Excel to add the values. • If you wonder later on how you got this result, the formula is visible in the formula bar near the top of the worksheet whenever you click in cell C6 again.
Type the formula in cell C6. Press ENTER to display the formula result. Any time you click in cell C6, the formula appears in the formula bar. Using Equal Sign
Other Math Operators • To do more than add, use other math operators as you type formulas into worksheet cells. Use a minus sign (-) to subtract, an asterisk (*) to multiply, and a forward slash (/) to divide. Remember to always start each formula with an equal sign. • Note You could use more than one math operator in a single formula. This course covers only single-operator formulas, but you should know that if there's more than one operator, formulas are not just calculated from left to right.
Other Math Operators (cont’d) • Excel uses familiar signs to build formulas.
Total All the Values in a Column • To add up the total of expenses for January, you don't have to type all those values again. Instead, you can use a prewritten formula, called a function. • You can get the January total in cell B7 by clicking Sum in the Editing group on the Home tab. This enters the SUM function, which adds up all the values in a range of cells. To save time, use this function whenever you have more than a few values to add up, so that you don't have to type the formula. • Pressing ENTER displays the SUM function result 95.94 in cell B7. The formula =SUM(B3:B6) appears in the formula bar whenever you click in cell B7. • B3:B6 is the information, called the argument, that tells the SUM function what to add. By using a cell reference (B3:B6) instead of the values in those cells, Excel can automatically update results if values change later on. The colon (:) in B3:B6 indicates a cell range in column B, rows 3 through 6. The parentheses are required to separate the argument from the function. • Tip The Sum button is also on the Formulas tab. You can work with formulas no matter what tab you work on. You might switch to the Formulas tab to work with more complex formulas, which are explained in other training courses.
To get the January total, click in cell B7, and then: On the Home tab, click the Sum button in the Editing group. A color marquee surrounds the cells in the formula, and the formula appears in cell B7. Press ENTER to display the result in cell B7. Click in cell B7 to display the formula in the formula bar. Sum Button
Copy a Formula Instead of Creating a New One • Sometimes it's easier to copy formulas than to create new ones. In this example, you'll see how to copy the formula you used to get the January total and use it to add up the February expenses. • First you select cell B7, which contains the January formula. Then, position the mouse pointer over the lower-right corner of the cell until the black cross (+) appears. Next, drag the fill handle over cell C7. When the fill handle is released, the February total 126.93 appears in cell C7. The formula =SUM(C3:C6) is visible in the formula bar near the top of the worksheet whenever you click in cell C7. • After the formula is copied, the Auto Fill Options button appears to give you some formatting options. In this case you wouldn't need to do anything with the button options. The button disappears when you next make an entry in any cell. • Note You can drag the fill handle to copy formulas only into cells that are next to each other, either horizontally or vertically.
Drag the black cross from the cell containing the formula to the cell where the formula will be copied, and then release the fill handle. Auto Fill Options button appears but requires no actions Copying a Formula
Use Cell References Cell references can indicate particular cells or cell ranges in columns and rows.
Cell References (cont’d) • Suppose it turned out that the 11.97 value in cell C4 for video rentals in February was incorrect. A rental of 3.99 was left out. To add 3.99 to 11.97, you would click in cell C4, type this formula into the cell, and then press ENTER: • =11.97+3.99 • As the picture shows, when the value in cell C4 changes, Excel automatically updates the February total in cell C7 from 126.93 to 130.92. Excel can do this because the original formula =SUM(C3:C6) in cell C7 contains cell references. • If you had entered 11.97 and other specific values into a formula in cell C7, Excel would not be able to update the total. You'd have to change 11.97 to 15.96 not only in cell C4, but in the formula in cell C7 as well. • Note You can revise a formula in a selected cell by typing either in the cell or in the formula bar.
Excel can automatically update totals to include changed values. Using Cell References