Download
1 / 3
0 likes | 13 Views
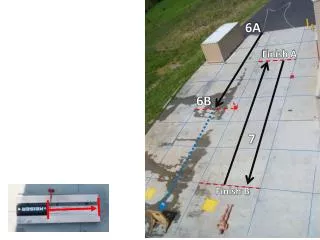
Metairie ProEdge Asphalt Contractor utilizes advanced milling techniques to restore damaged surfaces efficiently

E N D
Introduction Driveway installation is an important aspect of any property, whether residential or commercial. A well-constructed driveway not only enhances the aesthetic appeal of the property but also provides a smooth and durable surface for vehicles to traverse. However, the process of driveway installation requires careful planning, proper execution, and adherence to relevant regulations and standards. In this article, we will explore the essential steps involved in driveway installation, from initial preparation to final finishing touches. Step 1: Planning and Preparation Before embarking on any construction project, including driveway installation, thorough planning is crucial. This step involves considering various factors such as the purpose of the driveway, its dimensions, location on the property, and material selection. It is important to consult with professionals who specialize in asphalt or concrete paving to determine the most suitable material for your specific needs. Sub-Choosing the Right Material The choice between asphalt and concrete largely depends on factors such as budget, climate conditions, expected traffic load, and personal preference. Asphalt is a popular choice due to its affordability and ease of maintenance. On the other hand, concrete offers durability and a wide range of design options. Sub-Obtaining Construction Permits Before commencing any construction activity, it is essential to obtain the necessary construction permits from local authorities. These permits ensure that your driveway installation adheres to building codes and regulations set by municipal authorities. Sub-Site Excavation and Grading Once all necessary permits are obtained, site excavation and grading can begin. This involves clearing any existing vegetation or debris from the area where the driveway will be installed. The ground is then leveled or graded to ensure proper water drainage Learn more here and a stable base for the pavement. Step 2: Base Preparation A solid base is essential for a long-lasting and durable driveway. The base layer provides support and stability to the pavement above it. Sub-Base Material Selection The selection of the base material depends on the specific requirements of your driveway project. Commonly used materials include crushed stone, gravel, or recycled asphalt. These materials are compacted to create a firm and stable base. Sub-Base Compaction Proper compaction of the base material is crucial to prevent future settling and cracking of the driveway surface. Specialized construction equipment, such as rollers or plate compactors, is used to achieve the desired level of compaction. Sub-Adding a Geotextile Fabric In some cases, adding a geotextile fabric between the base material and the subgrade can help improve stability and prevent soil erosion. This fabric acts as a barrier, preventing the mixing of different layers and enhancing overall durability. Step 3: Paving Material Installation
Once the base preparation is complete, it is time to install the paving material of choice, whether it be asphalt or concrete. Sub-Asphalt Paving For asphalt driveways, hot mix asphalt (HMA) is commonly used. The HMA is delivered to the site in trucks and then spread evenly using paving equipment. It is then compacted using rollers to ensure proper density and smoothness. Sub-Concrete Paving Concrete driveways involve pouring concrete into prepared forms or molds. The concrete mixture needs to be properly proportioned and mixed before pouring onto the prepared base. It is then leveled and finished with tools such as trowels for a smooth surface. Step 4: Finishing Touches The final step in driveway installation involves adding finishing touches that enhance both functionality and aesthetics. Sub-Sealcoating Sealcoating provides an added layer of protection against moisture, oil spills, and UV rays. It also enhances the appearance of the pavement, giving it a fresh and well-maintained look. Sub-Landscaping and Sidewalk Construction To complete the overall look of your property, consider incorporating landscaping elements such as decorative plants or hardscaping features. Additionally, constructing sidewalks alongside the driveway can provide a safe pathway for pedestrians. Sub-Paving Repair and Maintenance Regular maintenance is crucial for prolonging the lifespan of your driveway. This includes periodic repairs to address cracks, potholes, or other signs of wear. Proper cleaning, sealing, and reapplication of sealcoating should also be part of your maintenance routine. FAQs Q: How long does driveway installation typically take? A: The duration of driveway installation depends on various factors such as the size and complexity of the project. On average, it can take anywhere from a few days to a couple of weeks. Q: Is it necessary to hire professionals for driveway installation? A: While some homeowners may choose to undertake driveway installation as a DIY project, hiring professionals ensures proper construction techniques, adherence to regulations, and high-quality results. Q: Can I install a driveway over an existing one? A: In certain cases, it is possible to overlay or resurface an existing driveway with new pavement material. However, this depends on factors such as the condition of the existing surface and its compatibility with the new material. Q: How often should I sealcoat my driveway? A: Sealcoating should ideally be done every 2-3 years to maintain optimal protection and appearance. However, this frequency may vary depending on factors such as climate conditions and vehicle traffic. Q: What precautions should I take during driveway installation? A: It is important to ensure proper safety measures during driveway installation, such as wearing protective gear, following construction regulations, and keeping the construction area secure to prevent accidents or injuries. Q: How much does driveway installation cost? A: The cost of driveway installation varies depending on factors such as material selection, size, site preparation requirements, and regional pricing. It is advisable to obtain multiple quotes from reputable contractors to compare costs.
Conclusion Driveway installation requires careful planning, expert execution, and attention to detail to achieve a smooth and durable finish. By following the essential steps outlined in this article and seeking professional guidance when needed, you can ensure that your driveway not only enhances the overall aesthetics of your property but also provides a functional and long-lasting surface for years to come. Remember to prioritize regular maintenance to preserve the integrity of your driveway and seek professional assistance for any repairs or issues that may arise.