Diagnosis
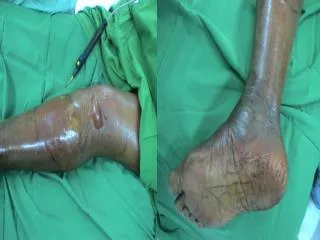
Diagnosis. Tenderness along the joint, pain in weight bearing Severe swelling Diagnosing Ankle Sprains Talor tilt test Anterior drawer test Cotton test.

Diagnosis
E N D
Presentation Transcript
Diagnosis • Tenderness along the joint, pain in weight bearing • Severe swelling • Diagnosing Ankle Sprains • Talor tilt test • Anterior drawer test • Cotton test
Perform the anterior drawer test with the ankle at 90° to the leg. Grasp the heel and pull forward while, with the other hand, placing posterior force on the tibia. If the test is positive, the so-called suction sign occurs. Dimpling is observed at the anterolateral aspect of the ankle, indicating compromise of the anterior talofibular ligament. A firm endpoint will be absent • Mild degree 5 mm • Moderate degree 5-10 mm • Severe degree > 15 mm
FIGURE 2. Anterior drawer test to assess the integrity of the anterior fibular ligament
D:\p.t\Physical Exam\videos\All Videos (A-Z)\Anterior Drawer Test.flv
The talar tilt test is used to examine the integrity of the calcaneofibular or the deltoid ligament. The patient is seated comfortably on the end of an exam table. Possible alternate positions can be side lying or supine. The examiner grasps the foot with the ankle at 90° to the leg, while stabilizing the tibia and fibula. To test the calcaneofibular ligament the examiner will adduct and invert the calcaneous into a varus position. The deltoid ligament is examined by abducting and everting the calcaneous into a valgus position. Note that the degree of tilt ranges from 0-23°. A positive test will result in laxity • mild degree Talar tilt 0-10 • Moderate degree Talar tilt 10-20 o • Severe degree Talar tilt > 20o
FIGURE. Inversion stress test to assess the integrity of the calcaneofibular ligament.
To perform the squeeze test, place the thumb on the tibia and the fingers on the fibula at the midpoint of the lower leg; then squeeze the tibia and fibula together. Consider pain along the length of the fibula, which indicates a positive test result
Side-to-side (Cotton) test- place examining hand under the plantar aspect of the foot/ankle, with your thumb under one malleolus and your middle finger under the other malleolus. Place a medial and lateral-directed force (not inversion/eversion stress as in the talar tilt test) on the ankle. Assess if translation and assess quality of endpoint. There may be a few mm of motion with a syndesmosis sprain. An alternative to this is to passively externally rotate the foot. Pain with this maneuver will occur in a syndesmosis sprain (= External Rotation test).
Factors predispose to ankle sprains • * Poor rehabilitation of a revent the sprain occprevious sprained ankle • * Poor proprioception (proprioception is the ability to sense where a joint is .... if you don't know where your ankle is, the muscles will not be able to prevent the ankle sprain) • * Hereditary hypermobility of joints has been named as a possible etiology. • * Weak muscles (they are just not strong enough to purring)
The common causes of chronic ankle pain • * Poor rehabilitation • * A fracture that was not initially diagnosed • * Post traumatic arthritis • * Osteochondritis dissecans (loose bit of bone in the joint) • * Syndesmotic ligament injury • * Functional instability (a feeling of 'giving way') • * Ankle impingement
Ankle sprain types The sprained ankle is often classified as to how severe it is: • First degree ankle sprain: * Some stretching or mild tearing of the ligament. * Little or no functional loss - the joint can still function and bear some weight * Mild pain * Some swelling * Some joint stiffness
Second andegree ankle sprain: *Moderate tearing of the ligament fibers *Moderate instability of the joint * Moderate to severe pain – weight bearing is very painful (difficulty walking )* Swelling and stiffness A more effective means of immobilizing the kle (splints) may be needed
Third degree ankle sprain: * Total rupture of a ligament - there is a loss of motion* Gross instability of the joint - joint function is lost* Severe pain initially followed by no pain * Severe swelling cast immobilization is needed for at least 2-3 weeks.
FIGURE 1. Grading of sprains. (A) The grade I sprain is characterized by stretching of the anterior talofibular and calcaneofibular ligaments. (B) In the grade II sprain, the anterior talofibular ligament tears partially, and the calcaneofibular ligament stretches. (C) The grade III sprain is characterized by rupture of the anterior talofibular and calcaneofibular ligaments, with partial tearing of the posterior talofibular and tibiofibular ligaments.
Rehabilitation (sprained ankle) • All ankle sprains recover through three phases: • Phase 1 includes resting, protecting the ankle and reducing the swelling (one week). • Phase 2 includes restoring range of motion, strength and flexibility (one week to two weeks). • Phase 3 includes gradually returning to activities that do not require turning or twisting the ankle and doing maintenance exercises. This will be followed later by being able to do activities that require sharp, sudden turns (cutting activities) such as tennis, basketball or football (weeks to months).
Rehabilitation (sprained ankle) • Aims of rehabilitation • 1- Decrease initial pain and swelling. • 2- Improve mobility and flexibility. • 3- Improve the strength of the joint muscles. • 4- Re-establish neural control and co-ordination. • 5- Return to full fitness.
Phase 1 - Early • Decreasing pain and swelling • This phase can last from 2 days to 2 weeks (or more) depending on how bad the injury is. • Protection of the ankle from further injury by taping, splints or a cast or brace. limited stress on the ankle can promote faster and stronger healing. By allowing the ankle to move forwards and backwards (in the sagittal plane) and not laterally, the ankle can keep moving but strain on the injured ligaments is significantly reduced. • A useful support at this stage is the aircast gel type ankle support which prevents most sideways movement but still allows limited use of the ankle.
Image 2 - Aircast gel ankle brace Ankle tape
Rest - this is essential. Use crutches with partial weight bearing to get about with if necessary. • Isometric exercises:- can be performed early on so long as they are not too painful. Avoid inversion and eversion though as this will stress the injured ligaments. • Ice - use cold therapy throughout the rehabilitation process. Apply ice for 20 minutes every hour initially for the first day then reduce this to 4 to 5 times a day from then on. In the acute stage ice will constrict blood vessels and further bleeding. Longer term benefits include reduction of pain and muscle spasm. • Ice should not be used for longer than 30 minutes at a time as nerve palsy may occur. Ice should be used for as long as it is beneficial. As soon as the rehabilitation process plateaus the therapist may decide to change to heat to progress further.
Compression - use grip bandage or taping. Even better are products that specifically apply compression at the same time as cooling. • Elevation - Elevating the leg will help swelling run away from the site of the injury. Elevate the leg while icing and for 10 minutes after.
Phase 2 - Rehabilitation phase • Improve mobility and flexibility • For the first 2 to 7 days after injury you can start to move the ankle straight up and down but do not turn it in or out. This will help increase mobility and start to strengthen it up. Do as much as pain will allow. Try 2 sets of 40 reps whilst the ankle is iced and elevated and build up on that. • As swelling and pain lessen, start to invert and evert the ankle (move the soles of the feet inwards and upwards and the outwards and upwards). This will start to put more stress on the damaged structures so be careful not to do too much. • Stretching the achilles tendon regularly is important.
Strengthening the ankle joint muscles • Strengthening begins with isometric exercises performed against an immovable object in four directions of ankle movement. • Strengthening exercises where pull the foot and toes up and hold for 10 sec's and then push down and hold for 10 sec's This can also be done for inversion and eversion as pain allows. • The patient then progresses to dynamic resistive exercises using ankle weights, resistance bands or elastic tubing. • Perform concentric and eccentric exercises with elastic band: • Concentric muscle contraction (muscle shortens) against the elastic band Eccentric contraction (muscle lengthens) during the slow relaxation of the muscle as the elastic band overpowers the deliberately slowly relaxing muscle • Toe raises, heel walks and toe walks may also be attempted to regain strength and coordination. • Continue to apply cold therapy to the joint regularly - at least 3 times a day for 20 minutes. • Strapping and taping may still be beneficial here. • Maintain fitness by swimming or cycling if pain allows. Cardiovascular exercises is important and should begin the first day after injury.
Use of elastic tubing in strengthening exercises for eversion. Single-leg toe raises done on a step
Re-establish co-ordination and proprioception • Proprioception exercises are thought to be important in avoiding recurrent ankle sprains. Early weight bearing is thought to help reduce proprioception loss. Try balancing on one leg with eyes closed. This will improve proprioception (the neuromuscular control over muscles). This will have been damaged when injured the ankle. Aim to be able to balance for 1 minute without wobbling. • A wobble board is a useful in strengthen the ankle and • improve proprioception.
Single-leg wobble board exercise to increase proprioception.
Phase 3 : Return to full fitness / functional training • In order to start the functional rehabilitation phase (activity and sports specific training) it is important the athlete has full range of motion and 80 to 90% of pre-injury strength. • Running may begin as soon as walking is pain free. It is a good idea to tape the ankle before starting running training particularly during early sessions until confidence, proprioception and strength has returned. • Running should begin on a clear flat surface such as a running track. Grass or bumpy surfaces will increase the risk of re-injury. • Jog the straights and walk the curves. • Speed should be gradually increased over time to a sprint. • Plyometric exercises • Sports specific drills using cones can be introduced. • Changing direction, running in a figure of 8 pattern and zigzagging between cones. • Return to competition gradually.
ACTIVITY PROGRESSION • The sequence for progression of activities is as follows: • 1- Swimming, aquatic exercises • 2- Walking; forward, retro • 3- Jogging • 4- Running • 5- Figure-eights • 6- Sport-specific drills • For 6 months after ankle sprain, athletes are advised to wear high-top shoes with taping or bracing (Air-cast).