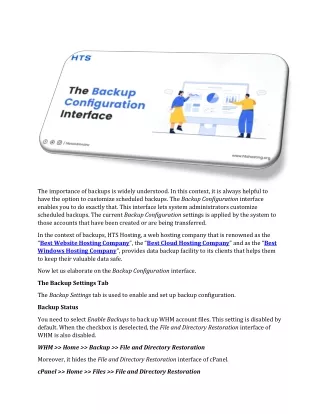
The Backup Configuration Interface
The Backup Configuration interface is used by system administrators for the purpose of customizing scheduled backups. The Backup Settings tab is used to enable as well as to set up backup configuration.

The Backup Configuration Interface
E N D
Presentation Transcript
The importance of backups is widely understood. In this context, it is always helpful to have the option to customize scheduled backups. The Backup Configuration interface enables you to do exactly that. This interface lets system administrators customize scheduled backups. The current Backup Configuration settings is applied by the system to those accounts that have been created or are being transferred. In the context of backups, HTS Hosting, a web hosting company that is renowned as the “Best Website Hosting Company”, the “Best Cloud Hosting Company” and as the “Best Windows Hosting Company”, provides data backup facility to its clients that helps them to keep their valuable data safe. Now let us elaborate on the Backup Configuration interface. The Backup Settings Tab The Backup Settings tab is used to enable and set up backup configuration. Backup Status You need to select Enable Backups to back up WHM account files. This setting is disabled by default. When the checkbox is deselected, the File and Directory Restoration interface of WHM is also disabled. WHM >> Home >> Backup >> File and Directory Restoration Moreover, it hides the File and Directory Restoration interface of cPanel. cPanel >> Home >> Files >> File and Directory Restoration
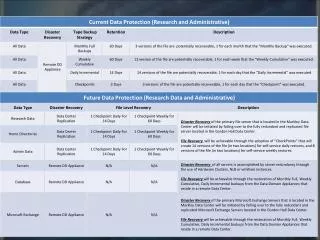
Global Settings The following global backup settings need to be configured for your WHM account: Backup Type - You need to select one of the below-mentioned settings in order to determine the way in which the system stores backup files. oCompressed –This setting should be selected for saving all of your information in a compressed format. Less disk space is used by this setting. On the flip side, it takes more time to finish a backup. oUncompressed - This setting should be selected for saving all of your information in an uncompressed format. This setting runs faster than that of the Compressed backups but uses more disk space. oIncremental –This setting needs to be selected for saving all the files in the directory tree. A combination of hard links and files is used by this setting to ensure speed and to save disk space. Check the Available Disk Space –This checkbox needs to be selected for enabling the system to check whether the server has the minimum free disk space available for creating local backups. This setting is enabled by default. It needs to be mentioned here that if the server doesn’t have free disk space, then critical services might not function, unless more space is created and made available. If this setting isn’t selected, the server runs backups regardless of the availability of free disk space. The following steps can be carried out after selecting the checkbox, Check the Available Disk Space: 1.Enter the amount of free disk space which is required by the backup system prior to performing backups. 2.Select one of the following units of measurement- oPercent of available disk space (%). oMegabytes (MB) Maximum Destination Backup Timeout–Enter the maximum number of seconds for allowing a backup process to upload a single backup file to a destination. You need to ensure that the maximum number of seconds that you enter gives the system enough time to upload the largest of your backup files. Maximum Backup Restoration Timeout –Enter the maximum number of seconds for letting a backup process restore a single backup file. You have to ensure that the number of seconds that are entered gives the system enough time to restore the largest of your backup files. Scheduling and Retention
The Scheduling and Retention settings let you specify the time with regard to running the backup process. You can select to run backups on a daily, weekly or monthly basis. It is possible to use a combination of these settings. You must opt for at least one of these settings. You need to select the checkboxes which correspond to the timing settings that you want to use. Daily Backup –A new backup is created by your system on each of the days of the week selected by you. You need to carry out the following actions if you opt for this setting: 1.Select the days on which you want to run backups. 2.Enter the maximum number of daily backup files that need to be stored on your system at any given time. You can enter any number between 1 and 9999. This needs to be entered into the text box, Retention. Once a backup completes successfully, then these backups are stored by the system. 3.Select the checkbox, Strictly enforce retention, regardless of backup success, in order to remove backups that are successful or unsuccessful. The system removes all those backups which are over the number that has been set in the Retention text box. Weekly Backup - A new backup is created by your system once a week on the day selected by you. You need to carry out the following actions if this setting is selected by you: 1.Select the day of the week on which you want to run backups. 2.Enter the maximum number of weekly backups that need to be stored on your system at any given time. You can enter any number between 1 and 9999. This needs to be entered into the text box, Retention. Once a backup completes successfully, then these backups are stored by the system. 3.Select the checkbox, Strictly enforce retention, regardless of backup success, in order to remove backups that are successful or unsuccessful. The system removes all those backups which are over the number that has been set in the Retention text box. Monthly Backup - A new backup is created either once or twice a month. It is created on the 1st or on the 15th day of every month. The below-mentioned actions need to be performed if this setting is selected. 1.Select the days of the month on which you want to run backups. 2.Enter the maximum number of monthly backups that need to be stored on your system at any given time. You can enter any number between 1 and 9999. This needs to be entered into the text box, Retention. Once a backup completes successfully, then these backups are stored by the system.
3.Select the checkbox, Strictly enforce retention, regardless of backup success, in order to remove backups that are successful or unsuccessful. The system removes all those backups which are over the number that has been set in the Retention text box. It needs to be mentioned here that if both, daily and monthly backups, are run on the same day then it is the daily backup that will be run first. Once the daily backup completes, then the daily backup gets copied in the monthly backup. Configure Backup Directory Before proceeding, it is important to let you know that it is strongly recommended that your backups be saved to a remote Additional Destinations location. It needs to be specified that the backup process and the transfer process use separate queues. Hence, if each backup completes faster than a transfer, then backup files can get accumulated on the server and eventually fill the hard drive. Additionally, it is highly recommended that backups should not be performed to remote filesystems. It is possible for you to back up directly to a remote filesystem, however, this configuration isn’t supported by cPanel & WHM. Hence, in order to avoid potential risks, it is recommended that you take the aid of a qualified system administrator when managing this custom backup path. The use of unique filepaths is recommended while storing multiple server backups in a file system that is shared. This helps to prevent backup file conflicts. Moreover, quotas are automatically disabled by the system on non-root filesystems which contain a backup destination. This is done to prevent performance degradation. The below-mentioned settings let you specify the location for saving your backups. Default Backup Directory –You need to enter the absolute path to the desired directory location, in order to change the default backup directory. By default, backup files are saved locally by the system on the /backup directory. Backup Staging Directory –The backup staging directory is used by the system while restoring backups from a remote server. This directory stores the files and directories of the remote backup, during a backup restoration. Once the system restores the backup, it empties the directory. It is possible to change the backup staging directory path. You need to enter an absolute path in order to update the backup staging directory. In this context it is important to mention that the following paths cannot be used: o/etc o/sys o/dev o/run o/boot
o/proc The below-mentioned paths cannot be used, but a subdirectory can be used within these paths. o/ o/home o/usr o/var Moreover, no front slash characters (\) can be used in the path. No such path can be used that contains two periods consecutively. It needs to be mentioned that backups are restored by the system one at a time. Retain Backups in the Default Backup Directory–This checkbox needs to be selected for retaining each account backup in the /backup directory. This is done after the backups have been transferred to another destination. If this setting hasn’t been selected then the server deletes account backup files from the /backup directory. This happens after the following events have taken place: oThe backup file is successfully transferred by the system to at least one additional destination. oThere is an attempt by the system to transfer, successfully or unsuccessfully, the backup file to all of your additional destinations. Certain important points need to be mentioned here. These are as follows: oThe system returns an error when the Retain Backups in the Default Backup Directory setting has not been selected and when a destination has not been specified in the Additional Destinations section. Error: Nowhere to back up: no enabled destinations found and retaining local copies is disabled. oIf the Retain Backups in the Default Backup Directory setting has not been selected then the File and Directory Restoration interface in WHM will be disabled and cPanel’s File and Directory Restoration interface will be hidden. oDue to this setting the system backup files, directories or other files won’t be removed by the system. Mount Backup Drive as Needed–The checkbox needs to be selected to mount a backup drive. A separate mount point is required by this setting. This setting causes the Backup Configuration process to check the file, /etc/fstab, for a backup mount. If a mount is present with the same name as the staging directory, then the drive is mounted by the Backup Configuration process. The process backs up the information to the mount. You need to
ensure that the location specified in the Default Backup Directory text box matches the mount point in the /etc/fstab file. If that isn’t the case then the backup will fail and an error will be logged by the system, which will be similar to the below-mentioned message: You have enabled BACKUPMOUNT in the /var/cpanel/backups/config file, but there is no mount point that matches /mnt/disk/backupMAIN in the /etc/fstab file. Once the backup process gets completed, the system dismounts the drive. It needs to be specified that if the checkbox is deselected, the Backup Configuration process won’t check the file, /etc/fstab, for a mounted backup drive. Save Configuration Once the desired settings have been configured, click Save Configuration, which is at the bottom of the Backup Settings form. Click Reset, in order to reset all the settings in the form to the previously saved settings. The Additional Destinations Tab The Additional Destinations tab should be used to store backups in a remote destination. A destination type needs to be selected from the menu. Then, Create New Destination needs to be clicked. A form appears for the selected destination type. Click Save Destination after completing the form. This saves the updated destination. Click Save and Validate Destination if you want to automatically validate your information after saving the changes. At this stage the Additional Destinations table appears. Saving your backups to a remote Additional Destinations location is highly recommended. If the Retain Backups in the Default Backup Directory setting isn’t selected, the system returns the following error: Error: Nowhere to back up: no enabled destinations found and retaining local copies is disabled. This error is also returned if a destination isn’t specified in the Additional Destinations section. Before we conclude, certain important points need to be mentioned. These are as follows: If the Incremental backup type is used, only Rsync additional destinations can be used. The amount of time taken by the backup process increases with every additional destination transfer. If the process goes on for too long, it might interfere with the next backup process.
Remote restoration needs to be carried out for restoring backups, which exist in the additional destinations that have been created. It is recommended that system backup files be transferred over encrypted connections. Source: https://www.htshosting.org/knowledge-base/technology/227/the- backup-configuration-interface