Download
1 / 34
370 likes | 519 Views
Learn how to stabilize vehicles in various positions, including upside down, and mitigate electrical hazards. Discover different cribbing configurations and directional movements for safe extrication operations.

E N D
8 Vehicle Stabilization
Knowledge Objectives (1 of 2) • Explain the basis for stabilizing a vehicle. • Explain the five types of wood box cribbing configurations. • Explain the five directional movements of a vehicle. • Describe how to stabilize a vehicle in its normal position. • Describe the proper procedure for deflating tires.
Knowledge Objectives (2 of 2) • Describe how to stabilize a vehicle resting on its side. • Describe how to stabilize a vehicle upside down or resting on its roof. • Describe how to marry two vehicles or objects together. • Describe ways to mitigate vehicle electrical hazards.
Introduction (1 of 2) • Vehicle extrication is a three-phase process. • The second step is vehicle stabilization.
Introduction (2 of 2) • Unstable vehicles are a threat to rescuers and victims. • Proper stabilization provides a foundation from which to work.
Cribbing (1 of 5) • Cribbing is the most basic physical tool used for vehicle stabilization. • Available as wood, composite, or steel • Several different types of designs
Cribbing (2 of 5) • Characteristics and properties of wood • Composed of a mixture of materials • Properties of each wood are different in terms of growth ring placement and direction of grain. • Not all wood is suitable for cribbing or shoring.
Cribbing (3 of 5) • When choosing wood, consider: • Measurement of applied stress • Wood bends when a force is applied to it. • Fiber stress at proportional limit (FSPL) rating: maximum stress a board can be subjected to. • Cribbing strength: dimension of contact point multiplied by FSPL.
Cribbing (4 of 5) • Five wood box cribbing configurations • Two–piece layer crosstie • Three–piece layer crosstie • Crosstie platform • Triangle crosstie • Modified crosstie
Cribbing (5 of 5) • When using two– or three–piece crosstie configurations, make sure all sections are uniform, with one on top of the other. • Avoid placing the contact points at the ends.
Vehicle Positioning (1 of 14) • Directional movements • Horizontal–forward or rearward on longitudinal axis or horizontally on lateral axis • Vertical–up and down in relation to the ground • Roll–rocks from side to side • Pitch–up and down on its lateral axis • Yaw–twists and turns on its vertical axis
Vehicle Positioning (3 of 14) • Postcollision positions • Normal upright position • Gain control by minimizing the suspension system. • If all four sides are accessible, insert cribbing equally at four or more points.
Vehicle Positioning (4 of 14) • Postcollision positions (cont’d) • Normal upright position (cont’d) • Place cribbing in solid areas. • Use step chocks to save the guesswork. Courtesy of Devon Sweet
Vehicle Positioning (5 of 14) • Postcollision positions (cont’d) • Normal upright position (cont’d) • Use wedges or shims to fill any void spaces. • Deflating the tires after cribbing has been inserted forces the vehicle to rest on the cribbing.
Vehicle Positioning (6 of 14) • Postcollision positions (cont’d) • Normal upright position (cont’d) • To deflate tires, use a channel lock wrench or the forked end of a Halligan bar. • Consider the internal options for stabilizing the vehicle.
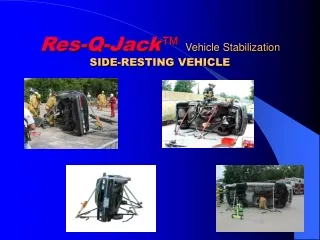
Vehicle Positioning (7 of 14) • Postcollision positions (cont’d) • Resting on its side • Dangerous • Stabilization involves cribbing and tensioned buttress struts. • Keep techniques basic.
Vehicle Positioning (8 of 14) • Postcollision positions (cont’d) • Resting on its side (cont’d) • Vehicle has a high center of gravity and a narrow track/base. • Lower the center of gravity by expanding the vehicle’s footprint.
Vehicle Positioning (9 of 14) • Postcollision positions (cont’d) • Resting on its side (cont’d) • Determine whether the vehicle is leaning. • The person in charge will feel for shifting. • Rescuers should work from a semi–kneeling stance.
Vehicle Positioning (10 of 14) • Postcollision positions (cont’d) • Upside down or resting on its roof • Roof posts can be compromised, making vehicle unstable. • Stabilization involves struts and cribbing. Courtesy of Robert Reul, Margate Fire Rescue
Vehicle Positioning (11 of 14) • Postcollision positions (cont’d) • Upside down or resting on its roof (cont’d) • The weight of the engine will usually drive the front area lower to the ground. • Usually three points of entry • Initial crib placement should focus on the most unstable area, which is usually the trunk area. • Tunneling is the process of gaining entry through the rear trunk area.
Vehicle Positioning (12 of 14) • Postcollision positions (cont’d) • On another vehicle • Two objects will need to be married in their current positions.
Vehicle Positioning (13 of 14) • Postcollision positions (cont’d) • On another vehicle (cont’d) • Use industrial-grade ratchet strapping. • Stabilize the bottom vehicle first. • Never crawl under the top vehicle. Courtesy of Robert Reul, Margate Fire Rescue
Vehicle Positioning (14 of 14) • Postcollision positions (cont’d) • On another vehicle (cont’d) • How is the top vehicle resting on the bottom vehicle? • Is any section of the top vehicle touching the ground? • Where are the victims in relation to the top vehicle? • Are there any victims inside either vehicle? • Where are the access points to both vehicles? • Will marrying the vehicles compromise the access points?
Hidden Dangers and Energy Sources (1 of 3) • Once the vehicle is stabilized, mitigate hidden hazards. • Unless there is an IDLH, the vehicle should be stabilized before opening the hood to eliminate the power. • Alternatively fueled vehicles require specialized procedures.
Hidden Dangers and Energy Sources (2 of 3) • Eliminating a vehicle’s electrical system: • Disable 12-volt DC battery • Remove fuses from fuse box • Remove smart keys
Hidden Dangers and Energy Sources (3 of 3) • Beware that supplemental restraint system air bag control units come equipped with an energy capacitor. • Can keep the system live after power has been disconnected
Summary (1 of 7) • Vehicle stabilization is a critical component of the extrication process. • Proper vehicle stabilization provides a solid foundation to work. • Cribbing is the most basic physical tool used in vehicle stabilization. • Soft woods are commonly used for cribbing because they are well suited for compression-type loads.
Summary (2 of 7) • NFPA 1006 discusses five types of wood box cribbing configurations: two-piece layer crosstie, three-piece layer crosstie, platform crosstie, triangle crosstie, and the modified crosstie. • There are five directional movements to consider during the process of vehicle stabilization.
Summary (3 of 7) • There are four common post collision vehicle positions that can be encountered at a collision scene. • The basic or simple forms of internally stabilizing a vehicle include placing the vehicle in park, turning off the engine, and applying the parking brake.
Summary (4 of 7) • The main purpose for stabilizing a vehicle in its normal position is to gain control of all vehicle movement by minimizing the vehicle’s suspension system. • When placing the cribbing, choose areas that are solid.
Summary (5 of 7) • When using cribbing, the goal is to make the contact area from the ground to the undercarriage tight, filling up any void spaces. • The purpose of deflating the tires is to have the frame of the vehicle settle down onto the cribbing, creating a balanced platform to work from and virtually eliminating the suspension system.
Summary (6 of 7) • The goal of stabilizing a vehicle on its side is to lower its center of gravity by expanding the vehicle’s footprint. • When a vehicle is involved in a roll-over, the roof posts will be compromised by the impact and weight of the vehicle, making the vehicle unstable.
Summary (7 of 7) • When the technical rescuer encounters a vehicle on top of another vehicle or an object on top of a vehicle, he or she is presented with two objects that are independently unstable. • Once the vehicle is stabilized, the technical rescuer should mitigate any potential post crash vehicle electrical hazards that can occur.