Advanced Shielding Design for Electron Beam Equipment
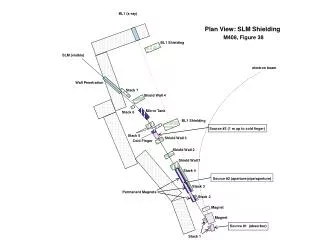
Detailed plan view of shielding arrangements for electron beam equipment, including the placement of mirrors, magnets, cold finger shield, and lead shields to ensure proper protection and beam control. The design features stackable shield walls for optimal safety.

Advanced Shielding Design for Electron Beam Equipment
E N D
Presentation Transcript
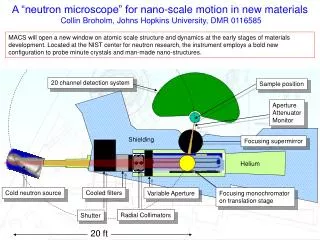
BL1 (x-ray) Plan View: SLM Shielding M408, Figure 38 BL1 Shielding SLM (visible) electron beam Wall Penetration Stack 7 Shield Wall 4 Mirror Tank Stack 6 BL1 Shielding Source #3 (1 m up to cold finger) Stack 5 Shield Wall 3 Cold Finger Shield Wall 2 Shield Wall 1 Stack 4 Source #2 (aperture/pipe/aperture) Stack 3 Permanent Magnets Stack 2 Magnet Magnet Source #1 (absorber) Stack 1
½ inch Pb shield Plan View: SLM Optical Bench Compton Scatter Shielding M408, Figure 37 1/8 inch Pb box visible beam UV filter M1 mirror M2 mirror 7/8 inch Pb stopper shield wall penetration ½ inch Pb collimators light pipe 1 inch Pb Collar