Download

1 / 26
260 likes | 414 Views
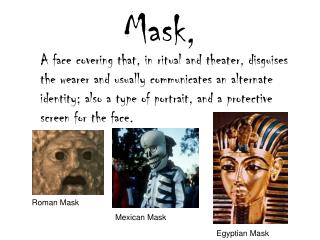
Cultural mask assignment. Supplies:. Mask form Plaster Kraft Corrugated cardboard for backing Awl or something similar to punch holes in the cardboard Embellishments, paint Feathers Beads Sting or yarn Scrap container for moistening strips Hot Glue Gun.

E N D
Supplies: Mask form Plaster Kraft Corrugated cardboard for backing Awl or something similar to punch holes in the cardboard Embellishments, paint Feathers Beads Sting or yarn Scrap container for moistening strips Hot Glue Gun
You'll need a mask form. You could simply use a plastic mask from the crafts store; those have the advantage of being adult-sized and readily available.
The mask you will be making will be made of plaster cloth, a cotton gauze infused with plaster of Paris. It's the same substance that's used to make casts for broken arms, and is readily available at crafts stores. It has the virtues of being easy to work with and yielding a strong and lightweight product.
You can work on either the inside or outside of the mask form, but working on the inside seems to give a little smoother result. Turn the mask form upside down. Cut 30-40 little squares and rectangles of plaster cloth. These should range in size from about 1/2" to 1" wide, and don't need to be cut exactly. You'll end up cutting more as you go, but this will get you started. Very important - use a scrap container for moistening the plaster cloth. Don't pour the resulting plaster water down your drain! The plaster particles can harden and start to clog your drains. Note - if the mask is to be worn, don't cover up the eye sockets. Dip the pieces in the water, then start smooshing them into the detailed areas of the mold.
Cover the inside surface of the form with a layer of moistened plaster cloth. Be sure to take time and fully smooth out all areas of the mask as you go.
The entire form will gradually get covered with plaster cloth. Bring the edges of the cloth up even with the edge of the mold.
Once one layer is in place, add more layers for strength. Since you're already carefully defined the detailed areas of the mask, the pieces of plaster cloth can be longer and wider. Three or four layers of cloth should make the piece strong but lightweight.
Let your mask set up for a couple of hours before attempting to remove it from the mold, then let it dry overnight.
Design stage Have a plan! Do a drawing of your overall on paper.
Begin the painting process by working background to foreground. Large areas of the background color should be applied first. After the paint is dry, draw on the overall design (in pencil)
Painting the “believable” eye
The entire background should be painted before drawing the eye on the mask. In this example, the background is white.
Draw the outline of the eye on the mask with a pencil. The eye is a basic football shape with the eyes at a slight angle upward.
Put down a base coat of whatever eye color your mask is going to be. In this case the base coat is blue.
Take an up close view of the eye and notice some common similarities: There is usually a highlight from a reflected light source The colored part of the eye, the cornea, usually appears to have a radials that expand out from the center.
Take an up close view of the eye and notice some common similarities: The pupil is always the darkest area, mostly black, varies in size, and is sometimes overlapped with a highlight. The outer edge of the cornea is usually a little darker than the inner part of the cornea
Paint in small dabs of a lighter color, such as white. This will be the radial we mentioned in the earlier slide
Begin blending out this area from the center out to give it the appearance of an actual cornea.
Paint in the pupil using a concentric circle in the center of the cornea. Use white to add highlights to the eye.
Cut out a piece of corrugated cardboard in the shape of an oval. The cardboard should be 1”-2” larger than the mask. Hot glue the mask on to the cardboard.
Use the Awl, or some other tool, to punch holes in the border area of the mask. These holes will be used to attach feathers, string, and beads to the mask
Group the feathers in bunches of 5-10 feathers and wrap the feathers together with string or thread. Push the group of feathers through the holes created by the Awl. Glue the backs of the group of feathers with hot glue.