Download
1 / 18
180 likes | 294 Views
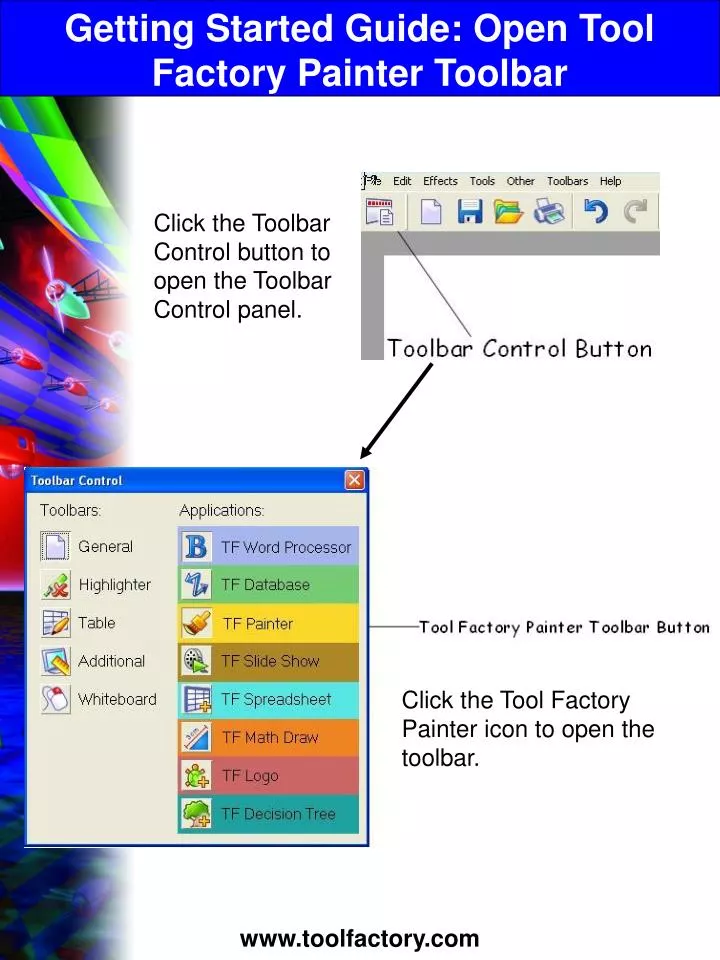
Getting Started Guide: Open Tool Factory Painter Toolbar. Click the Toolbar Control button to open the Toolbar Control panel. Click the Tool Factory Painter icon to open the toolbar. Getting Started Guide: Personalize Toolbars (CTRL+Shift+T).

E N D
Getting Started Guide: Open Tool Factory Painter Toolbar Click the Toolbar Control button to open the Toolbar Control panel. Click the Tool Factory Painter icon to open the toolbar.
Getting Started Guide: Personalize Toolbars (CTRL+Shift+T) On the General toolbar click the Toolbar Control button. CTRL+Shift+T
Getting Started: Adjust Pageview On the Additional Toolbar click the Page Setup icon and go to the Page tab. You can get to the same place by using these menu selections: File>Page Setup>Page. Adjust the amount of page you see. Adjust the type of paper. Choose from landscape, portrait, or poster mode for paper layout.
Brush Options: Selecting Brush On the Tool Factory Painter toolbar and click the Brushes icon.
Paint Colors: Select Paint Color and Mix Your Own Colors Click the palette button to open the mixing window. Drag the small splotches into the large splotch. Click one of the paint pots to transfer the color from the large splotch to the paint pot.
Paint Colors: Create Your Own Paint Pots Click on one of the small splotches and then click every paint pot to make them the same color. Drag colors from the small splotches into the new paint pots to make your own paint pot colors.
Paint Effects: Open the Paint Effects Panel Click the Paint Effects button on the Painter toolbar to open the Paint Effects panel.
Paint Effects: Descriptions of Paint Effects Tools Blur Sharpen Smudge Diffuse Darken Lighten Colorize Red Eye - Removes the red eye effect from photos. Clone - Clones a part of a picture from one place to another.
Eraser Options: Selecting an Eraser and Erasing a Single Color Check the Just One Color button. Select a color.
Special Features: Create a Repeating Pattern Create a painting and fill the background. On the Menu bar click Tool Factory Painter. You now have three options. Tile and Flip - Tiles the image but flips it in the middle of the page. Tile - Adds three more images than on the page. Wallpaper - Copies the image twenty-five times. Tiled once.
Special Features: Create Your Own Stamp 1. Click the Resource Bank button on the General toolbar. 2. Drag clip art onto the page. 3. Select the image and click the cut button. 4. Click the Stamp button on the Painter toolbar>Make Stamp from the Clipboard. Now just click on the page and stamp away!
Special Features: Grid Click the Grid button on the Tool Factory Painter toolbar to open up the Grid Panel.
Special Features: Region Selection Tools Click the Region button on the Painter toolbar. Click and drag to select. Click to end. Click to start and click again on corners to select. Hit enter to end. Click on the image and it will automatically select a region. TIP: Changing the Wand Settings changes the size of the region that is selected by the Magic Selection.
Special Features: Shapes Click the Shapes button on the Painter toolbar to open the Shapes panel. Select a shape and draw!
Special Features: Stamps Click the Stamp button on the Painter toolbar to open the Stamp panel. Stamp drop down menu. Rotate 90 degrees. Adjust the size of the stamp. Click to place a stamp or click, hold, and move the mouse.
Special Features: Symmetry On the Painter toolbar click the Symmetry button to open the Symmetry panel. Choose the desired type of symmetry and start painting. An example of vertical symmetry.
Special Features: Text Tool Click the Text Tool button on the Painter toolbar. You can now add text and graphics from the bank onto the page as long as this button is clicked. TIP: For this to work you must have the Tool Factory Word Processor Toolbar active. TIP: When you bring graphics and text onto the page using the text tool you can then reposition them later by clicking the Text Tool button and double clicking the image you would like to reposition.