Download
1 / 3
30 likes | 45 Views
When it comes to home decor, there is always a list of creativity to enhance the flavor of the room's interior. DIY Clock Bases' creativity becomes the center of attraction with the enchanting clocks hung on the wall.<br>

E N D
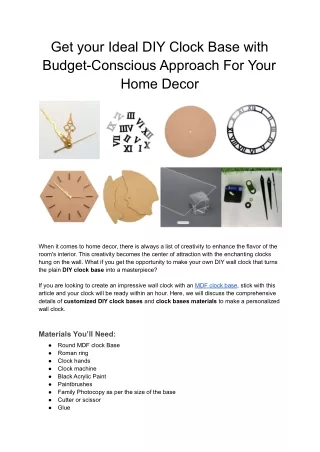
Get your Ideal DIY Clock Base with Budget-Conscious Approach For Your Home Decor When it comes to home decor, there is always a list of creativity to enhance the flavor of the room's interior. This creativity becomes the center of attraction with the enchanting clocks hung on the wall. What if you get the opportunity to make your own DIY wall clock that turns the plain DIY clock base into a masterpiece? If you are looking to create an impressive wall clock with an MDF clock base, stick with this article and your clock will be ready within an hour. Here, we will discuss the comprehensive details of customized DIY clock bases and clock bases materials to make a personalized wall clock. Materials You’ll Need: ● ● ● ● ● ● ● ● ● Round MDF clock Base Roman ring Clock hands Clock machine Black Acrylic Paint Paintbrushes Family Photocopy as per the size of the base Cutter or scissor Glue
● Mod Podge Dimensional Glaze Instructions: ● Place the plastic or any protective layer on the working table to avoid the stains of the paints. Use the roman ring lightly as it is in a cutout pattern, it may get cracked when comes under pressure. Every age group above 6 can work on this cloak-making art. ● ● Methods to Make the DIY Clock with MDF clock Base: Step: 1 Set your table with Clock making essentials Set the table with a protective layer of plastic and organize the clock-making essentials on the table. Be conscious while arranging the materials and keep them easy to reach while working on the clock. If you are working with your kid or any little one, make them wear the apron to avoid spoiling their clothes. Step: 2 Paint the Round MDF clock base black Here, we are working with a round DIY MDF clock base. Take the acrylic black colour and paint the base black. This will give the clock a decent background to our family photograph. You can either use paintbrushes or try your hands-on sponge paintings. Step: 3 Set your Photograph ready to Stick. Once you are done with your paint, let it dry for a few minutes. Till then, set your family photograph ready with the glue stick. If required, cut the extra edges of the photo to make it a perfect fit for the frame. Also, make a fine center hole as per the base measurement to create a sufficient gap for the clock machine. Step: 4 Stick the Photograph with Glue Now, if your paint is dried, let us move towards sticking the memory. Take any family photographs and stick them properly on the DIY clock base.
Step: 5 Add the layer of Mod Podge Dimensional glaze Now, while working on the dimensional layer, you need to secure your DIY clock base hole with a small stick or any tiny tube so that glaze won’t affect the center. Once you secure the hole, spread the dimensional layer on the base and keep it aside to dry for at least half an hour. This layer will add a polished surface to your base. Step: 6 Set the clock base with Clock-making materials. Once it dries completely, place the roman letter ring on the base and stick them properly. Be conscious while sticking the roman letter ring. Adjust it well so that while hanging the clock the photograph won’t seem tilted on the wall. Then finally add the clock machine with clock hands. And your personalized wall clock is ready to go on the wall. Create your DIY wall Clock As per the Nature of your Interior: Your living space is your open opportunity to pour your imagination into it. Whether you want to add the texture to your wall or want to gift a personalized memory to your loved ones, you can create your clock seamlessly with just a few basic materials. Get DIY clock bases with end products of clock-making materials at Hobby India. This online craft store offers you exactly what your vision desires.