Download
1 / 53
540 likes | 939 Views
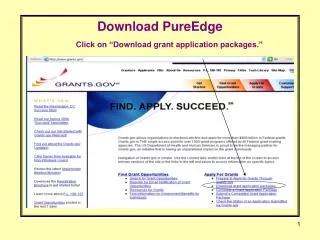
Download PureEdge. Click on “Download grant application packages.”. Click “PureEdge Viewer.”. If this is your first time downloading PureEdge: 1. Download the ISC Viewer: http://www.grants.gov/PEViewer/ICSViewer602_grants.exe 2. Download the Update:

E N D
Download PureEdge Click on “Download grant application packages.”
If this is your first time downloading PureEdge: 1. Download the ISC Viewer:http://www.grants.gov/PEViewer/ICSViewer602_grants.exe 2. Download the Update: http://www.grants.gov/PEViewer/PureEdgeUpgradeSetup.exe If you have downloaded the PureEdge viewer in the past, you may need to download the Update.
If you are not a Windows User click the hyperlink PureEdge Support for Non-Windows Users page or go to http://www.grants.gov/MacSuppor.
Follow the instructions for “Non-Windows Users.” If you are a Non-Windows user, you will need a windows emulator to run PureEdge.
Other Software Needed? You will need Adobe Acrobat or some other software that can convert documents to PDF. Applications submitted through Grants.gov will require any attachments be uploaded as PDFs. If files are uploaded in anything other than PDF, the application will generate an error.
Section 4: Search for Funding Opportunity Announcements (FOA). Download the Application Package and Instructions.
Search for Funding Opportunity Announcements (FOA). Go to www.grants.gov.Select “Search for Grant Opportunities.”
Perform a Basic Search Search by keywords. Examples: R21; SBIR; Conference, Shared Instrumentation, etc. Then, click the “search” button. Search by Funding Opportunity Number. Examples: PA-06-181;PA-06-120, etc. Then, click the “search” button. Do not search by CFDA number. Some FOAs have more than one CFDA numberand the number you enter might not be the primary CFDA number chosen for that FOA.
FOAs that meet your search criteria will be displayed. Select the FOA of your choice by clicking the blue hyperlink.
You will be taken to the Synopsis. Click on “Full Announcement” to see the full announcement of the FOA.
Click on “Apply for Grant Electronically.” This will take you to the website where you can download the application package and instructions.
Enter your email address if you would like to be notified of any changes associated with this opportunity. Right click on the hyperlink “Download Application Instructions.” Select “Save Target As” and choose the location where you want to save this file. Right click on the hyperlink “Download Application Package.” Select “Save Target As” and choose the location where you want to save the file.
Open the “application instructions” file you downloaded. It contains hyperlinks to useful information. Click on the hyperlink to the SF424 R&R Guide. It is very important to have the SF424 RR Guide handy when you are completing the application package.
Ctrl F Short on time and need instructions for a particular field in the grant application? Tip: Turn to the Table of Contents. Look for the specific section to which you need instructions. If that doesn’t work, press on your keyboard at the same time. In the “Find” window, enter the keyword you are searching for.
Once you have the PureEdge ICS Viewer and PureEdge Update on your computer, you are ready to open an application package. Open the application package you downloaded to your computer. Tip: Click the icon. This will turn the help function on. Hover over any field to get instructions for that field. Click the icon again to turn the help function off.
The forms associated with the application package are located on the left hand side of this page. Click on a form page and click the ‘Open form” button to open the form page.
Required Fields Grants.gov highlighted it’s required fields in yellow and also marked them with an asterisks “*”. Funding agencies did not highlight their required fields. Since your application will undergo two error checks, one by Grants.gov and the other by the funding agency, you must complete all fields required by Grants.gov and all fields required by the funding agency in order to pass both error checks.
Maneuvering through the application: Use the buttons at the top of the page to close the form, move from one page to another, and to print a page. How do I save my application? You can’t individually save each form page. You have to save the application package as a whole. Close any form page that might be open by clicking the “Close Form” button at the top of the page. When all forms are closed, scroll to the top of the grant application package page and click the “Save” button
The top section of the Grant Application Package page will be pre-populated based on the FOA associated with this package. Do not modify or enter information on the top half of this page. Complete the form pages and all required fields in the order in which they appear. Information you enter in the first form page will be used to populate the other form pages.
Section 5 refers to “Applicant Information.” The term “Applicant” refers to the applicant organization and not the PI. The SF 424 R&R form page is a 2 page document. Click “Next” to see the second page. To print the SF 424 R&R form page you will need to print each page individually. To do so, click the “Print Page” button at the top of each page.
PHS 398 Research Plan The research plan must be completed in sections and each section must be saved as its own separate file. When uploading documents into the application package, make sure each file is saved as a PDF before you upload it. Only PDF files will be accepted. Any other types of files will generate errors.
Research & Related Senior/Key Person Profile Key personnel are entered here. Each person’s biosketch will be uploaded as a pdf attachment after their profile. To move to the next profile, click the “Next Person” button.
Research & Related Budget - Section A & B If your application requires a full budget (as opposed to a modular budget) you will need to complete a detailed budget page for each year of the project. Instead of percent effort, you will now have to enter “person months.” Note: Person months cannot be less than 1. Entering person months of less than 1 will generate an error during the error checks. If your calculation of person months is less than 1, round up to 1 and enter the actual number of person months in the justification.
Research & Related Budget - Section A & B Before the system will allow you to proceed to the next budget period, you must upload the budget justification. Tip: If the budget justification file is not ready, upload any file as a place holder. Doing so will activate the “Next Period” button. However, please remember to go back and upload the budget justification. Click the “Next Period” button to move on to the next period.
Research & Related Budget – Cumulative Budget After all periods of the budget are complete, the cumulative budget will be automatically calculated.
If your application includes a collaboration with another organization, open the Research & Related Subaward Budget.
R&R Subaward Budget Attachment(s) Form Click the button labeled “Click here to extract the R&R Subaward Budget Attachment.” Save the file to your computer. Email the file to your collaborator to complete. When the file is emailed back to you, upload it as an attachment on this page.
After the application is complete, move all required forms from the left side to the right side. Click the button “Check Package for Errors.” If errors are found, each error will appear one at a time. Correct the error. Click “Check package for errors.” Correct the next error. Click “Check package for errors.” Correct the next error and so forth. Once all errors have been corrected, save the application. Send the application to your AOR to review.
After the AOR reviews the application, if no error’s are found, the AOR will save the application. Saving the application will activate the “Submit” button. The AOR will click the “submit” button to submit the application. Clicking the submit button will trigger the web browser to automatically open to the Grants.gov login page. The AOR will enter his/her username and password to log in.
The AOR will electronically sign and submit the application by clicking the “Sign and Submit Application” button.
A confirmation message will appear on the screen once the application is submitted Print the confirmation for your records. You will need the Grants.gov tracking number if you have questions about your application, or your application gets lost along the submission process. You will also need the tracking number to track the status of your application.
Section 7:Tracking applications in Grants.gov and (for HHS agencies) in the eRA Commons
Tracking applications in Grants.gov Go to http://www.grants.gov/GetStartedRegister?type=aor&showNav=reg. Click on “Track Application Status.”
Enter your username and password, and click the “Login” button.
You will see a list of the grant applications you, as AOR, have submitted. You can check the status of those applications on this page.
What do the application statuses mean? • A status of Received indicates that Grants.gov has received the application, but the application is awaiting validation. • A status of Validated indicates that Grants.gov validated the application and it is available for the agency to download. • A status of Received by Agency indicates that the agency has confirmed receipt of the application package. • A status of Agency Tracking Number Assigned indicates that the agency has assigned an internal tracking number to your application. This is the last status that Grants.gov tracks. Updates beyond this must be checked with the agency directly. • Note: All agencies do not assign tracking numbers. If you do not see an agency tracking number, this does not imply that the agency did not receive or process your application. The assignment of tracking numbers is based on the policy of a particular agency. • A status of Rejected with Errors indicates that Grants.gov was unable to process your application because of an error(s) and cannot accept the application until you correct the errors and successfully resubmit the application. You will receive email notification with information on how to address the error(s). This information can be found on the Grants.gov website in the Frequent Questions section. http://www.grants.gov/GrantsGov_UST_Grantee/!SSL!/WebHelp/applyingforgrants.html#question16
Each agency will have it’s own process to notify you of errors. It typically takes: Up to 1 day for Grants.gov validation. Up to 2 days for NIH Commons validation.If you do not know what to expect from the funding agency after your application is submitted through Grants.gov, call the funding agency. Ask how long it will take to find out whether your application has any agency specific errors?A good rule of thumb: If you have not heard from the funding agency within 3 days of submitting the grant, call the agency to check on the status of the grant.
Don’t be passive. Be proactive! Agencies will accept corrected applications up to a certain point. If you wait too long to check on your application, you might miss your opportunity to submit a corrected application.
If your application is going to NIH or to some other HHS agency (such as AHRQ, FDA, etc) you will track your application and check for errors in the Commons Log in to the Commons at https://commons.era.nih.gov/commons/.
Mark the box next to “Show eSubmission Errors.” If you want to narrow or expand your search, complete the “Received Date” fields.
A list of applications submitted through Grants.gov will be displayed. Click on the application ID to view errors.