Download
1 / 18
180 likes | 364 Views
iWeb Tutorial. Topics. After completing this tutorial, you should be able to:. Create your own webpage Customize your webpage Publish your webpage Edit and add to your webpage. Webpage Creation. Initial Steps. Opening program Selecting from pre-designed templates

E N D
iWeb Tutorial Colby College ITS
Topics After completing this tutorial, you should be able to: • Create your own webpage • Customize your webpage • Publish your webpage • Edit and add to your webpage Colby College ITS
Webpage Creation Colby College ITS
Initial Steps • Opening program • Selecting from pre-designed templates • Inserting text and photos • Inserting other media Colby College ITS
Beginning Steps • Open iWeb • Select template • Double click to edit existing text • Figure out what photos will be used Colby College ITS
Webpage Customization Colby College ITS
Formatting Text • Highlight text • To change color • Click on color icon • To change font • Click on font icon • To insert new text box • Click on text icon Colby College ITS
Inserting Photos • Select image from media browser • Drag over existing photo to replace with selected photo Colby College ITS
Inserting other media (Audio) • Select audio file from media browser • Drag into webpage • Select a photo to accompany audio Colby College ITS
Inserting other media (Video) • Select video from media browser • Drag into webpage Colby College ITS
Additional Formatting (1 of 3) • To overlap photos • Drag photos over each other • To change which one is on top, click on placement icons • To adjust image levels, such as contrast, click on adjust icon • Use Arrange tool to make additional alterations to layout Colby College ITS
Additional Formatting (2 of 3) • To insert other iWeb tools • Click on Insert at top of screen • Click on Buttons and select tool • To insert something from computer • Click on Choose • Select item Colby College ITS
Additional Formatting (3 of 3) • To change the focus of an image • Click on photo you wish to alter • Click on the Mask icon • Drag image using mouse to focus on the desired part of image Colby College ITS
Webpage Publishing Colby College ITS
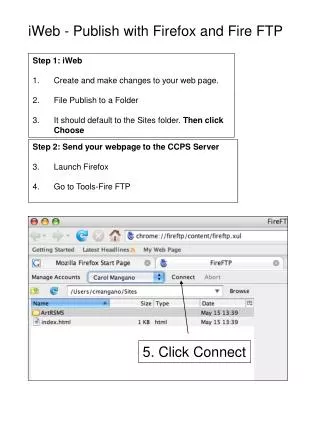
Publishing Webpage • Create a .Mac account • Click Publish icon in lower left hand of screen Colby College ITS
Webpage Editing and Expanding Colby College ITS
Expanding Your Webpage • To add another page to your website • Click on the Add Page button in the lower left hand corner of screen • To add a blog • Click on the Add Page button • Select blog page type, click choose • Add a blog by clicking on the Add Blog Entry button • To add a podcast • Create podcast in GarageBand • Select Share at top of screen • Click on Send Podcast to iWeb Colby College ITS
Questions? Comments?Feedback?Contact: Technical TrainingorCall Mel Regnell at ext. 4217 Colby College ITS