Download

1 / 6
0 likes | 1 Views
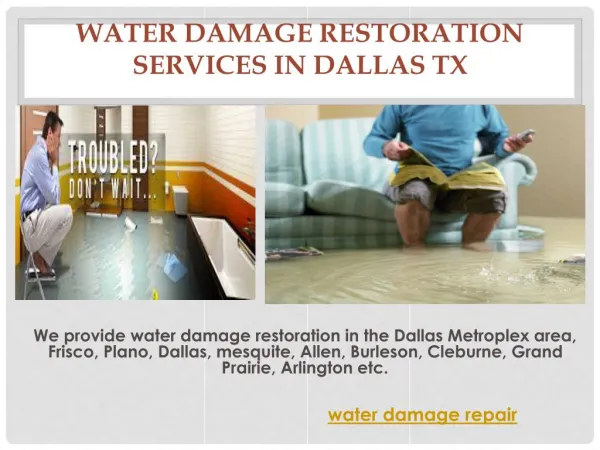
We handle complicated multi-unit water losses, collaborating gain access to, paperwork, and drying efforts with minimal disruption to residents.

E N D
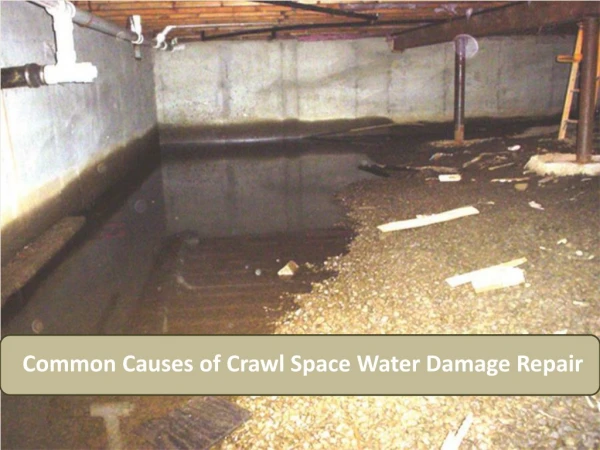
Water finds the vulnerable points. In a crawl space, that may be a low-slung vapor barrier with a tear, a split foundation vent, or a sagging duct sweating into the soil. In an attic, it is normally a flashing detail around a chimney, a nail leak in the underlayment, or an overworked bathroom fan discarding steam straight into the rafters. By the time most house owners discover a stain on the ceiling or smell musty air from a flooring register, the damage is currently layered: damp insulation, softened sheathing, inflamed framing, and a breeding ground for mold. Effective Water Damage Repair in these zones is less about shiny equipment and more about checking out the building, understanding how moisture moves, and acting quickly with the right sequence. Why crawl areas and attics are various from the rest of the house Kitchens and living rooms are conditioned, visible, and simple to gain access to. Crawl spaces and attics are none of that. They are tight, dark, and temperature swings are big. Air pressure, stack result, and wind drive unwanted air through vents, gaps, and recessed lighting. Water shows up in five main kinds: liquid leakages, ground vapor, condensation, bulk intrusion from storms, and periodic plumbing failures like a burst supply line in an attic. Each acts differently. Liquid water pools and wicks. Vapor finds cold surfaces. Condensation tracks with dew point and air motion. Bulk intrusion follows gravity, frequently along framing paths. A remediation plan has to fit these characteristics or it fails. On jobsites, I begin by defining the source with simple, reliable tests. A pin meter and thermo-hygrometer tell me if a joist is wet or if the air is just damp. Blue paper towels expose if the "leak" is actually tannin bleed from old plywood. Dye tests and hose tests, done systematically on a dry day, can isolate a roof penetration leak within an hour. Skipping the diagnostic action results in repeat damage, and a second expense nobody wants to pay. Safety initially: entering into tight spaces without getting hurt Attics and crawl spaces are unforgiving. In a confined crawl, you can pierce your match on rusty nails and entrust to fiberglass in your forearms. In an attic, one error on plaster and you remain in the living-room. I need 3 things on every entry: proper lighting, stable footing, and a real plan for egress. Headlamps are a must, plus a secondary light. In attics, short-term sidewalk slabs decrease danger and keep insulation from compressing. In crawls, I put down 6 mil plastic for tidy movement and to protect the vapor barrier during inspection. Air quality is worthy of the very same preparation as physical safety. A musty crawl space after a flood can measure outdoor-equivalent oxygen however raised carbon dioxide and great particulates, particularly if soil perspires and there is combustion equipment close by. I carry a portable air display and keep an N95 at minimum. For understood mold, a half- face respirator with P100 cartridges and sealed coveralls is not a luxury. It is how you end up the day without a headache and a cough. Assessing the damage: moisture mapping and the concealed paths The bones of a crawl space are wood beams, sill plates, rim joists, and piers. In attic spaces, you are taking a look at rafters, ridge boards, collar ties, and sheathing. Moisture seldom spreads equally. It tracks along grain, fasteners, and joints. A stud that reads 8 percent moisture content two feet from a damp zone can increase to 22 percent at the notch where an electrician drilled a hole. You need to map in grid style, note readings, and review after initial drying to ensure the pattern line is downward. Insulation makes complex the photo. In crawl areas, I still see fibrous batts jammed in between joists with the paper facer drooping like a hammock. Once damp, those batts hold water versus wood, slow drying, and sludge out gradually. In attics, blown-in cellulose can look dry on top while holding a mat of damp product below. It pays to dig and probe. I set aside bagging for insulation until I know which sections are genuinely saturated or polluted. Pull only what you must to speed drying and prevent microbial growth. I likewise search for the little perpetrators: a detached dryer vent pushing moist air into the attic, a bathroom fan with a lightweight flex duct that never ever reaches the outdoors, or an open-ended condensate line from an air handler that discards onto the insulation. In crawl areas, expect sweating ductwork, uninsulated cold water lines, and stopped working sump pumps. These information often trigger the slow, chronic moisture that damages wood long before a storm does the obvious damage. Stopping the source: roofing, grade, and plumbing fixes that stick
There is no point drying a space while water keeps coming in. For attics, roofing penetrations are suspect primary. I check boot flashings around vent stacks, the saddle on the high side of chimneys, and any kick-out flashing where a roofing system fulfills a vertical wall. Silicone blobs are not a repair work. Proper fixes include lifting shingles, replacing underlayment, and installing brand-new flashings sized for the field conditions. When a ridge vent leakages, the cause is often wind-driven rain or a vent installed too low. A higher-quality vent with appropriate end baffles and fasteners will save hours of future restorations. In crawl spaces, bulk water tends to get here from the border. Poor downspout extensions, unfavorable grade, and blocked footing drains are villains. I have seen house owners spend a fortune on interior drain when a twenty-dollar downspout extension would have solved 80 percent of the problem. Start outside: extend downspouts 6 to 10 feet, adjust grading to slope away at least 5 percent for a number of feet, and keep splash blocks clear. If water still intrudes, think about a boundary French drain with a daylight outlet or a sump with a reputable pump and alarm. Inside the crawl, seal ground vapor with a constant, taped vapor barrier that adds piers and walls. Spaces are not cosmetic. They are entry points for moisture and soil gases. Plumbing in attics is less common, however when an air handler stays up there, condensate management ends up being essential. The primary drain needs to slope and remain clear. The secondary pan needs a float switch wired to shut down the unit before overruning. I have actually changed ceiling drywall lots of times since a five-dollar switch was missing or bypassed. Drying method: air moves, heat helps, and persistence wins Drying a crawl space is not the like drying a living room. You work against raw soil, cooler temperature levels, and minimal gain access to. I go for regulated air motion across wet surfaces, adequate dehumidification, and, when safe, a little bit of heat to lower relative humidity and increase evaporation. Velocity without dehumidification simply presses moisture around. Dehumidification without air movement dries the air and ignores the wet wood. In attics, heat is normally plentiful by day, which can assist drive off wetness from wood and sheathing. The trap is nightfall, when temperature levels drop and humidity climbs up. I prefer a cycle: daytime air motion with targeted dehumidification vented to the exterior when possible, then tapered airflow in the evening to avoid condensation. Leave an information logger for 48 to 72 hours and enjoy how the curve reacts. When the dew point inside falls day over day, you are on track. One neglected tool is unfavorable air. In a musty crawl or musty attic, a little unfavorable pressure with an air scrubber and HEPA exhaust to the outside can prevent smells and spores from migrating into living areas. Seal obvious bypasses initially: the scuttle hatch, recessed lights, energy penetrations. I have actually lowered occupant grievances about odor by half just by controlling pressure during drying. Mold and microbial growth: when to remediate and when to monitor Mold is both easier and more complex than it is constructed out to be. Simple in that it needs wetness, a food source, and time. Complicated due to the fact that not all noticeable development indicates active colonization, and not all spores warrant major demolition. I use three triggers for formal removal: continual wood wetness above 16 to 18 percent, visible development beyond a few square feet, and air sampling showing elevated spore types compared to outdoors. If two out of 3 hit, I set containment, run unfavorable air with HEPA, and plan a combination of elimination and treatment. Bleach does not repair mold on porous products. It leaves water behind and can drive development deeper. For wood framing, I prefer mechanical removal of surface development utilizing HEPA vacuuming, mild scraping, and sanding
where useful. Then I apply an EPA-registered antimicrobial or a hydrogen peroxide-based cleaner that penetrates and breaks down staining. After cleaning, let the area dry, then think about a clear anti-microbial coating on persistent sections. The covering is not an alternative to repairing moisture, it is a belt-and-suspenders approach where future humidity spikes may occur. Insulation becomes a judgment call. Fiberglass holds dust that ends up being a food source. If the insulation is saturated or smells moldy, bag it and change later. If it is only mildly damp in spots and you can dry it thoroughly within 24 to 48 hours, you might save it. Cellulose that has been wet ought to be eliminated. It mats, compacts, and loses R-value quickly. Structural concerns: what wet wood can endure and where it fails Wood is resistant. A sill plate can strike 30 percent moisture content and dry back with no irreversible loss if it was a brief event. Problems emerge with repetitive wetting, fungal decay, and fasteners that loosen up as fibers swell and diminish. A screwdriver test tells part of the story. If you can sink a screwdriver into a sill with moderate hand pressure, decay is developed. In attics, focus on sheathing around penetrations and the lower third of rafters where condensation typically gathers. Dark staining alone is not a stop working. A soft, spongy feel underfoot or shingle nails pulling through the sheathing are stronger signals. Sistering joists in a crawl after a long-term leakage is common. Choose directly, dry lumber of equal or higher measurement, glue and bolt it to the original member, and bring it at least past the compromised area by 2 feet. In attics, enhance weak rafters with gussets and fix the moisture source before adding load. I have seen outstanding carpentry reversed by another winter of condensation. Attic-specific stop working points that masquerade as roof leaks Not every ceiling stain is a roofing system issue. I once traced a recurring winter spot above a corridor to a bath fan vent that went through an attic, uninsulated, and terminated just shy of the roofing system cap. On cold nights, the duct ended up being a condenser coil. Water ran back to the fan, then dripped onto the drywall. The repair took 2 hours: change with insulated duct, connect to the cap, and seal the joints with foil tape and a mastic collar. The homeowner had gotten 2 roofing quotes before calling. Recessed lights, specifically older non-IC-rated components, punch holes in the air barrier. Warm, moist indoor air trips stack effect into the attic, strikes cold sheathing, and condenses. In time you get rings of frost and drip marks radiating from light cans. Upgrading to IC-rated, airtight fixtures and air sealing around them with correct housings lowers this problem considerably. Include adequate attic ventilation that balances intake at the soffits with exhaust at the ridge, however do not count on ventilation to fix an air sealing failure. Ventilation supports a healthy attic, it does not treat an indoor humidity problem on its own. Crawl space truths: vented vs sealed, and why the old suggestions changed There is still dispute about vented crawl spaces. In mixed and damp environments, venting often makes things even worse by inviting warm, damp air under a cool house. When that air cools, relative humidity rises and wood gets wet even without a drop of liquid water. I prefer sealed crawl spaces in these regions: continuous ground vapor barrier, joints taped, walls insulated with foam board or closed-cell spray foam, rim joists sealed, and a dedicated dehumidifier sized for the volume. In cold-dry climates, a well-executed vented crawl can work, however it requires careful grading, drainage, and seasonal vent management. The difference appears in moisture readings. I have seen sealed crawls hold wood at 9 to 12 percent year-round, while vented crawls in the very same community swing in between 10 percent in January and 20 percent in August. The latter supports mold development in late summertime. Sealing and dehumidifying have upfront expenses, but they repay in fewer subfloor repair work, steady indoor humidity, and comfort. Timeframes and expectations: what "dry" actually means Customers request for precise schedules. I offer varieties, because product thickness, temperature level, and airflow dictate the speed. A damp subfloor over a moist crawl can dry in 3 to 7 days with great dehumidification and air motion. Attic sheathing after a roofing system leakage usually drops to stable readings in 2 to 5 days once the source is sealed and airflow is established. Deeply saturated framing might require 10 days. I do not remove equipment till moisture
material holds steady for two successive checks 24 hr apart without forced drying. That test prevents the bounce-back that shows up when machines leave too soon. Understand that "dry to the touch" is worthless for wood. A pin meter aligned with the grain, fixed for types and temperature, informs the story. For drywall, a non-invasive meter and a follow-up harmful check in a discrete location can verify dryness without opening big sections. Insurance and documents that in fact helps your claim Carriers react to facts. Images before, during, and after, with clear captions tied to dates, go further than flowery language. Keep a log: equipment used, readings by location, temperature level, relative humidity, and dew point. Document the cause as supported by evidence. If a roof boot stopped working, photo the crack effective water mitigation strategies and the water trail on the underlayment. If a cleaning machine supply line burst in an attic, keep the stopped working pipe for the adjuster. Scope disputes often fixate insulation and mold. Be ready to justify elimination with moisture readings, visible growth extent, and guidance from acknowledged requirements. Lots of adjusters will approve changing insulation once it has actually been saturated, even if it appears undamaged, since lost R-value and contamination are hard to reverse. Keep the conversation grounded in the structure science, not fear. Equipment choices that make their keep On repair online forums, equipment lists in some cases check out like wish catalogs. In practice, a well-chosen kit does the job without theatrics. For dehumidification, a high-efficiency LGR system sized to the area volume and grain depression needed will surpass two little retail systems. Position it to allow unblocked intake and exhaust, elevate it in Flood cleanup services a crawl to avoid soil contact, and run condensate to a safe drain or exterior. Air movers must be directional, not simply effective. In tight spaces, low-profile systems tucked along joists can develop a constant, gentle circulation across surfaces. Too much speed spreads dust and can damage loose products. Use HEPA air scrubbers when you disrupt mold or suspect particulates, and alter filters as needed, not on guesswork. Infrared electronic cameras are invaluable for initial mapping, but they are not a moisture meter. They show temperature differences that can indicate moisture. Confirm with contact or pin meters. A borescope helps examine cavities without large openings. An easy hand pump sprayer with a fine mist is still my go-to for applying cleaners equally on rafters and joists. Preventive information that keep the attic and crawl area dry Prevention is not attractive, but it is the most affordable, most dependable kind of Water Damage Remediation due to the fact that it removes repeat events. A few routines make the difference. Twice a year, walk the exterior and look at downspouts, grade, and any greenery trapped against the foundation. After heavy wind-driven rain, look into the attic with a flashlight and scan for fresh nail discolorations or damp underlayment. Change roofing flashings proactively when they show cracking or UV damage. Insulate and air seal attic hatches, and make sure bath fans in fact vent outside and run long enough after showers to clear moisture, normally 20 minutes. In the crawl, keep the vapor barrier undamaged. When trades get in, have them set protective sheeting. Label the sump pump breaker and test the pump at the start of each damp season. Insulate cold water lines to prevent summer condensation. If you heat with a heating system in the crawl, service it, and check for backdrafting that can add wetness and carbon monoxide threat. These touches are small, however they intensify into a dry, healthy envelope. Edge cases: when the obvious repairs are not enough Every so often, the building fights back. I worked on a mid-century home with a low-slope roof and a cathedral ceiling. The attic was generally a shallow plenum with no simple course for ventilation. Ice dams caused repeating winter leakages. The typical fixes, heat cables and patching, did bit. The enduring solution integrated a new self-adhered underlayment under the roofing, much better air sealing at the ceiling airplane, and dense-pack insulation to reduce heat loss that fed the dams. It was not cheap, however after one winter the ceiling stains stopped, and the house owner stopped shoveling the roof.
In another case, a crawl area stayed damp regardless of new rain gutters and a sealed liner. The soil was high in clay and the water level rose seasonally. We included an interior perimeter drain with a vapor-permeable path that directed water underneath the liner to a sump. The dehumidifier had less to do, wood wetness supported, and moldy odors in your house vanished. Sometimes you have to deal with the ground and the air together. A practical series that works Confirm and stop the source: roofing, grade, pipes, or ventilation fault. Do not start drying up until this is addressed. Stabilize the environment: develop safe access, control atmospheric pressure if needed, and set up preliminary air movement and dehumidification. Remove what can not be dried: saturated insulation, delaminated materials, and particles that traps moisture. Clean and remediate microbial development: mechanical removal, HEPA vacuuming, and suitable antimicrobial treatment. Dry to validated targets: display with meters, change equipment, and do not demobilize until readings hold without assistance. What success looks like In a healthy attic, sheathing reads cool and dry on an infrared scan, pin meter readings fall in the low teenagers or below, and there is no moldy smell on a humid day. Fans vent outside, ducts are insulated and sealed, and the hatch closes tight. In a healthy crawl, the vapor barrier is intact and taped at joints, wood wetness sits below 14 percent for the majority of the year, and there is no visible development on joists or subfloor. The dehumidifier cycles instead of runs constantly, and the sump, if present, is peaceful other than after storms. The art of Water Damage Repair in crawl areas and attics lies in pairing building science with useful fieldwork. You fix the water course, dry what is wet, remove what can not recuperate, and secure the envelope so it does not take place again. Do that with care and attention to detail, and you turn 2 of the most ignored areas of a home into peaceful, reputable parts of the structure that do their task without calling attention to themselves. Blue Diamond Restoration 24/7 Emergency Water, Fire & Smoke, and Mold Remediation for Wildomar, Murrieta, Temecula Valley, and the surrounding Inland Empire and San Diego County areas. Available 24/7, our certified technicians typically arrive within 15 minutes for burst pipes, flooding, sewage backups, and fire/smoke incidents. We offer compassionate care, insurance billing assistance, and complete restoration including reconstruction —restoring safety, health, and peace of mind. Address: 20771 Grand Ave, Wildomar, CA 92595 Phone: (951) 376-4422 Email: info@bluediamondrestoration247.com Website: https://bluediamondrestoration247.com Services: Service Areas: Emergency Water Damage Cleanup Fire & Smoke Damage Restoration Mold Inspection & Remediation Sewage Cleanup & Dry-Out Reconstruction & Repairs Insurance Billing Assistance Wildomar, Murrieta, Temecula Valley Riverside County (Corona, Lake Elsinore, Hemet, Perris) San Diego County (Oceanside, Vista, Carlsbad, Escondido, San Diego, Chula Vista) Inland Empire (Riverside, Moreno Valley, San Bernardino)