Download
1 / 16
160 likes | 301 Views
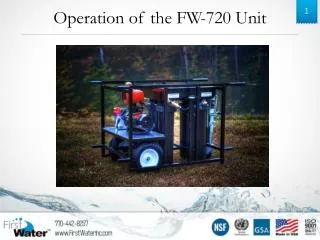
Operation of the FW-720 Unit. Side 1. Inlet. Hand Crank. Side 2. Flow Restrictor. Pump. Discharge. Inlet. Female GHT Inlet. 75 psi Pressure Relief Valve. Ball Valve. Side 3. Removable Pump. Side 4. Air Bleed Valve. Lamp out Solenoid. Pump. Intake Hose

E N D
Side 1 Inlet Hand Crank
Side 2 Flow Restrictor Pump Discharge Inlet Female GHT Inlet 75 psi Pressure Relief Valve Ball Valve
Side 3 Removable Pump
Side 4 Air Bleed Valve Lamp out Solenoid
Pump Intake Hose (Could be a standard garden hose) Discharge Hose Pump
Canisters and Filters Filters UV Bulb Canisters
Additional Components Extension Cords Discharge Hose Operation Manual Quick Setup Guide Canister Wrench Spare Quartz Sleeve or UV Bulb
Setup from Static Water Source - Pump must be Primed - Remove Plug and Fill with Water Purification Unit Source Water Pump
Setup – Directly From Building Simply connect hose and turn water on
Preparing the Unit • Make sure all canisters have new, clean filters in them • Disinfect all discharge outlets and hoses with a bleach / water solution • A ¼ cup to 1 gallon of water solution is generally a good ratio but use the ratio that is appropriate for your facility. Let sit in bleach water for 2 minutes.
Priming the Pump Priming Plug • Prime pump • Open priming plug and fill pump with water • Fill intake hose completely with water • Place foot valve into water source and connect other end of hose to pump intake • Plug pump in to power source • Wait for pump to turn on and see if the pump is primed. • If pump is not primed or loses the prime repeat the above process until pump stays primed. • Once pump is primed unplug pump to turn off then connect hose to pump discharge and the other end to the FW-720 intake. Drain Plug
Turning the FW-720 On • Once the FW-720 intake hose is connected, plug the UV power cord in. • The blue lamp on the power supply should light up indicating the lamp is on. Note: This picture shows the UV bulb illuminated. When in actual use the UV bulb will not be visible because it is inside a black canister. Warning: Exposure to UV light can cause skin and eye damage. Do not look directly at the UV bulb.
Flowing the FW-720 • Make sure a hose is connected to the FW-720 discharge outlet • Plug the pump in to turn it on • Open the intake ball-valve • Allow water to flow for a minute to flush any debris out of the system and hoses.
Cleaning the FW-720 • Turn unit off by unplugging the pump and the UV power supply • Disconnect all connections • Remove screen filter canister from pump. Rinse and clean screen filter. Drain and dry canister. • Remove the drain and priming plug from pump . Allow water to fully drain from the pump. Tilting the pump back and forth and side to side helps remove all water. • Replace drain plugs and screen filter after pump has drained. • Remove all filter canisters; remove and discard used filters; dry out the inside of the canisters. • Open the intake ball valve and the air bleed valve. Tilt the unit back and forth until the unit drains. If possible, allow the unit to air dry several days before replacing canisters. • Drain hoses • Store the unit with no filters installed. Filters will be installed before the next use. • Clean the unit as good as possible. The unit can be disinfected at your discretion but is not required. Disinfecting the unit is always done before it is used.
Preventative Maintenance Every 6 months: • Plug the UV power supply in and make sure the bulb is working • Remove canisters and make sure the O-rings are still lubricated • Make sure all parts and hoses are with the unit and haven’t been lost or repurposed.