Download
1 / 7
70 likes | 85 Views
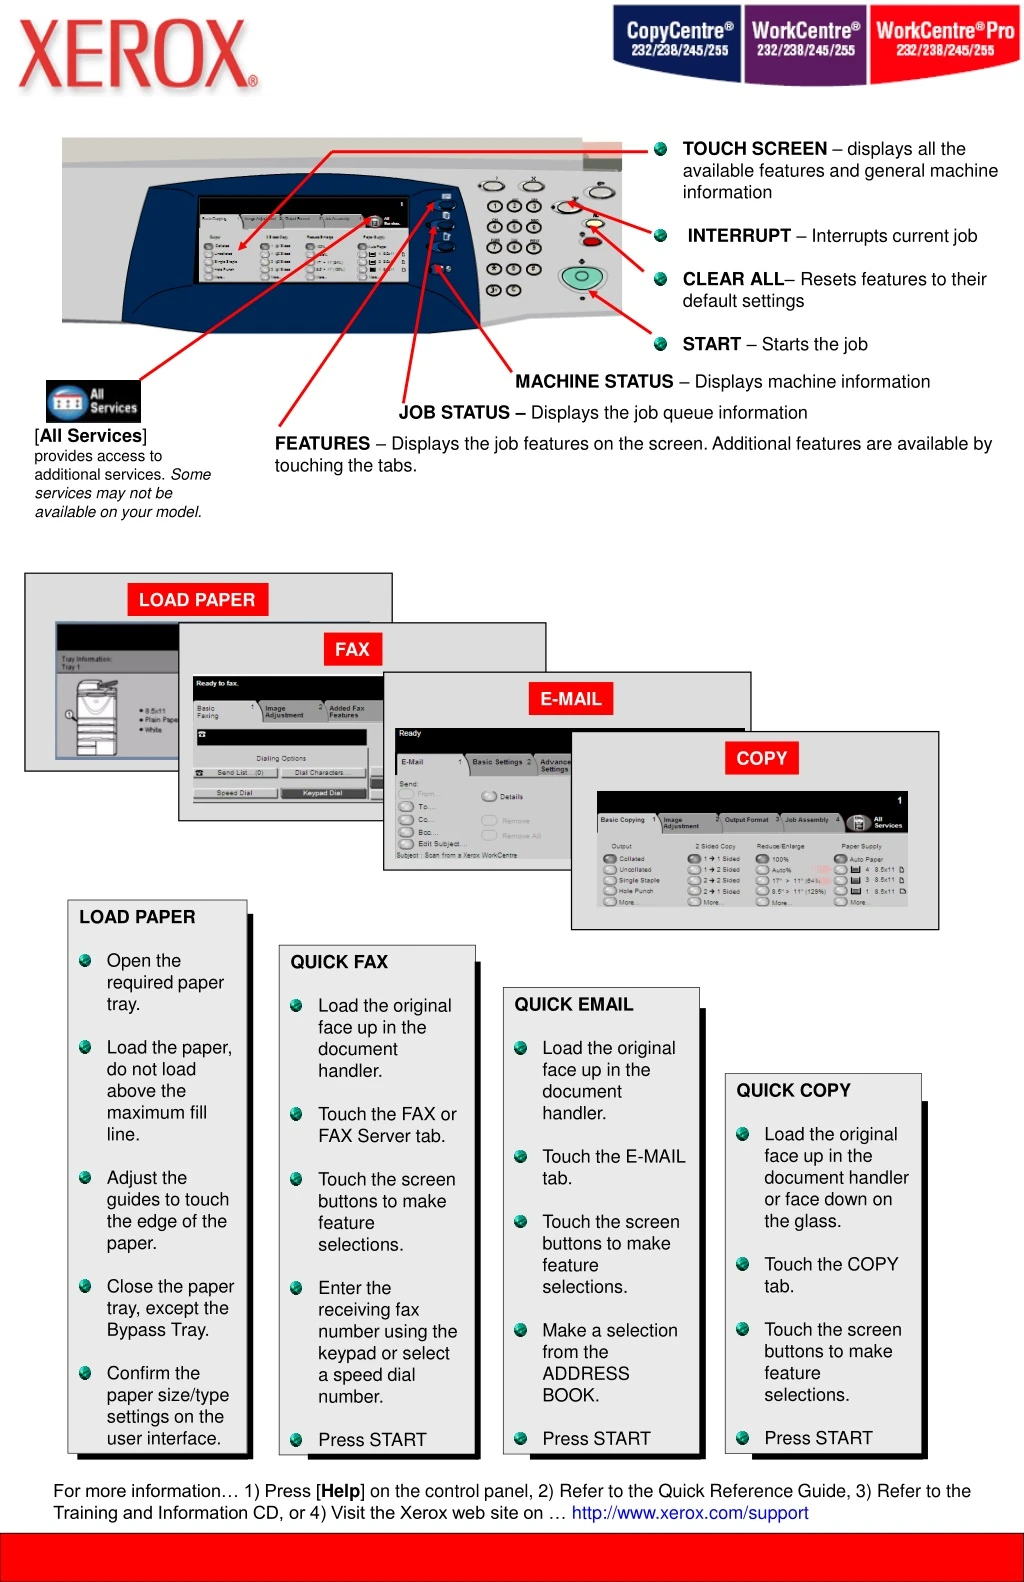
TOUCH SCREEN – displays all the available features and general machine information INTERRUPT – Interrupts current job CLEAR ALL – Resets features to their default settings START – Starts the job. MACHINE STATUS – Displays machine information.

E N D
TOUCH SCREEN – displays all the available features and general machine information • INTERRUPT – Interrupts current job • CLEARALL– Resets features to their default settings • START – Starts the job MACHINE STATUS – Displays machine information JOB STATUS – Displays the job queue information [All Services] provides access to additional services. Some services may not be available on your model. FEATURES – Displays the job features on the screen. Additional features are available by touching the tabs. LOAD PAPER FAX E-MAIL COPY LOAD PAPER • Open the required paper tray. • Load the paper, do not load above the maximum fill line. • Adjust the guides to touch the edge of the paper. • Close the paper tray, except the Bypass Tray. • Confirm the paper size/type settings on the user interface. QUICK FAX • Load the original face up in the document handler. • Touch the FAX or FAX Server tab. • Touch the screen buttons to make feature selections. • Enter the receiving fax number using the keypad or select a speed dial number. • Press START QUICK EMAIL • Load the original face up in the document handler. • Touch the E-MAIL tab. • Touch the screen buttons to make feature selections. • Make a selection from the ADDRESS BOOK. • Press START QUICK COPY • Load the original face up in the document handler or face down on the glass. • Touch the COPY tab. • Touch the screen buttons to make feature selections. • Press START For more information… 1) Press [Help] on the control panel, 2) Refer to the Quick Reference Guide, 3) Refer to the Training and Information CD, or 4) Visit the Xerox web site on … http://www.xerox.com/support
How to Load Paper 1 Open the Paper Tray • The Bypass Tray can be adjusted for all stock types and sizes between 4.13’ x 5.38” and 11 x 17, 60 to 220 gsm. • Adjustable Paper Trays hold stock sizes between 5.5 x 8.5 to 11 x 17, 64 to 220 gsm. • High Capacity Trays hold either 8.5 x 11 or A4, 64 to 200 gsm. Bypass Tray Adjustable Trays High Capacity Trays Finisher (Optional) 2 Load the Paper • Insert the paper on the LEFT side of the drawer. • Adjust the back and right Paper Guides to just touch the edge of the paper stack • Note the Paper Placement Icons on the drawer. • Do NOT load paper above the Maximum fill line 3 Close the Tray 4 Confirm the Paper Stock Loaded • If the tray information is correct, select the [Confirm] button. • Alternatively, change the paper size, type or color, by selecting the appropriate button on the touch screen, For more information… 1) Refer to the Quick Reference Guide, 2) Refer to the Training and Information CD, or 3) Visit the Xerox web site on … http://www.xerox.com/support
How to Make a Copy 1 Preparation • Cancel any selections made by a previous user by pressing the [Clear All] button. • Remove any staples and paper clips from your document and ensure that the documents are in good condition. 2 Load the Documents • Place the documents in the Document Handler in order (1,2,3…) with page 1 face up on top. • Slide the document guides against the edge of the paper • OR place the document face down on the Document Glass and register it to the rear RIGHT corner 3 Select Features and Number of Copies • Touch the buttons on the screen for the required features. • If the Image Adjustment, Output Format, Job Assembly button is selected, additional options for that feature become available. • Use the numeric keypad to enter the quantity of copies to be made • Press the [Start] button to start your job. 4 Press [Start] For more information… 1) Refer to the Quick Reference Guide, 2) Refer to the Training and Information CD, or 3) Visit the Xerox web site on … http://www.xerox.com/support
How to Send a Fax 1 Preparation • Cancel any selections made by a previous user by pressing the [Clear All] button. • Remove any staples and paper clips from your document and ensure that the documents are in good condition. 2 Load the Documents • Place the documents in the Document Handler in order (1,2,3…) with page 1 face up on top. • Slide the document guides against the edge of the paper • OR place the document face down on the Document Glass and register it to the rear LEFT corner 3 Select Fax Select the [Features] button Select the [All Services] button Select the [Fax] button 4 Select Fax Options • Use the numeric keypad to enter the recipient’s fax number OR use the [Speed Dial] to select a previously stored number. • Use the [DialPause] button between the fax number and a charge code. • [C] Clear button erases entries Dial Pause [C] Clear 5 Transmit the Fax Job Status • Press the [Start] button to transmit the fax. • Press the [Job Status] button view the progress of your job For more information… 1) Refer to the Quick Reference Guide, 2) Refer to the Training and Information CD, or 3) Visit the Xerox web site on … http://www.xerox.com/support
How to Scan to Your Network 1 Preparation • Cancel any selections made by a previous user by pressing the [Clear All]button. • Remove any staples and paper clips from your document and ensure that the documents are in good condition. 2 Load the Documents • Place the documents in the Document Handler in order (1,2,3…) with page 1 face up on top. • Slide the document guides against the edge of the paper • OR place the document face down on the Document Glass and register it to the rear LEFT corner 3 Select Network Scanning Select the [Features] button Select the [All Services] button Select the [Network Scanning] button 4 Select the Scanning Template • Select the Template that contains the destination and other settings required for your scan job from the [Template Destination] list. • Select the Basic or Advanced Settings tab to make those features available 5 Start the Job Job Status • Press the [Start] button to send the scanned files. • Press the [Job Status] button view the progress of your job For more information… 1) Refer to the Quick Reference Guide, 2) Refer to the Training and Information CD, or 3) Visit the Xerox web site on … http://www.xerox.com/support
How to Scan to E-mail 1 Preparation • Cancel any selections made by a previous user by pressing the [Clear All] button. • Remove any staples and paper clips from your document and ensure that the documents are in good condition. 2 Load the Documents • Place the documents in the Document Handler in order (1,2,3…) with page 1 face up on top. • Slide the document guides against the edge of the paper • OR place the document face down on the Document Glass and register it to the rear LEFT corner 3 Select E-Mail Select the [Features] button Select the [All Services] button Select the [E-Mail] button 4 Select the E-Mail Recipients • Select the [TO] in the send field and either input the full E-Mail address or use the Address Book to select a recipient. 5 Start the Job Job Status • Press the [Start] button to E-Mail the scanned files as an attachment. • Press the [Job Status] button view the progress of your job For more information… 1) Refer to the Quick Reference Guide, 2) Refer to the Training and Information CD, or 3) Visit the Xerox web site on … http://www.xerox.com/support
بزرگترین بانک پاورپوینت ایرانwww.txtzoom.comبانک هوشمند اسناد متنی