EGL Calling Java: Learning Module
This module demonstrates how to use EGL to interact with Java classes, methods, and variables. It covers invoking external type functions and transferring control across EGL and Java programs.

EGL Calling Java: Learning Module
E N D
Presentation Transcript
EGL Calling Java This Learning Module shows how to use EGL to call Java classes, methods and access class variables.
EGL externalType Part An externalType part provides the EGL mapping to a Java Class. This is similar to the mapping that an EGL Interface provides for Web Service functions, but extends to map Java class variables and constructors. Invoking ExternalType functions • If the class or function is marked static, • Simply invoke it using the name of its externalType part and use dot syntax to reference the methods typeName.methodName(); • If the class or function is non-static (more typical) • Create a variable based on its externalType part – initialize it with a new keyword • Use it in much the same way you would a library name (use dot syntax for the methods) externalTypeVariable.methodName(); externalType Declaration Two class variables One custom method class “constructor method” Variable of externalType(TaxModule) Create new (non-static) instance Initialize class variable values Call calculateTax routine
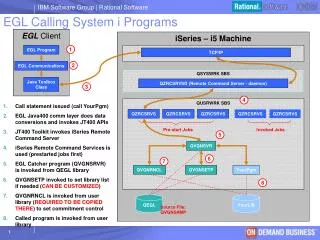
EGL Calling Java Calling EGL – 1 of 2 • The following types of transfer of control are possible in EGL: • EGL-generated Java™ program to EGL-generated Java program • Non-EGL (native or hand-coded) Java program to EGL program • EGL-generated Java program to non-EGL Java program • EGL-generated Java program to DLL • EGL-generated Java program to .EXE or .BAT file 1. EGL-generated Java program to EGL-generated Java program • Calling one EGL-generated program from another is as simple as invoking the Java class for the target program using a call statement. Be aware, however, of package dependencies. You must invoke a class that is one of the following: • Within the same package as the calling program. • Qualified with a package name using dot syntax. • Identified with a linkage option part. 2. Non-EGL Java program to EGL program • To invoke an EGL-generated program from a non-EGL Java program, you must do one of the following: • Define the EGL program as a service – as we’ve seen in a prior unit. • Create Java wrapper classes for the EGL program. See workshop, further back in this section. 3. EGL-generated Java program to non-EGL Java program • To invoke non-EGL Java code from Java code generated by EGL, you must create an EGL ExternalType – and a variable for the ExternalType. This EGL part contains function descriptions for the Java methods you wish to call. ExternalTypes are considered a Best Practice. • Invoke the Java method as follows: • Create a variable based on the ExternalType part and use it in much the same way you would a library, appending the ExternalType part variable name to the name of the method using dot syntax: • ExternalTypeVar.method();
EGL Calling Java Calling EGL – 2 of 2 • EGL-generated Java program to .DLL • You can call functions in a single, non-EGL dynamic link library (DLL) (written in, for example, C or COBOL) from an EGL Java program. The file extension for the DLL depends on your environment (examples include .dll, .so, and .sl). • You create a Library part of type nativeLibrary to act as an interface between your EGL program and the DLL. The Library part lists function names and parameters, and can use the alias property of the functions where function names do not match EGL conventions. • Access the functions by using dot syntax (library.function()) or by creating a use declaration for the library to make its functions global to your program. • EGL-generated Java program to .EXE or .BAT file • EGL provides two functions that allow you to call a system command (such as a .bat or a .exe executable file). These were covered as optional exercises in a previous section: • sysLib.callCmd(); • This function transfers control to a specified executable; when the executable terminates, control returns to the calling EGL program. • sysLib.startCmd(); • This function transfers control to a specified executable, then keeps running; both the EGL program and the executable run at the same time. • Related concepts – See product help • Transfer of control across programs • Linkage options part • Related tasks – See product help • Generating EGL and Web services • Generating Java wrappers
EGL externalType for the HelloEGLworld Class The externalType we will use to interface with the HelloEGLworld Java class EGL variable declaration for the externalType. Notes: - Creates a new instance of the Java class (in memory) - Passes two values into the class variables
Workshop – Create a Java Class and Call it From an EGL Program • To see how all this works together, you will complete a workshop as follows (from 10,000 feet) • You will: • Create a new Java Class • Create a new EGL program that contains: • An EGL externalType of the Java Class • Calls to the Java functions – through the externalType • Access of the Java class variables - through the externalType • After finishing that, we’ll do two additional things: • Learn how to call Java API’s through the EGL JavaLib (built-in system) functions • Pass string arrays back and forth between EGL and Java Important Note: Java is a case-sensitive language (okay we said that already). As such, be careful naming your classes and all the other files you create in this workshop, as the copy/paste code will pre-determine your part names.
Create a new Java Package and Class • From Project Explorer: • Right-click over \Java Resources: src\ and create a package named: egljava • Right-click over egljava and create a new Java class named: HelloEGLworld Using the copy/paste code in the Notes, create your first Java class… Press Ctrl/S – to save and compile your .java source to a .class file
Workshop continued – Create a new EGL Program From Project Explorer, right-click over the \EGLSource\programs\ directory, and create a new, EGL program • Name the program: callJava • From within the code, copy/delete and replace the boilerplate code, with the complete program solution shown below, in the Notes area of this slide Functions externalType Definition Top section of callJava program • With your mouse cursor inside the source, press: • Ctrl/S(why)? • Ctrl/G(why)?
Workshop continued – Debug the EGL Program and Java Calls • Add a Breakpoint to the callJava.eglprogram • From Project Explorer, right-click over the \EGLSource\programs\callJava.egl select Debug EGL Program… Step through the code • Note the variable values before and after the calls to the Java Class!
Additional Info on External Types • When creating external types, you may run into a Java ”final” type variable within the Java class you’re calling. • If you need to access this variable from EGL, it will need to be defined in your externalType. • The syntax is the same as with any other variable. Note, you do not need to include a “final” indicator. • Additionally, a cross-language conflict can occur when creating external types that have conflicting method/variable names. • i.e. If the name of a Java method is the same as an EGL reserved word, your externalType will not compile. • To fix this you must add the “JavaName” property to the function declaration. Invalid Valid
EGL and Remote Programs Topic Sub-Topics: • EGL Calls to Remote Programs (Overview) • Java (terms and concepts) • Calling Java using the externalType Part • Calling Java using JavaLib • Calling COBOL Programs • Calling RPG Programs
EGL’s JavaLib Built-in System Function • If you are not calling a custom Java Class, but only calling a static Java API (think of these as Java library “built-in-functions”) – you can dispense with having to define a new externalType, and call the API using the JavaLib Built-in Function. Here are the JavaLib function calls We are interested in: • invoke() • store() ***Notes
EGL’s JavaLib invoke() and store() Functions • With JavaLib you can: • invoke() – call a static Java API (i.e. call a class that does NOT need to be created as a new instance) • Format: JavaLib.invoke(“package.class”,”method”,<Optional parameter>); • store() – call a non-Static Java API and return an Object (instead of a Java primitive) • Format: JavaLib.store(“objVariable” as "objID:java", “package.class", “method“); Notes on store() • You tell Java to create a new Class instance (i.e. an object) and store it, in a temporary variable identified as the first parameter to store() • You add the boilerplate: as "objID:java", • You specify which package.sub-package.class, etc. • And the method that returns the Java object into the temporary variable
Workshop - EGL’s JavaLib invoke() and store() Functions From Project Explorer, edit the \EGLSource\programs\callJava.egl • Towards the end of the program (as shown here in the screen capture) insert the following two functions (found in the Notes section of this slide) • Un-comment the calls to these functions in the main() function • With your mouse cursor inside the source, press: • Ctrl/S • Ctrl/G
Workshop continued – Debug the EGL Program and Java Calls • From Project Explorer, right-click over the \EGLSource\programs\callJava.egl select Debug EGL Program and once again, step through the code
OPTIONAL Workshop – Passing a String Array Between Java and EGL • There are some situations in your projects where you may need to send an array of strings from EGL to Java. You would use an externalType to do this (and – it’s pretty easy). Follow these steps to see how (easy ) • From \JavaResources :src\egljava\HelloEGLworld.java – add the following new method to the existing Java class (source code is in the Notes section of the slides): • Press Ctrl/S – and you will get syntax errors in the code. Add the following import statement to the top of the file: New Method
OPTIONAL Workshop – Passing a String Array – Modify the externalType • From \Programs\callJava.egl – modify the EGL externalType definition we’ve been using. Add a new function for the new Java Class method at the bottom of the externalType Press: • Ctrl/S • Ctrl/G
OPTIONAL Workshop – Passing a String Array – Create a new JSP Page • From \WebContent\ – As you’ve done before, create a new JSP page, named: callJavaPage For the page’s JSFHandler, add the following code (which you can copy from the Notes section below) Notes: • Import statement – provides reference-ability to the externalType definition • Two fixed-length string arrays – one initialized with values (to be passed into the Java Class), one empty that will contain data returned from the Java Class call • Variable for the externalType to the Java Class – used in the previous workshop
OPTIONAL Workshop – Passing a String Array – Create a new JSP Page • From Page Designer, and from Page Data, drag and drop: strArray2 – string[] on to the page, and create output controls.
OPTIONAL Workshop – Run the Page on the Server • Right-click over the page, and select Run on Server Note the following: • The Java class was called, and an array of strings was passed to the function • The function concatenated the values passed in, with the literal “: Java” • The array returned (and eventually displayed through the page’s dataTable) is a copy of this new data • Open the Console view. Scroll up, and you’ll see the following SystemOut messages, written there by the Java function
Optional Workshop – Debugging from EGL to Java - and back • Open the HelloEGLworld.java program and set a breakpoint at the location you want the debugger to stop. Also set a breakpoint in callJava.egl following the java call. • From Project Explorer, right-click over the \EGLSource\programs\callJava.egl select Debug EGL Program… • The debugger will stop at the breakpoint in the java code. • Step through the java code. • Note the variable values in the Java Class. • If you continue to debug (step), the debugger will return to the EGL program and continue debugging.
Running a Java Batch Program • Besides debugging through your EGL/Java batch programs, you can run them by doing the following: • From Java Resources: src • Expand the programs folder • Right-click over the .java file you wish to run • Select: • Run As > • 2 Java Application • Note that, unless your program does anything external (writes to files, etc.) you won’t see anything. Run: callcmdPgm.java
OPTIONAL TOPIC – Calling EGL From Java Classes Using JavaWrappers • As mentioned in the beginning of this unit, you can call EGL programs, from native (hand-coded) Java classes. • To do this, you will “wrap” the EGL programs and their parameters with EGL “Java Wrappers”. What are Java Wrappers? • Java classes that simplify calling EGL programs from Java • Your Java code works with Java types, and conversion to EGL types is performed automatically by the wrapper. Steps: 1. Create the EGL Program • Code • Syntax check and validate 2. Create a new build descriptor with options set for wrapping an EGL program • Set the build descriptor option: enableJavaWrapperGen = YES • Create a CallLink (Linkage Option) element for the EGL called program, with: • type = remoteCall, javaWrapper = YES • Assign to the JavaWrapper Build Descriptor to the new program • Generate the Program 3. Create (code) the native Java Class and Save (which will generate) 4. Run the Java Class – which will call your EGL program 5. Optionally – Debug starting from the Java Class, calling EGL ***Notes
1. Call an EGL Program From Java – Create the EGL Program From the \programs\ folder, under \EGLSource\ create a new EGL program named: JavaCallEGL • Notes: • Use this code – for the lab (see screen capture) • Make the program name start with an upper-case character • The generated JavaWrapper will have an upper-case character, by default • The Notes contains this code (if you’re in a hurry ) • Save (Ctrl/S) and make sure you have no syntax errors
2. Call an EGL Program From Java – Create a New Build Descriptor As you did earlier in the course, create a new EGL Build Descriptor for your new program, following these detailed directions: From the Project Explorer, copy the existing batchBuildFile options: 1. Right-click over batchBuildFile.eglbld and select: Open With > Text Editor 2. From inside the file: Press Ctrl/A (to select all) … then Ctrl/C (to copy all selected text to the Windows buffer) 3. Close the file Next create a new EGL build file, and paste the copied entries into it: 4. From Project Explorer, right-click over \EGLSource\ and select: New > Other… • Expand EGL and select: EGL Build File 5 From the next wizard, name the file: JavaWrapBuildDescriptor 6. Close the new build file (you need to re-open and edit it in Text Editor mode) 7. Reopen JavaWrapBuildDescriptor file using the Text Editor 8. From the ***Notes part of this slide, copy and paste the contents 9. Save your changes (Ctrl/S) and close the file Assign (associate) the new JavaWrapBuildDescriptor to the new program and Generate the program: 10. From Project Explorer, right-click over your new JavaCallEGLProgram - Under \EGLSource\programs\ select: • Properties (note this option is usually at or near the bottom of the Context Menu) 11. From EGL Default Build Descriptors, select <JavaWrapBuildDescriptor.eglbld> for both: • Target system build descriptor • Debug build descriptor 12. Close the Properties view 13. Generate the JavaCallEGL program From the above, note the following: • Standard <BuildDescriptor…> entries • <ResourceAssocations…> entry, • Which would be used if the program accessed an external file • LinkageOptions entry (named javaWrapOption) • With a single <callLink> entry • For a <remoteCall…> to your EGL program • With option: javaWrapper=“YES” specified
3. Call an EGL Program From Java – Create the Java Class As you did earlier in the course, create a new Java Class file, following these detailed instructions: • From Project Explorer: Right-click over \Java Resources: src\egljava\ package and create a new Java Class named: InvokeEGL - Using the copy/paste code in the ***Notes
4. Call an EGL Program From Java – Run the Java Class From Project Explorer: Right-click over \Java Resources: src\egljava\ package\InvokeEGL.java …and select: Run As > 1. Java Application Note the Console when the run completes
5. Debug an EGL Program From Java – Optional – 1 of 3 • You may want to set break-points in the Java Class, and debug from Java to the EGL called program. To do this: Modify theLinkage Optionsfor your called program (JavaCallEGL) • library is the name of the EGL project containing the called program – in your case, specify: EGLWeb • location is localhost – enter it, as shown below • remoteComType is DEBUG – selected from the ComboBox Save your changes, and Generate JavaCallEGL
5. Debug an EGL Program From Java – Optional – 2 of 3 Create a new "EGL Listener" launch configuration From the Run Debug… Menu • Select EGL Listener > New_configuration • The Port: should be 8346 • Click Apply – to save your configuration • Click Debug – to launch the EGL listener ***Notes
5. Debug an EGL Program From Java – Optional – 3 of 3 Debug the Java Class calling the EGL program: • Add breakpoints to the both the Java Class file and EGL program source • From Project Explorer, Right-click over the Java Class, and select: Debug As > 3 Java Application • Resume or step through the Java code • Step or Resume through the EGL code
OPTIONAL Workshop – Access the HTTP Servlet Header In many web applications you will need to access what is called the HTTP Servlet Header – which contains information such as the: • Login name • User Role Test – defined for a given page • Path • To do that, you can nest Java externalType definitions as shown in this example:
OPTIONAL Workshop – Access the HTTP Servlet Header – 1 of 3 Add new EGL externalType definitions Under \EGLSource\ open: com ibm egl jsf FacesContext Select and replace all of its contents, with the externalTypes in the Notes section of this slide.
OPTIONAL Workshop – Access the HTTP Servlet Header – 2 of 3 New .jsp page • Create a new web page, named: readServletHeader.jsp (use a template) • In Page Designer, change the default heading text, and Edit the EGL for the page. • Replace the default JSFHandler with the statements from the Notes section of this slide • Read the comments to see how to access a “3-deep nested Java Object” (the Request object) – Press Ctrl/S JSF Handler Part
OPTIONAL Workshop – Access the HTTP Servlet Header – 3 of 3 • From Page Data, drag hRec onto the page. • Create read/only output fields Run the page on the server • You should see something like what is shown in the screen capture below • If you were logged in to an external server, you would see additional variable information.
OPTIONAL Workshop – Access the URL of the Current Page In many web applications you will need to access just the URL – of the current page. That is, the left-most portion of the URL (minus the page name and .JSP extension). This consists of: • http:// • Domain name • Application/Context root (in our case: EGLWeb) and sub-directories • To do this, you will once again rely on Java externalTypes and some EGL procedural code, written by Scott Pecnik/IBM
OPTIONAL Workshop – Access the URL of the Current Page – 1 of 3 Add new EGL externalType definitions Under \EGLSource\ open: com ibm egl jsf FacesContext Select and replace all of its contents, with the externalTypes in the Notes section of this slide. You may have already made changes for the previous (servletHeader) workshop. Still, there are
OPTIONAL Workshop – Access the URL of the Current Page – 2 of 3 New .jsp page • Create a new web page, named: getURL.jsp (use a template) • In Page Designer, change the default heading text, and Edit the EGL for the page. • Replace the default JSFHandler with the statements from the Notes section of this slide JSF Handler Part
OPTIONAL Workshop – Access the URL of the Current Page – 3 of 3 • From Page Data, drag requestURL onto the page. • Create a read/only output field Run the page on the server • You should see something like what is shown in the screen capture below • If you’re using WebSphere the port # (8080) will be either 9080, or 9081
OPTIONAL Lab – Sending eMail Using EGL and RBD • One of the standard requirements for Web Applications is to programmatically send eMail, from server-side logic. This is very easy to do using EGL, a Java Class that does the mail send, and a page. • Steps: • Create a new Java class that accesses the JavaMail API • Create an externalType for the class • Use the externalType in your EGL business logic – calling it from an EGL Logic Part • We’ll do an example of this using a Web Page, but note that you could also call JavaMail using batch EGL (programs) just as easily. ***Notes To: xxxx Fr: xxxx Subject: xxxxx Content: xxxxx JSFHandler … externalType Call Java Class WAS Send Java Class … Invoke JavaMail …
Step 1 – Create Java Class to Invoke SendMail API • JavaMail is an API that is used to send eMail from Java Classes. You’ve already created a new Java Class so this should be fairly straightforward. • From Navigator, • Right-click over egljava and create a new Java class named: SendMail • Using the copy/paste code in the Notes, create the SendMail Java class… • You will need to modify the line for mail.host – and enter the name of your SMTP mail server
Step 2 – Create a New Web Page • From \WebContent\ - Right-click, and create a new, Web Page named: eMailPage.jsp • Change the default page header text and edit the EGL Page Code • Replace the existing boiler-plate code with the statements in the Notes section of this slide. • Review this code, and press Ctrl/S – to save and generate your JSFHandler
Step 3 – Create the Web Page Controls • From Page Designer/Page Data • Drag: em – eMailRec onto the page • Create an input form (input fields) • and a submit button • Drag sendMailFunc() on top of the submit button
Step 4 – Run the Page – Check out the eMail! • Run the page on the server, enter a valid email address and press the Send Mail (submit button) • Wait a few seconds (perhaps a bit longer) and check your eMail
Topic Summary • Now that you have completed this topic, you should be able to: • Create a new EGL externalType for a Java class • Create an EGL variable for the externalType • Call the Java Class through the externalType, and access: • Static Class Variables • Non-static Class Variables • Static Methods • Non-static Methods • Pass data into the externalType via parameters • Pass and return string arrays • Call JavaLib built-in functions to access static Java APIs Summary