Download

1 / 8
80 likes | 100 Views
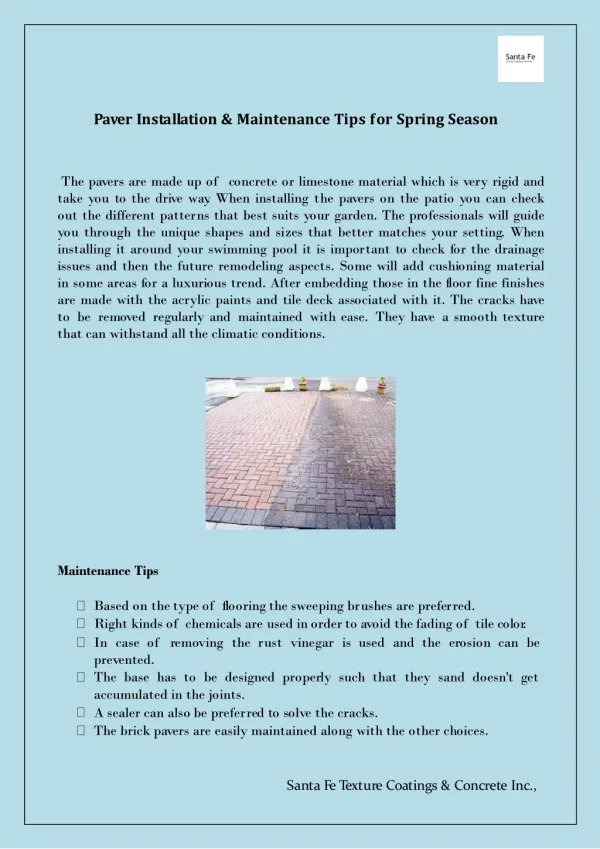
Consider these tips for installing cobblestones by Gather Co. This document will help you in installing cobblestones properly. We are pleased to provide you guidance in addition to product sales. We have a massive range of surfaces such as cobblestones, crazy paving, filetti, limestone flooring, organic steppers, parquetry tiles, recycled bricks, speciality tiles, stone brick, and subway tiles.

E N D
Tips For Installation Gather Co Sydney, Australia 1800 428 237 hi@gatherco.com.au gatherco.com.au @gathercoaustralia
TIPS FOR INSTALLATION | COBBLESTONES Meeting Expectations Product Variation Variation has been carefully considered when producing our surface collections. Colour, tone, composition, and texture are all naturally occurring characteristics of stone and will always differ from piece to piece. Variation may also result in significant inconsistencies when delivered product is compared to any samples presented. That said, variation is in no way considered a material defect. It’s precisely what makes stone so uniquely beautiful. Please be sure to seriously consider these inherent characteristics whenever assessing the suitability of any Gather Co surface. It is always recommended to mix all batches supplied for a single installation to ensure natural variation is seamlessly blended. www.gatherco.com.au 2
TIPS FOR INSTALLATION | COBBLESTONES 1.) INSTALLATION FORETHOUGHTS 1.1 Supply Partners 1.2 Storage 1.3 Drainage 1.4 Substrate & Foundation Works 1.5 Movement Joints 1.6 Waterproofing & Moisture Management 1.7 Weather Conditions 1.8 Pre-Sealing 1.9 Pools & Wet Areas 2.) GUIDEINSTALLATION Table of Contents 2.1 Bedding Method Selection 2.2 Wet Bed Installation Method 2.3 Adhesive Installation Method 2.4 Cutting 2.5 Sealing 2.6 Grouting 2.7 Clean Up 2.8 Cure Periods 3.) OVERVIEW MAINTENANCE 3.1 Cleaning 3.2 Re-Sealing www.gatherco.com.au 3
must be applied. This involves implementing adequate ’run off’ slope gradients and effective drainage points to promote positive moisture dispersal. 1.4 Substrates & Foundation Works Ensuring a high quality finish involves starting with a high quality substrate. Special consideration needs to be given to determine the level of traffic that is intended for the installation. When considering concrete substrates, always seek direction from a qualified structural engineer. A general guide for slab thickness is as follows: •75mm min with reinforcement for pedestrian traffic. •100mm min with reinforcement for vehicle traffic. Typically, a minimum strength of 25mpa must be achieved. Concrete or any other substrates should be dry and not have a moisture equilibrium greater than 75% relative humidity as measured with correctly calibrated moisture probes. Another key consideration should be to ensure the ground material under the slab is of suitable stability. When earthworks and drainage have been completed, it is vital to ensure the ground under the slab is well compacted, ’soft spots’ have been addressed and water flow is managed to prevent issues arising once the slab and flooring have been laid. Curing time for the concrete needs to be given the relevant considerations also. 1.5 Movement Joints Movement or control joints are an essential component of hard surface installations. Their purpose is to manage the effects of expansion and contraction, a primary cause of surface cracking. Joints must be maintained, without interruption from the concrete substrate, through the mortar bed and finally, to a flexible sealed joint at the surface. Additional joints divided into 20m2 grid sections should also be applied to the mortar bed and top surface (tile, paver, cobbles, crazy paving, wall cladding etc). These supplementary joints areindependent of the concrete substrate and typically range from 5-10mm in width. Always seek the direction of a qualified structural engineer when designing the set-out for movement joints. TIPS FOR INSTALLATION | COBBLESTONES 1. INSTALLATION FORETHOUGHTS When selecting any product across the Gather Co collection, consideration must be given to ensure each product is appropriate for the intended application. Gather Co is pleased to provide the following advice in addition to the product sale. In almost all cases, we recommend following the direction of qualified and experienced construction professionals. These tips are to be used in conjunction with the relevant Australian Standards including (but not limited to) AS3958.1 & 2, as well as all corresponding instructions from our supply partners. Gather Co recommends sampling installation procedures prior to commencing any site works. This prerequisite will ensure appropriate measures have all been adequately addressed. Gather Co has partnered with highly reputable industry leaders to supply the very best in waterproofing, grouts, adhesive and sealing products. When applying our recommended products, it is always advised to follow the procedures and specifications of our supply partners. 1.1 Supply Partners Our recommended installation accessory brands are: • LATICRETE®: 1800 331 012 / www.laticrete.com.au • ARDEX®: 1800 224 070 / www.ardexaustralia.com •ACTICHEM™: 1300 278 264 / actichem.com.au When deciding on suitable products, the following must be taken into account: 1.2 Storage Once delivered, uninstalled product must always remain completely protected from all weather exposure including direct sunlight. Single stacking of pallets and crates on firm, level ground is also essential. 1.3 Drainage Pre site evaluations will determine the necessary drainage requirements for any given project. Seeking advice/service from qualified engineers and construction professionals will ultimately assure the desired outcome is achieved. Sufficient drainage is essential to ensuring the longevity of any installation. Rising moisture should always be considered when designing any flooring as this can often be the cause of salt transfer and efflorescence at the surface. Adequate measures www.gatherco.com.au 4
2. INSTALLATION GUIDE In general terms, flooring installations typically employ one of the two following procedures. Gather Co offers details on each procedure listed below as a guide only. Ultimately, all decisions attaining to the most appropriate method of installation, fall to the installer. 2.1 Bedding Method Selection Elements within the Gather Co surfaces range are largely prepared by hand. Hand splitting as part of the production process typically yields stock with a thickness fluctuation greater than 6mm. This variation has been accounted for in the design and manufacturing of our collection and is no way considered a flaw. Varieties that exceed a 6mm thickness deviation should employ the ‘wet bed’ method of installation. Where a maximum inconsistency of less than 6mm is maintained, the standard ‘direct adhesive’ method may be applied. 2.2 Wet Bed Installation Method Gather Co suggests the application of this method when installing any flooring variety from our collection that exceeds a 6mm thickness variation. Cleanliness prior to and during installation is vital. To ensure a positive bond is successfully established, thoroughly clear the concrete substate of all contaminants, including dust. Wet Bed Mortar Composition: •3 parts coarse washed sand (as per Aust. Standards). •1 part cement (type GP cement). •1 part clean water. Gradually combine slurry components with a paddle mixer or in a barrel cement mixer. Mixing must be sustained until all lumps are expelled and material is completely blended. Where necessary, mix in additional water to achieve the desired consistency. A bonding agent such as Laticrete Everbond may also be used to further improve adhesive strength and workability. Contact Laticrete directly for further direction: LATICRETE®: 1800 331 012 / www.laticrete.com.au Bonding Agent: Laticrete 254 Platinum Adhesive is a high performance glue, optimal for bonding the substrate and top surface to the wet bed mortar compound. Contact Laticrete directly for further direction: LATICRETE®: 1800 331 012 / www.laticrete.com.au TIPS FOR INSTALLATION | COBBLESTONES 1.6 Waterproofing & Moisture Management As part of the substrate design process, consideration must be given to waterproofing and moisture management. Attention to both issues will assist in: •Minimising the development of surface efflorescence. •Reducing swelling in the substrate caused by sustained moisture exposure. Gather Co always recommends the application of Laticrete's full Hydro Ban System. LATICRETE®: 1800 331 012 / www.laticrete.com.au 1.7 Weather Conditions Another important consideration for the installation process is weather. Temperatures over 30 degrees celsius may result a in loss of moisture and rapid shrinking of the bonding and adhesive layers. Alternatively, rain can add excessive moisture, causing wetter, weaker bonds. Always work within the atmospheric perimeters, as specified by our supply partners, whenever applying their product(s). 1.8 Pre-Sealing The process of dip sealing (sealing all six sides) prior to laying certain surfaces, in particularly harsh environments, may be a consideration. Surfaces’s that are highly porous or moisture sensitive may also require pre-sealing prior to installation. Always seek manufacturers advice before pre - sealing, to ensure the correct product is used and that the process won’t affect the bond of the chosen adhesive. An example of a quality pre sealer is Defender CSD 50 from Actichem. ACTICHEM™: 1300 278 264 / actichem.com.au Please refer to our sealing guidelines for direction on the applicable sealers and procedure. 1.9 Pools & Wet Areas In areas where exposure to water is significant or the product is highly porous, it is essential to apply a quality synthetic consolidating sealer. This sealer must also encompass strong properties of moisture repellency . Pool surrounds and bathrooms are examples of where added protection is absolutely necessary. Defender CSD 50 from Actichem is our recommendation for sealing surfaces in these harsh environments. Please refer to the applicable sealing guideline for direction on appropriate sealers and the and full procedure, or contact Actichem directly: ACTICHEM™: 1300 278 264 / actichem.com.au www.gatherco.com.au 5
Adhesive Composition: Place potable water into a clean pail and add adhesive powder. Mix by hand or with a slow speed paddle mixer until a smooth, trowelable consistency is achieved. Use approximately 5 – 5.5 litres of water per 20kg bag. Allow adhesive to slake for 5 –10 minutes. Mix again without adding any more water or powder. Laying Technique: General installation tips for working with our suggested adhesives are as follows: 1. Thoroughly clean all contaminants from the concrete slab and/or screed bed prior to beginning installation. 2. Apply a consistent layer of adhesive using a suitable notch trowel at 8-10mm thick. Then, back butter the reverse side of each stone to be installed. Only spread as much adhesive as can be laid in 10 - 15 minutes or whilst adhesive is wet and tacky. 3. Position stones and use a rubber mallet to gently manoeuvre each piece into its final setting. Always ensure no significant voids are captured under newly seated product as this will compromise support and adhesion. 4. Use spirit level tool to ensure desired levels are maintained. 5. Apply spacers to maintain consistent grout-joint openings. 6. Proactively clean any surface contamination from newly installed product. This must be done immediately and with care to ensure no staining or unsightly marks are left. 7. Only work in small controlled areas to ensure adhesive does not dry before product can be laid. TIPS FOR INSTALLATION | COBBLESTONES Laying Technique: General installation tips for working with wet bed mortar are as follows: 1. Thoroughly clean all contaminants from the concrete slab prior to beginning installation. 2. Distribute a consistent layer of adhesive (bonding agent) to the concrete slab using a10mm notch trowel. 3. Apply the wet bed mortar mix. This layer should be evenly spread, with no voids and at a consistent thickness of 25mm. 4. Clean and remove all contaminants from the back of the stone before laying. 5. Evenly spread adhesive across the back of each stone piece in a consistent 1-2mm coating. 6. Position stones and use a rubber mallet to gently manoeuvre each piece into its final setting. Always ensure no air voids are captured under newly seated product as this will compromise support and adhesion. 7. Use spirit level tool to ensure desired levels are maintained. 8. Apply spacers to maintain consistent grout-joint openings. 9. Fill all voids around newly seated product and discard any excess slurry. 10. Proactively clean any surface contamination from newly installed product. This must be done immediately and with care to ensure no staining or unsightly marks are left. 11. Only work in small controlled areas to ensure slurry does not dry before product can be laid. 2.3 Adhesive Installation Method Gather Co has partnered with Laticrete to supply the very best in adhesive products. For standard installations with no special considerations, we suggest the use of: •Laticrete 335 Premium Flexible Adhesive or •Laticrete 335 Rapid Premium Flexible Adhesive (for moisture sensitive surfaces). Gather Co only suggests the application this installation method for varieties within our Thin Format cobblestone collection that maintain a maximum thickness variation of less than 3mm. It is crucial to follow all procedures and specifications as detailed by Laticrete when applying these products. For further direction, consult Laticrete directly: LATICRETE®: 1800 331 012 / www.laticrete.com.au 2.4 Cutting Stone cutting is most effective when carried out with a sharp diamond blade. We strongly recommend the use of a high quality wet bench saw. Always wash each piece directly after every cut to avoid saw residue accumulating and drying to stain the exposed surface. WARNING: Crystalline Silica (or silica dust) is a naturally occurring mineral found in soil, sand and stone. It is also commonly used in the manufacturing of countless construction materials including bricks, porcelain and terracotta. Silica exposure has been extensively documented to cause a broad range of serious health issues. Adequate PPE is essential when engaging in any kind of contact with Silica dust. Furthermore, appropriate safety guidelines relating to silica exposure must always be adhered to on all construction sites. www.gatherco.com.au 6
4. TIPS FOR INSTALLATION | COBBLESTONES 2.5 Sealing Sealing is an essential step in the installation process and paramount to maintaining the aesthetic of stone surfaces. Gather Co has partnered with Actichem to supply the very best in sealing products. Solv Sealer Gold is their premium natural look sealer and does not alter the stones raw appearance. Sealing should always be carried out in two phases. 1. Once product has been laid and prior to grouting. 2. Following grouting and only after the final surface clean up has been thoroughly completed. It is always our recommendation to follow the direct guidance of Actichem when applying any of their products: ACTICHEM™: 1300 278 264 / actichem.com.au 2.6 Grouting Grout application is an important final stage to ‘locking in’ newly installed surfaces. We recommend the following Ardex products: FG-8 - standard cement grout for joints up to 8mm in width. WJ-50 - specially formulated cement grout for wide joint openings of above 9mm in width. The procedure for applying these products is as follows: 1. Thoroughly clean all vacant joints prior to grouting. 2. Apply grout to joints, ensuring the entire void is completely filled. 3. Immediately remove any significant grout excess with trowel tool. 4. Sponge the entire exposed surface with clean water. 5. Follow cure times as dictated by Ardex. For superior results, always follow Ardex’s specifications and guidelines: ARDEX®: 1800 224 070 / www.ardexaustralia.com 2.7 Clean Up Final clean up should only occur once all grout joints have completely cured: 1. Sweep all loose contamination from installed surface. 2. Generously apply a pH neutral cleaner to the installed surface. 3. Gently agitate the surface with a stiff broom. www.gatherco.com.au Remove all residue from surface with a wet-vac or squeegee. DO NOT use acidic cleaners without engaging a qualified and experienced stone cleaning professional. ProNeutro from Actichem is a new generation, neutral pH detergent that is great for natural stone surfaces. Contact Actichem directly for further direction on their range of surface cleaning products: ACTICHEM™: 1300 278 264 / actichem.com.au 2.8 Cure Periods Recommended minimum cure periods for new installations, under standard conditions (21° C) are as follows: •Pedestrian traffic: 2 days. •Vehicular traffic: 3 weeks. 3. MAINTENANCE OVERVIEW Ongoing maintenance regimes may vary from surface to surface. Regular cleaning will reduce the risk of soiling through dirt, mould and efflorescence. Please refer to our “Maintenance Guide” document for further detail on compatible products and best practice procedures. 3.1 Cleaning ProNeutro from Actichem is a new generation, neutral pH detergent that is great for h stone surfaces. A cleaning professional should only attempt the use of acid based products on stone surfaces. For further advice, please contact Actichem directly: ACTICHEM™: 1300 278 264 / actichem.com.au 3.2 Re-Sealing Both Solv Sealer Gold & Defender CSD 50 by Actichem will provide ultimate protection for up to 15 years. That said, application methods, weather conditions, traffic and invasive cleaning chemicals may significantly reduce this timespan. We highly recommended sealers be re-applied every 5 – 7 years in commercial settings or where harsh conditions exist. For further advice, please contact Actichem directly: ACTICHEM™: 1300 278 264 / actichem.com.au 5. 7
Persons receiving this information will make their own determination as to its suitability for their own purposes prior to use. In no event will Gather Co be responsible for damages of any nature whatsoever resulting from the use of or reliance upon information from this document or the products to which the information refers. All values are best approximations. No part of this document may be reproduced or distributed without the expressed written permission of Gather Co. Although the information in this documentation is presented in good faith and believed to be correct at the time of creation, Gather Co makes no representations or warranties as to the completeness or accuracy of the information. Gather Co has no liability for any errors or omissions in the materials. Gather Co and the manufacturers represented herein, reserve the right to change, delete, or otherwise modify the information which is represented without any prior notice. Gather Co Sydney, Australia 1800 428 237 hi@gatherco.com.au gatherco.com.au @gathercoaustralia