Expert Weathering Techniques for Realistic Model Effects
1.08k likes | 1.21k Views
Learn advanced weathering techniques to create realistic effects on your models. Explore grain detail, peeling paint, silver gray look, rotting wood, and more. Discover methods to speed up weathering processes and minimize costs. Get insights on adding sun, water, dirt, and wind effects for authenticity. This clinic covers both basic and intricate weathering methods for freight cars, steam engines, diesels, passenger cars, and structures. Improve your modeling skills with step-by-step instructions and materials showcase.

Expert Weathering Techniques for Realistic Model Effects
E N D
Presentation Transcript
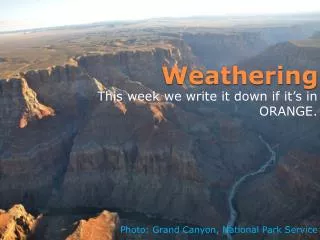
Easy Weathering Frank Markovich October 2013
Goals for Clinic • See prototype examples. • See model examples of the above. • Understand some of the techniques to achieve realistic results – not just weathering. • Logical treatments – beyond just overall effect. • Methods to speed things up and keep costs down! • How to simply add: • Grain detail (Appropriate) • Peeling paint • Weathering – the silver gray look. • Interior wood – • Effects of elements – where you would see it – sun, water, dirt, wind etc. to your models. • Rotting wood – yes it does. • Bleached wood – from sun etc. • Weathering of stained wood. – different than painted wood. • Things that attack or attach to wood. Don’t forget mold, plants, etc. • Where dirt, rust etc. attach to rolling stock and structures – just barely talk about that. • Dented wood – broken wood – burned wood. • Wood under water. • Doing all of this safely.
Before we get to detail • Following are some very fast and simple ways to weather a few items. Later will touch on more advanced – and time consuming techniques. • Start with freight cars. • This can take less than 5 minutes per car. • Go as far as you want. • Use light colors on the underside to bring out the detail. • Up front I have examples of the materals for you to look at.
Freight cars. • Rust color running down the sides – any technique. Could also use Rust and Dust. • On ends same treatment. • Underside add some rust and some light colors (dust or dirt) keep it light. Will bring out detail on underbody and trucks. If using a black tone it down with some white mixed in! • This can be brushed on or use an airbrush – would not recommend a rattle can as you can’t control it enough. If airbrush do a very light dusting only! (next slide)
Freight Cars – Cont. • With pastels, chalks, pan pastels, can be applied with a soft brush and rubbed in a bit. This gives you lots of control. • Set with dull coat or hairspray – keep it away from wheels. • Roof partly depends on the car and era – if steam you need some black for soot etc. But in all cases a bit of white to bring out the details. • I will dry brush an off white on everything when done to bring out rivet detail etc. • See examples at the front of the room.
Steam Engines • Well here lots of white for the residue from water. It should run down in logical areas, by steam dome, around cylinders around the whistle, air pump, etc. • Also on the wheels – they should be lightened up a bit. • Rust will also appear but don’t do too much for the most part railroads kept engines decent. • For oil use a shinny black acrylic. • Stains on the tender etc. Use a drop of water and then put in a gray or similar color just a drop in the center. Let it dry or for effect you can use air to move it around and let it dry. This also works great on tar paper roofs etc.
Steam Engines – Cont. • Use the same (or similar materials as on freight cars). • This is one place where I prefer an airbrush. • Be sure to keep it off of the wheels or immediately after you apply the weathering wipe the wheels. • Since these get handled quite a bit a clear mat coat over what you do is necessary!
Diesels and similar • Same as freight cars in a way. • There will be some dark streaks around the vents. • Wheels should have some dirt coloring – underbody in general. • Some streaks down the side – but not the water streaks and oil streaks as steam engines.
Passenger Cars • In general these were kept pretty clean. • But the undersides should have some dirt coloring or even some light rust. • Roof could have water marks etc. • Very light weathering on the sides and ends (usually).
Structures – my area • I start before building but you can do after. • For quick and dirty – • Start with a wash of India ink and Alcohol or Shoe Dye and Alcohol – very light. • Then use the techniques talked about earlier in freight cars. • Heaviest weathering towards the bottom of the structure. • For roof – similar for 1st step then dry brush on a light color (not pure white) and even some green to look like moss.
– In more detail – if starting before building.Wipe driftwood stain or other stain method such as India Ink or leather dye on the wood • Use a rag (Cut up T-Shirt), wear gloves. • As an alternative use inexpensive paint brushes. • Will demonstrate. • Wipe 1 direction. • Do not try to fully cover. • Vary quite a bit! • This must dry a few days!!!! • I usually let it dry at least one week.
Next distress the wood • Use distressing tool. • E-Xato knife with #11 blade • Wood burning tool for knot’s. I do this first. • Dental tools – picks etc. • Or even the file cleaner, or wire brush.
Mistakes • You can learn from them! • You can hide them. • Don’t be afraid. • Get those kits out of the box or weather your ready to run items.
Handouts etc. • There are handouts – consist of a packet of information including this presentation. • At the end will be a list of sources for materials. • This is a full update of another clinic given at the PCR in 2012. But this time with emphasis on easy! • Goal here is for easy things to do and for the most part very inexpensive. • Will pass models around. Please handle with care.
Overview • Let me start by saying that 95% or more of what I am going to cover, I learned from others. Other 5% was learned from mistakes I made. • Real wood doesn't just weather over time, there are dents, discoloration from water, wind etc., cracks, splits, rotting, attacks from plant life and fungus, paint chipping off, accidents breaking the wood etc. • Special thanks to Mic Greenberg, the late Colin Emmerson (both close friends that showed me more than I could ever learn on my own), and the many weathering books and videos that I have taken information from. • In all cases there are at least 2 references that I used for my techniques. • Most of this is done before assembly of the model. • I found what works for me but you may find what works best for you. Inspiration can be great! I will think up things to try at 2:00 AM. • Most importantly have fun!!!!!
Samples • During the clinic I will be passing around some samples. • Please return them. • I don’t have samples of everything but a representative group.
Study the prototype! • Go to the location. • Take pictures • Make notes • Colors • Weathering • Take measurements etc. • If not possible then use references: • Books • Photographs • Videos – use them more and more now. • Internet – User groups really have helped me. Most of the prototype photos are from this source. • Museums • Even eye witnesses if you can find them. • This part can be a hobby itself or a hobby within a hobby.
Some examples • These are from Westside lumber co. • Notice the weathering over time. • Would most likely not do as heavy but for some structures I might. • First picture is the dispatchers office. Notice the peeling paint and how the weathering is more towards the bottom of the building. • Will go through the next few slides quickly to just talk about what I look for. • I don’t model WSLC but a private line (fictional) in the same geographic area.
Notice more weather effects towards bottom of building. Peeling paint.
Notice grain on end beams. Weathered grey for fence and how rough cut the fence is.
Rotting wood on stair – rough wood on the end. Shades on the wood – paint missing in spots.
Look at the grain on the end board. Also notice missing paint on the sides and end.
Look at the end of beams on the plow – black color with grain. Paint missing on the rest of the wood. Stains everywhere.
Look at the knots on the ends of this building. Also the foreground building the weathering towards the bottom.
Look at the color change from the top of the building to the bottom.
Water tank discoloration. You can get that with a white wash or even use bleach and a strong light source.
Make notes • I suggest you write down everything. • Now onto adding this detail in your modeling.
Lets start with Ready to Run • This has become the main way most people model today. • But the shinny rolling stock and engines just does not look real. • Very easy to modify. • Most of the time it takes less than 15 minutes per model to add in enough weathering to improve the look substantially!!!
Here are some methods • Just washes – India Ink and alcohol or leather dye and alcohol. Higgins brand of ink works well – make sure it is the water soluble type. • Pastels – can get these at any craft stores. I have some that have lasted 30 years. I use them quite a bit. Used to set with dullcoat – now use hair spray – works better and doesn’t hide colors. • Bragdon or other chalks – just like above.
Continued • Pan pastels – used them on one building. Advantage is that they can be removed if you don’t like it. Sealing again with either dull coat or with hairspray or other flat clear finish. • Airbrush or thin washes of paint – almost a stain.
Some guidelines • Go at least 2 shades lighter • Don’t do too much!! • Use prototype as an example.
Specific items • Freight cars. • Rust color running down the sides – any technique. Could also use Rust and Dust. • On ends same treatment. • Underside add some rust and some light colors (dust or dirt) keep it light. Will bring out detail on underbody and trucks. If using a black tone it down with some white mixed in! • This can be brushed on or (next slide)
Freight Cars – Cont. • With pastels, chalks, pan pastels, can be applied with a soft brush and rubbed in a bit. This gives you lots of control. • Set with dull coat or hairspray – keep it away from wheels. • Roof partly depends on the car and era – if steam you need some black for soot etc. But in all cases a bit of white to bring out the details. • I will dry brush an off white on everything when done to bring out rivet detail etc.
Steam Engines • Well here lots of white for the residue from water. It should run down in logical areas, by steam dome, around cylinders around the whistle, air pump, etc. • Also on the wheels – they should be lightened up a bit. • Rust will also appear but don’t do too much for the most part railroads kept engines decent. • For oil use a shinny black acrylic. • Stains on the tender etc. Use a drop of water and then put in a gray or similar color just a drop in the center. Let it dry or for effect you can use air to move it around and let it dry. This also works great on tar paper roofs etc.
Cars and trucks • Should be similar to other items – but not too weathered unless abandoned. • Just light weathering with airbrush or powders.
Rusted items • This applies to even cars and truck that are abandoned. • First paint a dark color such as weathered black or burnt umber. • Then – one of the following: • Airbrush – a light rust – do not fully cover. • Use powders – pastels etc. lightly on item and seal. • Wet part of model – apply acrylic rust color – then hit with air. Do on a number of locations. • Then do hairspray – rubber cement, salt, sifted dirt on model. • Now apply the final color – very thin and remove as talked about before some of the paint.
Structures • Following slides relate to structures.
Real wood • While I have seen some very beautiful models made of other materials, for a wood structure, real wood to me still looks the best. But I have seen others do a great job with plastic or resin. Experiment. • Some effects cannot be accomplished easily with other materials. Such as exposed wood, broken wood, lifted boards etc. • Real wood takes stains well. I know others are able to simulate with various plastics but it just isn’t the same look. • For castings such as windows and doors I always paint them first with a raw wood color. Then continue from there. Floquil CN Grey is a good choice for the base coat.
Why detail wood? • I like to see some depth in a wood building or rolling stock. • If it looks too smooth it loses the real look and the feel. • Even on freshly painted structures and rolling stock, variations can be seen. Nothing stays fresh looking in nature very long! • It is fun and adds much to a model as long as it isn’t overdone! That to me can be a huge mistake. And believe me I have made it more than once.
Some examples • Both from the YSL – (I am a member) and from my own home layout. • On the next slide – look closely at the wood detail – grain detail – variation in the paint etc. • Board ends are fairly even but not perfect. • Wood is worn in many places. • It brings the flatcar to life!
Shacks • Notice different colors and textures. • Shingles are individual. • Nail hole detail. • Grain detail. • Loose board modeled. • Framework. • Roof not complete. • Windows open. • Peeling Paint • Knot Holes – now I do knots themselves – use a wood burning set for this or even an old soldering iron. For holes use a wood carving set and gouge out the wood – distress then use black and dark browns around it. • Broken windows.
Open window and doors – peeling paint – These windows and doors work and are built of individual pieces.
Overall effect of rundown cabin. Broken glass. Interior framing Broken boards.
See splits. Knot hole Missing shingles Lots of detail in the wood and texture. This is an HO model.
Even nail holes.
Dry brush white as a final step. Did add in some chalks to highlight.
Picture rubbed into the side. Sanded on the back and worked in with knife and dental tool. Also missing boards and shingles show the interior framing. Offset boards to simulate too much use. Nail holes.