Download
1 / 8
80 likes | 184 Views
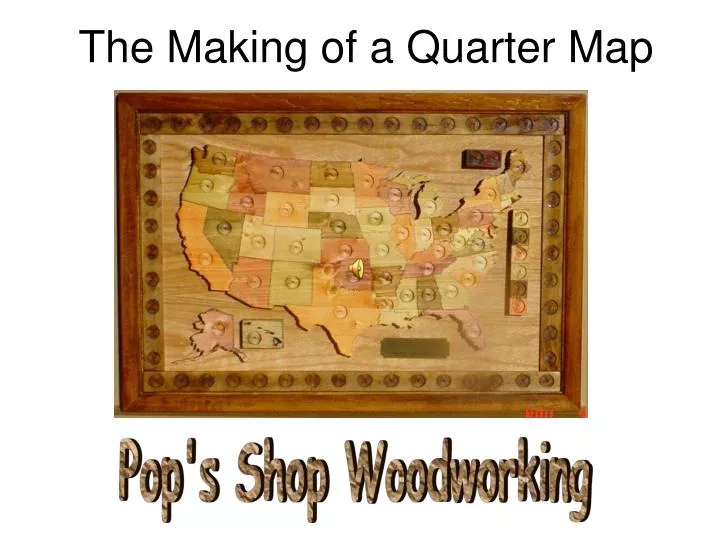
The Making of a Quarter Map. Pop's Shop Woodworking. Cutting and Staining the Map. The next step is to cut the quarter holes in each state that is big enough. A special Foristner bit is used in order to make sure that the quarters will fit tightly into the holes.

E N D
The Making of a Quarter Map Pop's Shop Woodworking
Cutting and Staining the Map The next step is to cut the quarter holes in each state that is big enough. A special Foristner bit is used in order to make sure that the quarters will fit tightly into the holes. The first step in making a Quarter map is cutting out all of the states from a piece of 3/4 x 20 x 24 laminated Ponderosa Pine. Once the pieces are cut, they are sanded and stored awaiting the next step. After the map has been cut and sanded we test fit the map to make sure that all pieces are still true and accurate. Making of the Pop's Shop Quarter Map
When all the preliminary work is done, it is time to stain each state. We have worked out a formula using 8 different stain colors to enhance the wood. Now we let the stained states sit for at least 24 hours to let the stain dry. (During humid times, this step may take as long as 72 hours.) Making of the Pop's Shop Quarter Map
Making the Frames After ripping a 1 x 12 x 10' piece of basswood to 1.5" it is time to route the edges to their finished design. Fred takes care to make sure the best side will be toward the front of the map. Once the shape has been routed into the "sticks" it is time to miter the actual frame. Fred has made a jig for the miter bench in order for all cuts to be accurate and true. He will also number each piece that is cut to insure that the graining pattern will be continued around the frame. Making of the Pop's Shop Quarter Map
Now that all the pieces of the frame are cut, it is time to assemble the frame. Matching the pieces of the frame and adding the backboard, all pieces are glued and clamped for 12 hours to maintain strength. Fred adds one more step and adds brad nails to each corner to insure that the frame will not separate. After the frame has had a chance to set up, it is time to do the finish sanding. Starting with "fine" paper, then "extra fine", then "super fine", we end up with a frame that is great to the touch as well as looking good. An extra step to be sure, but it is well worth the time for this quality product. Making of the Pop's Shop Quarter Map
Now that we have the “finish” sanding completed, it is on to the staining of the frame. Unless the frame is a special order, we compliment the frame color with the map colors. Once stained, it is set aside to dry (24-72 hours). Making of the Pop's Shop Quarter Map
Putting It All Together All the stains have dried. time to put it all together. Matching the map coloring with the frame coloring, we carefully measure and glue each state in place. the outer quarter holders are also glued into place. All the stains have dried. time to put it all together. Matching the map coloring with the frame coloring, we carefully measure and glue each state in place. the outer quarter holders are also glued into place. Time to relax and let the entire project dry for at least 24 hours to insure that when the finish is applied, no colors or glue will seep through the finish. Now that everything has dried and inspected, it is time to start putting on the final finishes. I use lacquer as my finish due to its strength, sheen and durability. 1st coat must dry at least 12 hours before the next step. Making of the Pop's Shop Quarter Map
Using 0000 Steel Wool (extra fine), I will go over all surfaces to get out any "nibblies" , bumps, or irregularities in the finish process. Once I am satisfied that the map is ready, it's back to the spraying. Second coat of lacquer is sprayed on and set aside to dry. Steel wool again and then a final coat of finish will bring the work to a piece of art. After the final coat has dried for 24 hours, I put the hangers on the back of the map and the bronze plaque on the front. Carefully wrapped in bubble wrap, the map is ready for a loving family to hang on their wall. Proudly display your collection on a favorite wall for everyone to see and admire. Making of the Pop's Shop Quarter Map