EIGRP
?. OSPF. EIGRP. Introduction. This presentation is concerned in its entirety with securing the edge router, defined as the last router (or routing device) through which your traffic will pass on its way out of your LAN. It is also the first device encountered by inbound traffic.

EIGRP
E N D
Presentation Transcript
? OSPF EIGRP
Introduction • This presentation is concerned in its entirety with securing the edge router, defined as the last router (or routing device) through which your traffic will pass on its way out of your LAN. • It is also the first device encountered by inbound traffic. • Checking the security posture of a Cisco router is largely an examination of the contents of the configuration of the router. • The majority of the commands you will be examining are concerned with securing the Management Plane. • A large part of the configuration of your LAN edge router will be based on information supplied by the service provider to which you are connecting.
Security Highlights part 1 • Passwords • Encrypt passwords using MD5 wherever possible. • Where MD5 isn’t possible, hide the passwords from casual viewing. • Configure lockouts to preclude password guessing. • Enforce a minimum password length standard. • Don’t leave connections up when idle. • Traffic Filtering • Selectively filter icmp packets. • Use ingress and egress filtering. • Authentication • Use local usernames. • Implement AAA. • Set authentication for eigrp and ospf.
Security Highlights part 2 • Management • set keepalives for management access sessions • restrict management access to authorized users • set exec timeouts • use ssh & https for management access • banners (login, motd, exec, incoming) • if used, snmp v3 only • configure centralized logging • config change notifications • set logging level • set logging source interface • set logging time-stamp • use AAA for accounting • replace and rollback for configuration files • exclusive configuration access • software resilience • Hardware • Set memory threshold levels. • Set cpu threshold levels.
Areas of Security • Physical • The router should be secured in a locked room or protected area. • Access to the console port should be prevented. • An uninterruptible power supply (UPS) should be employed to protect the configuration of the router in the event of a power outage. • Internetworking Operating System (IOS) • The most stable version of the IOS should be used. A visit to the Cisco.com web site should provide the version of the most recent IOS for the router platform type. • Store a copy of the configuration file in an off-device location as well as in persistent memory on the device itself. • Move the IOS to persistent memory so that it can be easily reinstalled. • Harden the Router • “Harden” is a term used to describe a process by which the router is configured so as to make unauthorized access to it as difficult as possible. • Secure all methods of connection. • Disable unused services, interfaces, and ports. Disabled = inaccessible.
“Hardening” the Router • Authenticate access – allow only authorized users to have access to the device and/or services on the device. • Authorize actions – restrict authenticated users from accessing everything. Allow authenticated users to have access to only what is required. • Account for the actions – generate, capture, and store log and audit messages depicting every action taken by an authenticated user. Tag every message with identifying information about the user including who, what, when. • Display banners – Legal notifications and warnings. • Encrypt everything that can be encrypted. • Hide everything else.
Basic Configuration Items • Command: • no ip source-route • Disables ip source routing • IP source routing allows the originator of a packet to dictate which routers the packet should traverse along its way. • It is a very dangerous capability and is routinely disabled using this command • Finding it in the configuration: • show running-config | include ip source-route • no ip source-route
Basic Configuration Items • Command: • ip cef • Enables Cisco Express Forwarding • Required in order to enable Unicast Reverse-Path Forwarding • CEF creates a Forwarding Information Base (FIB) table containing the next hop addresses. It also creates adjacencies with the source of the packet. When a packet is received, CEF can determine if a next hop address exists based on whether or not a relationship has already been established between the layer 3 (IP) data and the layer 2 (MAC) data. This saves the time required to perform Address Resolution Protocol (ARP) searches on packets from known sources. • Its main function is to speed up the switching process in the router. • Finding it in the configuration: • show running-config | include cef • ip cef
Basic Configuration Items • Command: • no service tcp-small-servers • no service udp-small-servers • As of version 12.0 of the Cisco IOS, the services included under these commands are disabled by default. The commands will not appear in the configuration file. • For earlier versions of the IOS, it is absolutely necessary to disable these and other unused services because they can be used to launch DoS attacks. • Finding it in the configuration: • show running-config | include small-servers • Prior to 12.0 • no service tcp-small-servers • no service udp-small-servers • Cisco Guide to Harden Cisco Devices – Disable if Not Needed
Basic Configuration Items • Command: • no ip domain lookup • Disables Domain Naming System (DNS) name-to-address translations. • This service is sometimes needed, but not very often. • Finding it in the configuration: • show running-config | include ip domain lookup • no ip domain lookup • Cisco Guide to Harden Cisco Devices – Disable if Not Needed SOP
Basic Configuration Items • Command: • no ip finger • Disables the Finger service. • Disabled by default since IOS 12.1(5). • Finger is a very old service which provides information about users currently logged in to a network or on to a device. In the ancient days of networking, it was the only way to find out if a fellow user was available. • Legend has it that the name “finger” refers either to the virtual running-of-the-finger down a list of names, looking for the one you want; or, the pointing-of-the-finger at someone you want to find. Take your pick. • Finding it in the configuration: • show running-config | include finger • no ip finger • Cisco Guide to Harden Cisco Devices – Disable if Not Needed
Basic Configuration Items • Command: • no ip bootp server • Disables the Bootstrap Protocol (bootp) service. • BOOTP is typically used with diskless workstations and other devices which don’t contain their own operating system, which would allow them to use the Device Host Configuration Protocol (DHCP). • There are not a lot of devices like this anymore. • Finding it in the configuration: • show running-config | include bootp server • no ip bootp server • Cisco Guide to Harden Cisco Devices – Disable if Not Needed SOP
Basic Configuration Items • Command: • ip dhcp bootp ignore • At some point in the development of the Device Host Configuration Protocol (DHCP), it was decided to include the capability of providing BOOTP capabilities for those few devices which still required it. • If bootp is not required, this command leaves DHCP operational while configuring it to ignore any BOOTP requests.. • Finding it in the configuration: • show running-config | include bootp ignore • ip dhcp bootp ignore • Cisco Guide to Harden Cisco Devices – Disable if Not Needed
Basic Configuration Items • Command: • no service dhcp • If DHCP relay services are not required, it is safe to disable the service • Finding it in the configuration: • show running-config | include service dhcp • no service dhcp • Cisco Guide to Harden Cisco Devices – Disable if Not Needed SOP
Basic Configuration Items • Command: • no mop enabled • Disables the Maintenance Operation Protocol (MOP) service. • MOP is a 30+ year old protocol developed by Digital Equipment Corporation which is no longer in business. • From the original specifications: “MOP allows control of unattended remote systems that are part of a DECnet network.” • If there’s no DECnet network, there’s no need for MOP. • Finding it in the configuration: • show running-config | include mop enabled • no mop enabled • Cisco Guide to Harden Cisco Devices – Disable if Not Needed
Basic Configuration Items • Command: • no service pad • Disables the Packet Assembler/Disassembler (PAD) service. • PAD is used to actively assemble X.25 packets out of serial data streams from network devices and disassembles like packets into a data stream which is suitable for sending to data terminals. • If you’re not using an X.25 network, you don’t need it. • Finding it in the configuration: • show running-config | include service pad • no service pad • Cisco Guide to Harden Cisco Devices – Disable if Not Needed
Basic Configuration Items • Command: • no ip http server • no ip http secure-server • Disables the HyperText Transfer Protocol (HTTP) service and the HTTP over Secure Socket Layer (SSL) service (HTTPS). • Finding it in the configuration: • show running-config | include http server • no ip http server • show running-config | include http server • no ip http secure-server • Cisco Guide to Harden Cisco Devices – Disable if Not Needed SOP
Basic Configuration Items • Command: • no service config • Disables a Cisco IOS device search for a network server to load the configuration file. • Prevents the device from trying to find the config file using TFTP • Finding it in the configuration: • show running-config | include service config • no service config • Cisco Guide to Harden Cisco Devices – Disable if Not Needed
Basic Configuration Items • Command: • no cdp run • no cdp enable • Cisco Discovery Protocol • Within a LAN, cdp is a relatively safe protocol. On interfaces touching untrusted networks, cdp should not be used because it advertises information about individual devices which would be helpful to a hacker. • no cdp run is the global command which disables cdp for all interfaces. • no cdp enable is used on individual interfaces. • Finding it in the configuration: • show running-config | include cdp • no cdp run • no cdp enable • Cisco Guide to Harden Cisco Devices – Disable if Not Needed
Basic Configuration Items • Command: • no lldp transmit • no lldp receive • no lldp run global • Link Layer Discovery Protocol. • Similar to CDP, but used between devices that do not support CDP. • Use the no lldp transmit and no lldp receive commands in interface configuration mode for individual interfaces; or, the no lldp run global to disable it on all interfaces. • Finding it in the configuration: • show running-config | include lldp • no service config • Cisco Guide to Harden Cisco Devices – Disable if Not Needed
Passwords • Command: • enable secret <password> • The enable password is used to enter privileged exec mode in which the entire router can be reconfigured. • It is essential that only the secret version of this command be used. • Finding it in the configuration: • show running-config | include enable • enable secret 5 $1$yx4M#bFUI/TnJyoWTvF1LUt.PK. • Of primary importance is that the password is set (enable secret), and • that it is protected with the MD5 hashing algorithm (5).
Passwords • Command: • service password-encryption • Causes all passwords which are not already encrypted with MD5 to be encrypted using Cisco proprietary encryption algorithm type 7. • Type 7 encryption is a basic substitution method of encryption which does not provide any security for the password beyond making it difficult to read. • Finding it in the configuration: • show running-config | include service password • service password-encryption
Passwords • Command: • security passwords min-length <#> • Sets a minimum length for any future passwords. • Passwords which are already set are not effected by this command. • What the value of <#> is should be a matter of local policy. • Cisco recommends a minimum length of 10. • Finding it in the configuration: • show running-config | include security password • security passwords min-length 10
Passwords • Command: • service password recovery • no service password recovery • This command is not available on all version of the IOS. • The no version disables the password recovery feature of the router and should only be used IAW local policy. • Finding it in the configuration: • show running-config | include service password • service password-recovery • Executing the ‘no’ version removes the command from the config file. • There will be no output if the ‘no’ version has been executed. • There will also be no output if the IOS version does not support the command. SOP
Passwords • Command: • username <name> [privilege <level>] secret <password> • Creates an entry in the local database. • Preceding the password with the keyword “secret” causes the plaintext password to be hashed using the MD5 hashing algorithm. • Preceding the password with the keyword “password” causes the password to be left in plaintext unless the service password-encryption command has been executed. This form of the command is not authorized. • There should be one username configured with a privilege level of 1 (one) for normal connection to the router. Once connected, this user can execute the “enable” command to move to a higher privilege level. • Finding it in the configuration: • show running-config | include username • username NOACCESS privilege 1 secret 5 $1$yx4M#bFUI/TnJyoWTvF1LUt.PK • username ADMIN privilege 15 secret 67UI#kouekla;*#Kkboup@bN&7arP
Login • Command: • login block-for <block_time> attempts <#> within <time_period> • If <#> attempts to login have occurred withing <time_period> in seconds, prevent all further login attempts for <block_time> in seconds. • For example:login block-for 180 attempts 4 within 60 • Finding it in the configuration: • show running-config | include login block-for • login block-for 30 attempts 3 within 30
Login • Command: • login quiet-mode access-class <acl# or aclNAME> • This command sets the access list <acl# or aclNAME> as a list of ip addresses that can still login even though every other ip address is blocked out. • The access list usually contains the ip address of a Network Management Station or Administrator Workstation. • Finding it in the configuration: • show running-config | include login quiet-mode • login quiet-mode access-class ALLOW_ACCESS • show access-list ALLOW_ACCESS • Standard IP access-list ALLOW_ACCESS • 10 permit 10.4.1.14
Login • Command: • login delay <#> • Force a delay of <#> seconds between each login attempt • Finding it in the configuration: • show running-config | include login block-for • login delay 3
Login • Command: • login on-failure log [every <#>] • This command causes a log entry to be generated every time a login fails. • It might seem that setting this to 1 would be a good idea; however, a number between 5 and 10 is more appropriate. If login attempts are being blocked (failing), then security is being enforced. • Login failures are counted on a per-ip address basis. • Finding it in the configuration: • show running-config | include login on-failure • login on-failure log every 5
Login • Command: • login on-success log [every <#>] • Unlike login failures, this one should be set to 1. • Since 1 is the default, it is not necessary to include it in the command. Enter only login on-success log. • Finding it in the configuration: • show running-config | include login on-success • login on-success log
Login • Command: • security authentication failure rate <#> • Sets a global threshold rate for login failures. • If the threshold is breached, a syslog message is posted and a 15-second delay is enforced. • This global setting can be overruled by the login block-for command • Finding it in the configuration: • show running-config | include security authentication • security authentication failure rate 8
Login Displaying all the login commands in the configuration: show login A login delay of 3 seconds is applied. Quiet-Mode access list ALLOW_ACCESS is applied. All successful login is logged. Every 5 failed login is logged. Router enabled to watch for login Attacks. If more than 3 login failures occur in 30 minutes or less, logins will be disabled for 30 seconds. Router presently in Normal-Mode. Current Watch Window Time remaining: 22 seconds. Login failures for current window: 0. Total login failures: 0.
Filtering • Ingress & Egress Access Lists: • The ingress filter is the access list assigned to the interface connected closest to the service provider which filters (blocks) known malicious or simply bad traffic from entering your LAN. • The egress filter is the access list assigned to the interface connected closest to your LAN which allows only legitimate traffic to depart your LAN. • Note that the egress filter may be more than one access list. If the router you’re examining has multiple LANs connected to it, it may be necessary to implement an egress filter to each of the interior interfaces. • To determine which access list is the egress and which is the ingress, it will be necessary to review the structure of the network to determine which interface should host the ingress filter and which should host the egress filter. • continued on next slide
Filtering • Ingress & Egress Access Lists: • For this example, interface FastEthernet0/0 (f0/0) will be the interface connected to the provider. View the configuration for the interface: • show running-config | section FastEthernet0/0 • If the resulting display contains the two lines ip access-group <NAME> in and ip access-group <NAME> outthe <NAME> preceding “in” is the ingress filter andthe <NAME> preceding “out” is the egress filter. • If the interface only includes the one “in” filter, you’ll need to view the configuration of the other interfaces to determine which should contain the outbound filtering. • continued on next slide f0/1 f0/0 f1/1 f1/2
Filtering • Ingress Access List: • Once you’ve decided which is the ingress filter and which is the egress filter, you next need to examine their contents. • Access-lists are essential for securing a router. They can, however, be extremely complex. Without a thorough understanding of all the applications traversing the router and the protocols involved, it is impossible to validate each acl. • There are some things which are universally filtered at the outside interface. Among these are ip addresses which are not routable across the Internet, referred to as private addresses. Certain multicast addresses should also be blocked as well as malformed addresses. • RFC 5735 and RFC 4193 list the private address and other reserved ranges for IPv4 and IPv6 respectively and discuss their purpose and implementation. • The Center for Internet Security (CIS) Security Configuration Benchmark for Cisco IOS Version 3.0.0, September, 2011 contains a recommended list of ip addresses that should be blocked at the ingress filter. They are included in the example ingress access-list on the following slide. There are other candidates for inclusion in this list. • continued on next slide
Filtering • Ingress Access List: • access-list <acl> deny ip <your_internal_address_range> any log • access-list <acl> deny ip 127.0.0.0 0.255.255.255 any log • access-list <acl> deny ip 10.0.0.0 0.255.255.255 any log • access-list <acl> deny ip 172.16.0.0 0.15.255.255 any log • access-list <acl> deny ip 192.168.0.0 0.0.255.255 any log • access-list <acl> deny ip 192.0.2.0 0.0.0.255 any log • access-list <acl> deny ip 169.254.0.0 0.0.255.255 any log • access-list <acl> deny ip 0.0.0.0 0.255.255.255 any log • access-list <acl> deny ip host 255.255.255.255 any log • Line 1 prevents any external host from spoofing your ip addresses. • Line 2 is the loopback range of addresses • Lines 3, 4, & 5 are the big 3 private address ranges • Line 6 is TEST-NET-1 and is used only in documentation • Line 7 is the local link block • Lines 8 & 9 are blocking bogus ip addresses • continued on next slide
Filtering • Egress Access List: • The egress filter is an access list which insures that only legitimate traffic (traffic generated by your own LAN) is allowed to exit the LAN. • The access-list may be complex due to the inclusion of protocols and applications as well as operationally mandated traffic. • The single entry you’re looking for is one that allows only your address space: • access-list <acl> permit ip <your_internal_address_range> any log • If there are other users (LANs) connected to other interfaces, this line needs to be adjusted for their ip address range and included in the filter located on their interface of the router.
Filtering • ICMP: • Internet Control Message Protocol • Purpose is to assist in the control of the Internet Protocol (IP) • Can convey virtually ALL information about internal structure of your LAN • Is required for some purposes • Which ICMP messages need to be filtered and which need to be allowed will be dictated by local mission requirements as well as restrictions mandated by the external service provider. • At a minimum, all non-mandated inbound requests should be filtered as well as any outbound requests from addresses other than the management station. • To verify the filtering established for a particular LAN, it is necessary to have an understanding of the structure of the LAN – what ip address is/are assigned to the management station(s); what is the address space for the LAN; what applications are running which require the use of ICMP; etc. • continued on next slide
Filtering • ICMP: • ICMP needs to be filtered on both the egress and ingress interfaces. • In the ingress filter access list, there might be lines which allow icmp echo requests from specific external ip addresses such as a trusted management station or server. Verify the ip addresses included with the local operating procedures. • All other ip traffic from the network to which the management stations /servers belong should be explicitly blocked. • ip access-list extended INGRESS_FILTER • permit icmp host <trusted-management-station> any echo • permit icmp host <trusted-management-server> any echo • deny ip any <the_rest_of_the_network> <mask> • continued on next slide
Filtering • ICMP: • In the egress filter access list, there might be lines which allow icmp echo requests from specific internal ip addresses such as a management station. Verify the ip address of the management station. • All other icmp traffic from your network must be explicitly blocked. • ip access-list extended EGRESS_FILTER • permit icmp host <trusted-management-station> any echo • permit icmp host <trusted-management-server> any echo • deny icmp any <the_rest_of_the_network> <mask> • Note: If icmp echo-requests are permitted out of your LAN, the corresponding echo-reply must then be permitted back in to your router through the ingress filter. The entry in the ingress filter should be as specific as possible to ensure no unauthorized icmp traffic enters.
Local Authentication • Local Usernames: • username <name> [privilege <level>] secret <password> • Local usernames are used in many places for authentication purposes. • In the aaa command (discussed elsewhere) aaa authentication login default local enable, the “local” option indicates that the local username database should be consulted for authentication (then the enable secret password). • In the command ip http authentication local, “local” means that only a username from the local username database, once properly authenticated by entering the correct password, will have access to the http protocol. • On vty, aux, and con lines, the command login local means the same thing. Use show running-config | begin line to see all the line configurations. • Finding it in the configuration: • show running-config | include local • ip http authentication local • login local
AAA • New Model: • aaa new-model • Activates AAA (authentication, authorization, accounting) functionality • Immediately applies local authentication to all lines and interfaces except the console (line con 0). Sessions already opened are not affected. If a session times-out and no username is configured, you are effectively logged out. For this reason, a username must be configured prior to executing this command. • Finding it in the configuration: • show running-config | include aaa new-model • aaa new-model
AAA • Designate Server(s): • tacacs-server host <ip | hostname> [timeout <sec>] [key <KEY>] • radius-server host <ip | hostname> [timeout <sec>] [key <KEY>] • Designates the TACACS+/RADIUS server ip address or hostname • Finding it in the configuration: • show running-config | include tacacs-server • show running-config | include radius-server • tacacs-server host A.B.C.D timeout 15 • radius-server host E.F.G.H auth-port 1645 acct-port 1646 timeout 15 key 7 08136D… • (The RADIUS server configuration includes the default authentication and accounting port assignment numbers of 1645/1646. TACACS+ uses only port 49.)
AAA • Create Server-Groups: • aaa group server tacacs+ <NAME> • aaa group server radius <NAME> • Creates a group named <NAME> into which servers can be added. • The router prompt changes to the server-group config prompt • (config-sg-tacacs+)#server < ip | hostname > • (config-sg-radius)#server < ip | hostname > • Adds the server(s) to the group. • Finding it in the configuration: • show running-config | include aaa group • aaa group server tacacs+ <NAME> • aaa group server radius <NAME>
AAA • Authenticating Enable EXEC Mode: • aaa authentication enable default group tacacs+ enable • Creates the default list for determining whether or not a user can access privileged EXEC command level. • This command allows for up to four of these methods: • group <NAME> - use the servers configured in the <NAME> group • group tacacs+ : use all available tacacs+ servers • group radius : use all available radius servers • enable : use the enable password • line : use the line password (if connected via vty line, for example) • none : no authentication required • Finding it in the configuration: • show running-config | include aaa authentication enable • aaa authentication enable default group tacacs+ enable
AAA • Authenticating Logins: • aaa authentication login default group tacacs+ local enable • This is the default list for authenticating a user who wants to log in. • This command allows for up to four of these methods: • group <NAME> - use the servers configured in the <NAME> group • group tacacs+ : use all available tacacs+ servers • group radius : use all available radius servers • enable : use the enable password • line : use the line password (if connected via vty line, for example) • local : local username database • local-case : case-sensitive local username database • none : no authentication required • Finding it in the configuration: • show running-config | include aaa authentication login • aaa authentication login default group tacacs+ local enable
AAA • Accounting: • aaa accounting exec start-stop group tacacs+ • Accounting occurs for all user shell EXEC commands • aaa accounting commands 15 default start-stop group tacacs+ • Accounting occurs for all commands on level 15 • aaa accounting network start-stop group tacacs+ • Accounting occurs for all network related services like PPP • aaa accounting connection start-stop group tacacs+ • Accounting occurs for all outbound connections • aaa accounting system start-stop group tacacs+ • Accounting occurs for all system related events not directly related to a user • These five commands are all required to completely configure aaa accounting. • “start-stop” accounting begins as soon as the session begins. A summary record which includes session statistics is sent when the session ends. • Finding it in the configuration: • show running-config | include aaa accounting
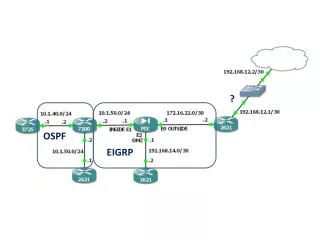
EIGRP • Authentication: • (config)# key chain KC_EIGRP • (config-keychain)# key 1 • (config-keychain-key)# key-string ReallyStrong! • Creates a key chain for EIGRP called “KC_EIGRP” and adds key #1 to it • (config-if)# ip authentication mode eigrp 33 md5 • In interface configuration mode, activate authentication for as 33 • (config-if)# ip authentication key-chain eigrp 33 KC_EIGRP • Set authentication to use the key-chain configured previously. • Finding it in the configuration: • continued on next slide
EIGRP • Finding it in the configuration: • show running-config | section key chain • key chain KC_EIGRP • key 1 • key-string 7 04690E07032D557D1D0B0A19154A • Once you know the key chain name, search for it: • show running-config | include KC_EIGRP • ip authentication key-chain eigrp 33 KC_EIGRP • Debugging eigrp will display which interfaces are authenticating: • debug eigrp packets • : EIGRP: Received packet with MD5 authentication, key id = 1 • : EIGRP: Received HELLO on <int> nbr <ip>
OSPF • Authentication: • (config-if)# ip ospf message-digest-key 1 md5 ReallyReallyStrong! • Establishes the key for this interface • This must be pre-shared. That is, the interface on the next device in line to which this interface is connected must have an identical key configured. • (config-if)# ip ospf authentication message-digest • Activates the MD5 (message-digest) authentication on this interface • Finding it in the configuration: • Since authentication is configured on a per-interface basis, verifying the configuration needs to be performed the same way: • show ip ospf interface <int> (once per interface) • /- output ommitted -/ • Message digest authentication enabled • Youngest key id is 1