Download
1 / 20
290 likes | 695 Views
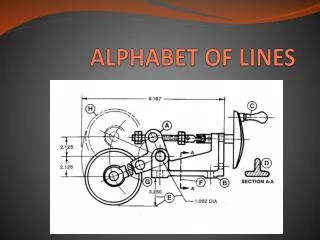
Alphabet Of Lines. Unit 2. Introduction to the Alphabet of Lines. In order to understand what the drafter is trying to get across, you must be able to understand the symbols and lines he uses. Each line has a definite form and line weight.

E N D
Alphabet Of Lines Unit 2
Introduction to the Alphabet of Lines • In order to understand what the drafter is trying to get across, you must be able to understand the symbols and lines he uses. • Each line has a definite form and line weight. • The standard thick line weight varies from .030 to .038 of an inch. • The standard thin line weight varies from .015 to .022 of an inch.
Visible Hidden Center Dimension Extension Leader Section Cutting Plane Phantom Viewing Plane Break 11 Main Line Types
Visible Lines • Dark, heavy lines. • Show the outline and shape of an object. • Define features you can see in a particular view.
Hidden Lines • Light, narrow, short, dashed lines. • Shows the outline of a feature that can not be seen in a particular view. • Used to help clarify a feature, but can be omitted if they clutter a drawing.
SectionLine Section Lines • Thin line usually drawn at a 45 degree angle. • Indicates the material that has been cut through in a sectional view.
Center Lines • Thin line consisting of long and short dashes. • Shows the center of holes, slots, paths of rotation, and symmetrical objects.
Dimension Lines • Dark, heavy lines. • Show the length, width, and height of the features of an object. • Terminated with arrowheads at the end.
Extension Line Dimension Line Extension Lines • Used to show the starting and stopping points of a dimension. • Must have at least a 1/16th space between the object and the extension line.
Leader Line Leader Lines • Thin lines. • Used to show the dimension of a feature or a note that is too large to be placed beside the feature itself.
Cutting Plane Lines • Thick broken line that is terminated with short 90 degree arrowheads. • Shows where a part is mentally cut in half to better see the interior detail.
Break Lines • Used to break out sections for clarity or for shortening a part. • Three types of break lines with different line weights. • Short Breaks. • Long Breaks. • Cylindrical Breaks.
Short Break Line Short Break Lines • Thick wavy line. • Used to break the edge or surface of a part for clarity of a hidden surface.
Long Break Lines • Long, thin lines. • Used to show that the middle section of an object has been removed so it can be drawn on a smaller piece of paper.
Cylindrical Break Lines • Thin lines. • Used to show round parts that are broken in half to better clarify the print or to reduce the length of the object.
Phantom Lines • Thin lines made up of long dashes alternating with pairs of short dashes. • Three purposes in drawings. 1. To show the alternate position of moving parts. 2. To show the relationship of parts that fit together. 3. To show repeated detail.
Phantom Lines Alternate Position • Phantom lines can show where a part is moving to and from. • Eliminates the confusion of thinking there may be 2 parts instead of just 1.
Relationship of Mating Parts • Phantom lines can also show how two or more parts go together without having to draw and dimension both parts.
Repeated Detail • Phantom lines can show repeated detail of an object. • Saves the drafter time and the company money. • Less chance of drafter error.
Summary • Now that we have discussed the 11 main line types, you should be able to do the following: 1. Identify the alphabet of lines. 2. Identify where the line types are used. 3. Produce the lines with various line weights.