Print Making
Print Making. 3-color reduction method. Traditional Styles. Gutenberg press created the ability to mass produce work. Print would not sell alone so, press productions of art work began: Wood cutting Lithographic production.

Print Making
E N D
Presentation Transcript
Print Making 3-color reduction method
Traditional Styles • Gutenberg press created the ability to mass produce work. • Print would not sell alone so, press productions of art work began: • Wood cutting • Lithographic production
http://www.moma.org/interactives/projects/2001/whatisaprint/flash.html
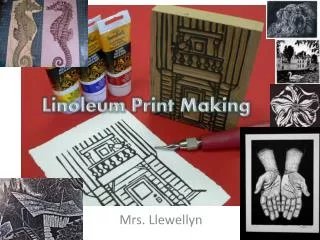
The Assignment • Choose a Nursery Rhyme, Fable or Myth. • On a normal piece of paper, sketch a depiction of a scene from the literature. (i.e. a cow jumping over the moon) • Once your drawing is approved, you will receive a 4”x6” piece of linoleum to redraw onto. • Using a three-color step reduction process, create 10 prints depicting your scene.
three-color step reduction process • Step One : think of final product (like the Pepsi Logo below)
Step Two • Carve out all the detail that will have ink as the background color • Roll with the first color, align the paper, press, remove, and let dry.
Step Three • After making 10 solid prints, carve away the layer that you want to remain the background color . • Roll with a new color, align the dry print and press, covering the previous color then set out to dry.
Step Four • After making 10 solid prints, carve away the layer that you want to remain the preprinted colors. • Roll with the lastcolor, align the dried print and press.
The secret to alignment • In order for your three layers to align nicely, you have to have a register. • Registers are the places by which you put the paper down onto the linoleum every time. • We will be exploring registry by using a register plate. • Here is how it works:
Step One: Supplies • You are going to use a wooden registry with three pegs and a 2-inch border. You will need the following to make your prints: • Wooden registry • 1 ½ inch wide, 3-hole punched strip of paper. • Masking tape • An 8x10 piece of paper • A 4x6 piece of linoleum • A Baren • A Brayer
Step two: Setting up the registry • Put the strip onto the wooden registry. • Align the 8x10 with the edge of the wood and the edge of the strip. • Tape the two papers together (do not untape until you are finished with all three layers)
Step three: Print away • Be sure to use the same wooden registry for each layer of prints. • Be sure to align the linoleum with the same corner of the wooden registry every time. • Do not roll the ink onto the linoleum while it is still on the wooden registry. Ink will get onto the wood and transfer to your prints if you do.