UI Thread in MFC
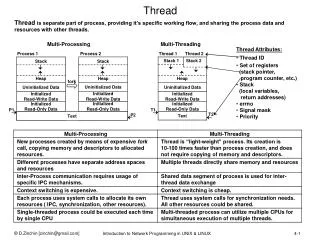
UI Thread in MFC. 參考資料 : 1. 深入淺出 MFC 第 14 章 2. Chapter 17,Windows Programming with MFC, Second Edition. 井民全製作. 情況是這樣的 每一個視窗都需要有一條 thread 來執行 message – loop 分派 Window message. 補充. WinMain function. while (GetMessage (&msg, NULL, 0, 0)) {

UI Thread in MFC
E N D
Presentation Transcript
UI Thread in MFC 參考資料: 1. 深入淺出 MFC 第14章 2. Chapter 17,Windows Programming with MFC, Second Edition 井民全製作
情況是這樣的 每一個視窗都需要有一條 thread 來執行 message – loop 分派 Window message. 補充 WinMain function while (GetMessage (&msg, NULL, 0, 0)) { TranslateMessage (&msg) ; DispatchMessage (&msg) ; } Message-loop 1 … WndProc ( …){ switch (message){ case WM_xxx: } } void CtestDlg::OnBnClickedOk(){ } 你的按鈕對應程式碼 2 3 WinProc function
補充 如果你不信, 請加入無窮迴圈 WinMain function while (GetMessage (&msg, NULL, 0, 0)) { TranslateMessage (&msg) ; DispatchMessage (&msg) ; } Message-loop 1 … WndProc ( …){ switch (message){ case WM_xxx: } } 不會返回 void CtestDlg::OnBnClickedOk(){ } 你的按鈕對應程式碼 2 3 while(true); 因為沒有人執行 Message-loop 視窗將不會對你的動作 產生反應 WinProc function
Step 1: 繼承 Step 2: 建立視窗的程式碼 Introduction如果你的 thread 要建立視窗, 請加入 message - loop • UI Thread 專門用來處理視窗 • 需要 Message – loop • 所以我們要繼承 CWinThread, 然後呼叫 afxBeginThread 即可啟動 thread 定義 UI Thread 類別 class MyUIThread: public CWinThread{ DECLARE_DYNCREATE (MyUIThread); public: BOOL InitInstance (){ m_pMainWnd = new MyFrame(); m_pMainWnd->ShowWindow (SW_SHOW); } }; IMPLEMENT_DYNCREATE (MyUIThread, CWinThread) 允許 CObject-Derived 類別可被 CRUNTIME_Class 動態建立 當 thread 建立時, 會執行的初始化 function
建立 UI Thread 前面定義的 UI thread 類別 CWinThread* pThread = AfxBeginThread (RUNTIME_CLASS (MyUIThread)); 取出 MYUIThread 的 CRuntimeClass 結構 內含該物件相關的資料. 如 基礎類別與類別名稱 afxBeginThread 原型 CWinThread* AFXAPI AfxBeginThread(CRuntimeClass* pThreadClass, int nPriority = THREAD_PRIORITY_NORMAL, UINT nStackSize = 0, DWORD dwCreateFlags = 0, LPSECURITY_ATTRIBUTES lpSecurityAttrs = NULL); 設定 thread 的優先權 指定 thread 建立後 立即啟動 使用預設的 stack size 使用與建構它的 thread 一樣的 security 等級
如何終結 thread? • 送一個 WM_QUIT的訊息給 Thread message queue 即可 PostMessage(WM_QUIT); CWnd::OnNcDestroy會 post 一個 WM_QUIT 給 thread 的 message queue. PostMessage(WM_CLOSE);
結束 thread PostMessage(WM_CLOSE); 按下後產生新的 UI thread CWinThread* pThread; pThread = AfxBeginThread (RUNTIME_CLASS (MyUIThread)); 來看看範例吧 建立視窗 建立視窗
// A. 這個視窗類別是等會兒 由 UI thread 建構 // 自訂視窗類別 class MyFrame: public CFrameWnd{ DECLARE_MESSAGE_MAP() CButton MyButton, ExitButton; public: MyFrame(){ Create(NULL,"Hello MFC"); // 建立視窗 MyButton.Create("My button",WS_CHILD|WS_VISIBLE, \ CRect(10,10,100,30),this,123); ExitButton.Create("結束目前的 thread",WS_CHILD|WS_VISIBLE, \ CRect(10,40,300,60),this,567); } afx_msg void OnBnClickedOk(){ MessageBox("test"); } afx_msg void OnExitButtonClickedOk(){ // 終結 Thread PostMessage (WM_QUIT); } }; 建立按鈕 建立離開按鈕 建立自己的按鈕訊息回應 function 接下頁: 註冊 message event
// 自訂按鈕事件註冊機制 // 向按鈕註冊: 當按鈕被按下時, 呼叫 OnBnClickedOk() 處理 BEGIN_MESSAGE_MAP(MyFrame, CFrameWnd) ON_BN_CLICKED(123, OnBnClickedOk) ON_BN_CLICKED(567, OnExitButtonClickedOk) END_MESSAGE_MAP()
定義 UI class 範例 Step 1:定義一個UI 類別 (你必須繼承 CWinThread) class MyUIThread:public CWinThread{ DECLARE_DYNCREATE (MyUIThread) public: BOOL InitInstance (); }; IMPLEMENT_DYNCREATE (MyUIThread, CWinThread) Step 2: UI thread 第一個執行的 method 就是在這裡, 建構我們前面定義的視窗 BOOL MyUIThread::InitInstance () { m_pMainWnd = new MyFrame(); // 建立一個視窗 m_pMainWnd->ShowWindow(SW_SHOW); // 把視窗秀出來 m_pMainWnd->UpdateWindow(); // 送出 WM_PAINT message 出去 return TRUE; }
啟動 UI thread 的時候 // 利用 afxBeginThread 建立 UI thread 範例 void CMyUIThreadDemoDlg::OnBnClickedOk(){ CWinThread* pThread = AfxBeginThread (RUNTIME_CLASS (MyUIThread)); }