Download
1 / 10
100 likes | 231 Views
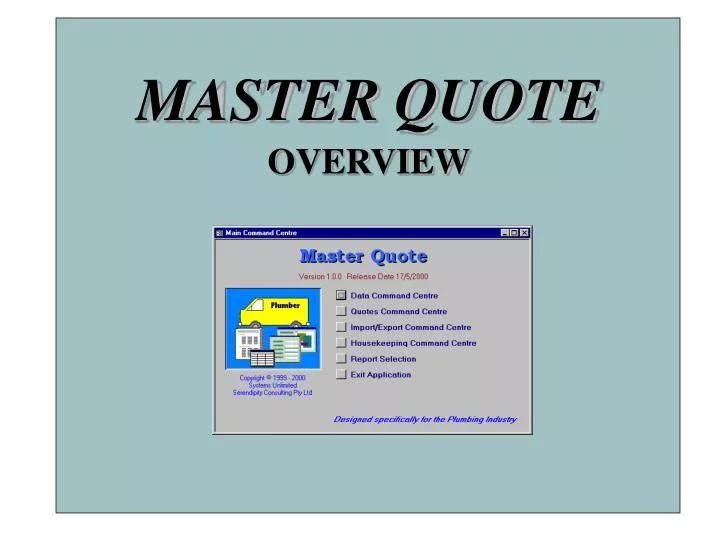
MASTER QUOTE. OVERVIEW. COMMAND CENTRES. A. Data Command Centre. B. Quotes Command Centre. C. Import/Export Command Centre. D. Housekeeping Command Centre. SYSTEM SETUP.

E N D
MASTER QUOTE OVERVIEW
COMMAND CENTRES A. Data Command Centre B. Quotes Command Centre C. Import/Export Command Centre D. Housekeeping Command Centre
SYSTEM SETUP This area allows you to setup your own company details. Once set up you only need to enter this area for future changes. 2 1 3 4 5 6 7 8 9 1. Enter your company details 2. Enter the first quote number that you wish Master Quote to use 3. Enter the directory where your MYOB data file is located. This will be where the file of accepted quotes created will be exported. 4. Click on the down arrow to link to the correct version of MYOB you are using, so that Master Quote can export in the correct format 5. Enter your MYOB General Ledger Account Number for Sales. This needs to be identical in MYOB. 6. This is the tax rate that will be calculate on all your items. If using the system prior to 1/7/00, this could be set to 0%. 7. If you only use a small number of items, it might be easier to make them all inactive on import, and then activate the relevant ones. 8. Move the default to “Print on my letterhead” if you do not want the company details printed on the quote. 9. Both Quote Message and Special Conditions can be set with a standard comment but both can be changed per individual quote.
NEW ITEM SETUP This area allows you to setup your own items additional to those of your suppliers. 1. Enter a number to easily identify the product. This can either be alpha or numeric, or a combination. 1 2 2. “Attach” to an Item Group for easy location. You will note that there is a Labour (User defined). 3 4 5 3. Enter a description for this item. Click on Add New Item to start. 4. Enter brief identification of measure eg Hours could be “hrs”. 5. Enter enter the relevant prices. BUILDING KITS This area allows you to build your own kits. That is group materials and Labour used continually for the same process. When entering a New Quote you will just need to select the kit not the individual items each time. 1. You must enter in an “Item Number”, eg. Kit 1 or Toilet. 1 2 3 2. Attach to group for easy location Kits (User defined) 4 3. Type full description. 4. Select items to form kit Note: The Trade and Retail Prices will be calculated automatically as you add items. These will automatically adjust when new price list is imported.
SETTING ACTIVE / INACTIVE ITEMS This area allows you to make your items either Active or Inactive this will minimize the number of items in the search area as the inactive items will not appear. 1. To locate the item or Group you wish to modify, click on the relevant section.Using the “Keyword Search” only the items containing this word or exact combination will be displayed. 2. Click here to make Active or Inactive. The inactive items will not be displayed in the search area of the quote screen. 3. Continue with your selection , then click on close
NEW QUOTES This area allows you to enter new Quotes. 2. Enter order number. 1. Select Customer The Quote number is automatically generated. 3. Enter Job/Site details. 5. Choose the desired pricing level. See note below. 4. Set a Default Markup or this can be by line item. 6. Click on this line to search for item or click on Item Search heading for more refined search facility. NOTE: Re 3. If you select Trade Prices you add a markup, if you use Retail Price you put in a negative markup eg -10.
NEW QUOTES - Searching This page shows the various methods that can be used to locate an item quickly and efficiently. OR OR 1c. Type in a Keyword of the Item you are searching for then click on the GO icon and a list of items containing that word will be displayed. 1a. Click on the Drop down box next to Item Groups, to search by their groups 1b. Choose one of the Suppliers, then search with any of the search facilities, 1d. Highlight a word and click on the filter with the lightening bolt to “filter” just those items containing that part of the description. 1e. Click on a column and then click on the A-Z to get it sort in order of the lowest to highest price. Alternatively, the Z-A would give you the highest to lowest price. 2. Click to select item. 3. The selected item will be shown at the bottom. IMPORTANT:When adding a new line to the quote, always TAB through the rest of the fields, if you don’t use TAB the linewill not be totalled nor included in the Quote Summary figures. 4. Click to add to quote. If you click back on Line Items these items will included in the quote.
NEW QUOTES - Notes This page is specifically designed for directions on how to enter data in the “Notes” field. This is where you would enter the job descriptions. This can be as long as you need but only the first 255 characters will be exported to MYOB NEW QUOTES- Quote Summary This page is designed specifically for directions on using the“Quote Summary” field. Modify either the Quote Message or Special Conditions if necessary. These fields are automatically calculated
MODIFY QUOTES This area allows you to either modify the quote, or to accept the quote. 1. Find quote by customer or number, click on the drop down box. Click if accepted, and today’s date is the default. Copy a Quote for a similar job, save re-entering. REPRINT QUOTES This area allows you to either reprint Quotes or Invoices, which have already been typed. It allows you to print the Compact Quote, Detailed Quote, Compact Invoice or Detailed Invoice. See below for instructions on how this is done. 1. Enter a number or click on down arrow to select the Quote to be printed or click on down arrow from list. 2. Click to Preview or click on Print. A Detailed Quote/Invoice will print individual products PLUS the first part of your “Notes”. A Compact Quote/Invoice will only print notes, that is a description of job. 2. Make your selection of the type or form you wish to print or preview.
This has just been a brief overview of Master Quote and its many features. Please do not hesitate to call if you have any further queries. Thank you for watching.