Slump mold slab plates
Slump mold slab plates. Focus on experimentation with surface design. Objectives . Use slabs and a plate mold to create a slab plate Develop creative thinking skills through the planning and designing of a unique plate. Experiment with glaze colors in order to finish piece. .
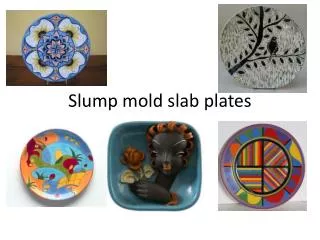

Slump mold slab plates
E N D
Presentation Transcript
Objectives • Use slabs and a plate mold to create a slab plate • Develop creative thinking skills through the planning and designing of a unique plate. • Experiment with glaze colors in order to finish piece.
Cardinal’s plate • Jacob’s plate has been fired and he is adding the glaze for surface color. • Jacob’s plate has a cardinals logo drawn incised into the surface.
Glaze Work • Experimented with specialty glazes to achieve the surface design that you see.
Process • Roll out a slab large enough to span across the diameter or area of your plate. • Turn your plate upside down and use its shape as your stencil. Take a knife and cut around the edge to create a circular or square shape. Flip you plate over. • Place a paper towel between your slab and the plate. • Lightly push slab onto the plate. Use a ceramic sponge to gradually shape the slab into desired form. • Allow some drying time before working on your design. • Plan out the design for your plate.
Pottery wheel • Student created the plate using the slab mold process • He added designs by centering the plate on the pottery wheel and incising using a trimming tool.
This student found leaves from outside and pressed them into the surface of the plate to create an impression. She carved the logo into the center of the plate. She chose natural colors reminiscent of nature to finish her plate.
Penguin plate • This student chose to incise a penguin into her plate. She also made asterisks to look like snowflakes. • She meticulously painted her plate to make sure that glazes did not flow into the next space.
Experimentation Gone CRAZY • Eddie Coleman designed this plate by incising many different lines to create symbols of things that he was interested in. • He experimented with glazes, by placing a clear coat of glaze down first and then placing different colors of glazes all over the clear coat.